Avengers Assemble Developer Guide
Table of Contents
- Acknowledgements
- Setting Up, Getting Started
- Design
- Implementation
- Planned Enhancements
- Documentation, Logging, Testing, Configuration, Dev-ops
- Appendix
- Appendix A: Product Scope
- Appendix B: User Stories
- Appendix C: Use Cases
- Appendix D: Non-Functional Requirements
- Appendix E: Glossary
- Appendix F: Instructions for Manual Testing
- Launch and Shutdown
- Saving Data
- Getting Help
- Clearing all Persons and Exams:
clear - Importing persons:
import - Adding a Person:
add - Editing a Person:
edit - Deleting a Person:
delete - Deleting Shown Persons:
deleteShown - Listing all Persons:
list - Finding a Person:
find - Copying Emails:
copy - Exporting Data to a CSV File:
export - Adding an Exam:
addExam - Deleting an Exam:
deleteExam - Selecting an Exam:
selectExam - Deselecting an Exam:
deselectExam - Importing Exam Scores:
importExamScores - Adding a Persons's Exam Score:
addScore - Editing a Person's Exam Score:
editScore - Deleting a Person's Exam Score:
deleteScore - Mean and Median of Exam Scores
- Appendix G: Effort
- At app launch, it initializes the other components in the correct sequence, and connects them up with each other.
- At shut down, it shuts down the other components and invokes cleanup methods where necessary.
UI: The UI of the App.Logic: The command executor.Model: Holds the data of the App in memory.Storage: Reads data from, and writes data to, the hard disk.- defines its API in an
interfacewith the same name as the Component. - implements its functionality using a concrete
{Component Name}Managerclass (which follows the corresponding APIinterfacementioned in the previous point.) - executes user commands using the
Logiccomponent. - checks for changes to
Modeldata so that the UI can be updated with the modified data. - keeps a reference to the
Logiccomponent, because theUIrelies on theLogicto execute commands. - depends on some classes in the
Modelcomponent, as theUIupdates based on items that are stored inModel - Update using listeners embedded into UI components - This design choice would involve embedding listeners into the UI components that would listen for changes in the
Model(e.g. adding a listener to filteredPersons in ExamListPanel). This would allow for a more loosely coupled system, but would involve more complex implementation which could get messy as the number of listeners increase. - Update using a centralized update method - This design choice involves having a centralized
updatemethod in theMainWindowthat would call anupdatemethod in all other UI components after every command. This would involve a more tightly coupled system and may involve unnecessary updates, but would be easier to implement and maintain. - When
Logicis called upon to execute a command, it is passed to anAddressBookParserobject which in turn creates a parser that matches the command (e.g.,DeleteCommandParser) and uses it to parse the command. - This results in a
Commandobject (more precisely, an object of one of its subclasses e.g.,DeleteCommand) which is executed by theLogicManager. - The command can communicate with the
Modelwhen it is executed (e.g. to delete a person).
Note that although this is shown as a single step in the diagram above (for simplicity), in the code it can take several interactions (between the command object and theModel) to achieve. - The result of the command execution is encapsulated as a
CommandResultobject which is returned back fromLogic. - When called upon to parse a user command, the
AddressBookParserclass creates anXYZCommandParser(XYZis a placeholder for the specific command name e.g.,AddCommandParser) - The
XYZCommandParseruses the other classes shown above to parse the user command and create aXYZCommandobject (e.g.,AddCommand) which theAddressBookParserreturns back as aCommandobject. - All
XYZCommandParserclasses (e.g.,AddCommandParser,DeleteCommandParser, ...) inherit from theParserinterface so that they can be treated similarly where possible e.g, during testing. - After the
XYZCommandParseris instantiated by theAddressBookParser, it uses theArgumentTokenizerclass to tokenize the user input string into the arguments.- This is done through the
tokenizemethod which returns anArgumentMultimapobject.
- This is done through the
- The
ArgumentMultimapclass is then used to extract the relevant arguments. - For some commands, some arguments are mandatory and the
arePrefixesPresentmethod is used to check if the arguments (i.e the corresponding prefixes) are present in the user input. If not, an exception is thrown. - For some commands, multiple arguments under the same category (e.g. two name arguments for an AddCommand) are not allowed. The
ArgumentMultimapclass is used to check for undesirable multiple arguments using theverifyNoDuplicatePrefixesFormethod. If multiple arguments are present, an exception is thrown. - Validation of each extracted argument is done using the methods defined in the
ParserUtilclass. This class contains methods to validate different arguments extracted by theArgumentMultimapclass based on theVALIDATION_REGEXdefined in component classes (Name.java,Score.java, etc.). - The parsed arguments are then used to create a
XYZCommandobject to be executed. - stores the address book data i.e., all
Personobjects (which are contained in aUniquePersonListobject) and allExamobjects (which are contained in aUniqueExamListobject). - stores the currently filtered
Personobjects (e.g., results of a search query) as a separate filtered list which is exposed to outsiders as an unmodifiableObservableList<Person>that can be 'observed' e.g. the UI can be bound to this list so that the UI can update when the data in the list changes. - stores the currently selected
Examwhich is exposed to outsiders as an unmodifiableObservableValue<Exam>. This is used in conjunction with the exam and exam score implementation, and also used to update the highlighted exam on the UI. - stores
ScoreStatisticsfor the currently selectedExam. This statistic is used in conjunction with the mean and median feature. It is also exposed to outsiders as an unmodifiableObservableValue<ScoreStatistics>so that the UI can be bound to this value for updating. - stores a
UserPrefobject that represents the user’s preferences. This is exposed to the outside as aReadOnlyUserPrefobjects. - does not depend on any of the other three components (as the
Modelrepresents data entities of the domain, they should make sense on their own without depending on other components) - can save both address book data and user preference data in JSON format, and read them back into corresponding objects.
- inherits from both
AddressBookStorageandUserPrefStorage, which means it can be treated as either one (if only the functionality of only one is needed). - depends on some classes in the
Modelcomponent (because theStoragecomponent's job is to save/retrieve objects that belong to theModel) - name (
Name), - phone number (
Phone), - address (
Address), - email (
Email), - matriculation number (
Matric), - reflection (
Reflection), - studio (
Studio), - and tags (
Tag). NameEmailPhoneAddressMatricReflectionStudioTagPersonDetailPredicatetakes a prefix and keyword as parameters, allowing it to filter contacts based on specific details like name, phone number, etc.ExamPredicatetakes a prefix, a keyword, and an exam as parameters, allowing it to filter contacts based on exam scores of a specific exam.ImportCommandreads the CSV file with the given file path.- The CSV file is parsed and each row is converted into an
AddCommand - The
AddCommandis then executed passing the same model as import command. - The
AddCommandthen adds the person to the model. - The file exists
- The file is a CSV file
- The first row of the file is the header row. In which all compulsory fields for creating a persons object
(ie
name,email,address,phone)are present. Optional headers will be read if present. Headers in the CSV that are not a field inPersonwill be ignored. The
executemethod retrieves thefilteredPersonslist inModelby calling thegetFilteredPersonList()method inModel. This list stores the relevant persons currently displayed in thePersonListPanel. It then creates a temporaryAddressBookobject and iterates through thefilteredPersonslist to add each person from the list into theAddressBook. The data is then written to a JSON file namedfilteredaddressbook.jsonwith thewriteToJsonFilemethod inExportCommand.The
executemethod also retrieves the address book file path by calling thegetAddressBookFilePath()method inModel(thisAddressBookstores information of all persons and exams). This file path is retrieved to obtain information on the examinations added in the application- From the
filteredJsonTree, the persons array is extracted using thereadPersonsArray()method inExportCommandto obtain the filtered persons and their data. - From the
unfilteredJsonTree, the exams array is extracted using thereadExamsArray()method inExportCommandto obtain the exams. - Alternative 1 (current choice): Obtaining exam names from
examsarray in the address book file path.- A person in the JSON file will only contain the exam details if they have a score for that exam. Therefore, with this choice, if no one in the filtered person's JSON file contains any score for a specific exam, the exam name will still be exported.
- By adopting this alternative, users will be informed about the existence of an exam even if none of the persons in the filtered list have a score for that exam.
- Alternative 2: Obtaining exam names directly from
personsarray in the filtered person's JSON file.- This choice will only export an exam if someone in the filtered persons list has a score for that exam.
- The
ObservableList<Exam>object is what is returned when retrieving theUniqueExamList. This prevents unwanted modifications to theUniqueExamListwhen retrieving the selected exam. deselectExamfollows a similar structure as the diagram above, differing in the arguments parsed and the methods called on theModelcomponent (i.e. callingdeselectExamonModelinstead ofselectExam).- The column header is not the
emailcolumn, but does not start withExam:. - The column header's name does not correspond to an existing
Examobject. (i.e. Anything afterExam:is not an existing exam name.) - The
emailvalue does not correspond to an existingPerson. - The
Doublerepresenting the score for an existingPersonandExamis not a validScore. - Get the
Examobject corresponding to the exam name in the row; - Get the
Personobject corresponding to the email in the row; - And finally add the
Scoreobject to the correctPersonfor the correctExam. - Head tutor for CS1101S course
- Has a need to manage various aspects of course administration
- Has a need to schedule classes
- Has a need to coordinate with teaching assistants
- Has a need to effectively communicate with students
- Has a need to manage a significant number of persons
- Prefer desktop apps over other types
- Can type fast
- Prefers typing to mouse interactions
- Is reasonably comfortable using CLI apps
- Manage persons faster than a typical mouse/GUI driven app
- Centralized platform to store and manage person details for all relevant individuals involved in course administration
- Able to store and manage exam scores for all students in the course
- Easier access to information through organizing relevant persons into different subgroups
- Able to set up the application through different data-loading options
- Able to assist with management of large scale communication
- The CS1101S Head Tutor will face challenges in effectively organizing and managing contact information within the department due to the large scale the course has to operate on. Existing methods, such as paper-based lists or basic digital spreadsheets, lack the necessary functionality to efficiently handle the diverse needs of proper contact management. There is a need for a user-friendly and offline-capable address book solution tailored specifically to the needs of a single user. This address book system should provide features such as easy contact entry and editing, quick search functionality, customizable categorization options, and the ability to add notes for each contact. Additionally, it should operate offline without requiring an internet connection and should not rely on complex database management systems.
- While Avengers Assemble will greatly improve contact management and organization for the CS1101S Head Tutor, it will not address broader departmental communication or collaboration needs beyond individual contact management since the application is designed to be a single-user system. It will not facilitate communication between users or provide collaboration tools for group projects or tasks. Additionally, the address book system will not handle complex data analysis or reporting functions beyond basic contact information management. Finally, while the system will provide offline functionality, it will not offer real-time synchronization with online databases or cloud storage solutions.
User requests help information.
AvengersAssemble copies the link to the user guide to the user's clipboard.
User pastes the link into a browser to access the user guide.
Use case ends.
User requests to clear the sample data.
AvengersAssemble clears the sample data.
AvengersAssemble displays a message indicating that the sample data has been cleared.
Use case ends.
User requests to import person details from a CSV file.
AvengersAssemble imports the person details from the CSV file.
AvengersAssemble displays a message indicating that the person details have been imported.
Use case ends.
1a. The file to be imported is not a CSV file.
1a1. AvengersAssemble displays an error message indicating that the file type is not recognized and should be a CSV file.
Use case ends.
1b. AvengersAssemble cannot find the file to be imported.
1b1. AvengersAssemble displays a message indicating that the file is not recognized.
Use case ends.
User requests to add a new person and inputs details for the new person.
AvengersAssemble saves the new person's information.
AvengersAssemble confirms the addition of the new person.
Use case ends.
1a. User does not input all compulsory parameters along with the person.
1a1. AvengersAssemble prompts the user on the proper usage of the command.
Step 1a1 is repeated until the data entered is correct.
Use case resumes at step 2.
1b. User tries to add a person with an existing email address.
1b1. AvengersAssemble displays an error message informing the user that the email address already exists.
Step 1b1 is repeated until a valid email address is entered.
Use case resumes at step 2.
User requests to edit a specific person with updated details.
AvengersAssemble saves the updated details.
AvengersAssemble confirms the successful update.
Use case ends.
1a. User does not input enough parameters along with the person.
1a1. AvengersAssemble prompts the user on the proper usage of the command.
Step 1a1 is repeated until the data entered is correct.
Use case resumes at step 2.
1b. The selected person does not exist.
1b1. AvengersAssemble displays an error message indicating that the person does not exist.
Use case ends.
User requests to list persons (UC08)
AvengersAssemble shows a list of persons
User requests to delete a specific person in the list
AvengersAssemble deletes the person
Use case ends.
2a. The list is empty.
Use case ends.
3a. The given index is invalid.
3a1. AvengersAssemble shows an error message.
Use case resumes at step 2.
User requests to find group of persons (UC09) by desired requirements
User requests to delete all listed persons.
AvengersAssemble deletes all listed persons.
AvengersAssemble displays a message to confirm that all listed persons have been deleted.
Use case ends.
2a. No persons are listed.
2a1. AvengersAssemble displays a message indicating that there is no persons to delete.
Use case ends.
2b. User has a filtered view that contains all existing persons.
2b1. AvengersAssemble displays a message indicating that all persons cannot be deleted at once.
Use case ends.
User requests to list persons.
AvengersAssemble shows the list of persons.
User views the list of persons.
Use case ends.
2a. The list is empty.
2a1. AvengersAssemble displays a message indicating that the list is empty.
Use case ends.
User requests to find a specific group of persons matching the search criteria.
AvengersAssemble displays a list of persons matching the criteria.
Use case ends.
1a. No persons match the search criteria.
1a1. AvengersAssemble displays a message indicating that no persons match the search criteria.
Use case ends.
User requests to copy emails of currently displayed persons.
AvengersAssemble copies the emails of currently displayed persons into user's clipboard.
AvengersAssemble notifies the user that emails have been copied.
User can paste emails when composing emails.
Use case ends.
2a. No persons currently displayed.
2a1. AvengersAssemble displays a message indicating that no persons are currently displayed.
Use case ends.
User requests to filter persons (UC09) by desired requirements
User requests to export all listed persons and details to a CSV file.
AvengersAssemble exports the persons to a CSV file.
AvengersAssemble displays a message to confirm that all listed persons have been exported to a CSV file.
Use case ends.
2a. No persons are listed.
2a2. AvengersAssemble displays a message indicating that there is no persons to export.
Use case ends.
User requests to import exam results from a CSV file.
AvengersAssemble displays a message that all exam results have been imported.
Use case ends.
2a. AvengersAssemble cannot find the file specified.
2a1. AvengersAssemble displays a message indicating that the file is not recognized.
Use case ends.
2b. The file to be imported is not a CSV file.
2b1. AvengersAssemble displays an error message indicating that the file type is not recognized and should be a CSV file
Use case ends.
2c. There are duplicate entries in the CSV file.
2c1. AvengersAssemble displays a message indicating that there are duplicate entries in the CSV file, and only the first instance has been kept.
Use case ends.
2d. The CSV file contains invalid entries.
2d1. AvengersAssemble displays a message indicating that there are invalid entries in the CSV file, and all other valid entries have been imported.
Use case ends.
User requests to add an exam.
AvengersAssemble displays a message that the exam has been added.
Use case ends.
1a. User does not input all compulsory parameters along with the exam.
1a1. AvengersAssemble prompts the user on the proper usage of the command.
Step 1a1 is repeated until the data entered is correct.
Use case resumes at step 2.
1b. User tries to add an exam with an existing name.
1b1. AvengersAssemble displays an error message informing the user that the exam name already exists.
Step 1b1 is repeated until a valid exam name is entered.
Use case resumes at step 2.
1c. User tries to add an exam with an invalid score.
1c1. AvengersAssemble displays an error message informing the user that the score is invalid.
Step 1c1 is repeated until a valid score is entered.
Use case resumes at step 2.
1d. User tries to add an exam with an invalid name.
1d1. AvengersAssemble displays an error message informing the user that the name is invalid.
Step 1d1 is repeated until a valid name is entered.
Use case resumes at step 2.
User requests to delete an exam.
AvengersAssemble displays a message that the exam has been deleted.
Use case ends.
1a. The exam does not exist.
1a1. AvengersAssemble displays an error message indicating that the exam does not exist.
Use case ends.
User requests to select an exam.
AvengersAssemble displays the scores of the selected exam.
Use case ends.
1a. The exam does not exist.
1a1. AvengersAssemble displays an error message indicating that the exam does not exist.
Use case ends.
User requests to deselect an exam.
AvengersAssemble displays the persons without the scores of the selected exam.
Use case ends.
1a. The exam does not exist.
1a1. AvengersAssemble displays an error message indicating that the exam does not exist.
Use case ends.
User requests to select an exam (UC15) to add scores to.
User requests to add scores to a student for the selected exam.
AvengersAssemble displays a message that the scores have been added.
Use case ends.
2a. The student does not exist.
2a1. AvengersAssemble displays an error message indicating that the student does not exist.
Use case ends.
2b. The student already has a score for the exam.
2b1. AvengersAssemble displays an error message indicating that the student already has a score for the exam.
Use case ends.
User requests to select an exam (UC15) to edit scores for.
User requests to edit scores for a student for the selected exam.
AvengersAssemble displays a message that the scores have been edited.
Use case ends.
2a. The student does not exist.
2a1. AvengersAssemble displays an error message indicating that the student does not exist.
Use case ends.
2b. The student does not have a score for the exam.
2b1. AvengersAssemble displays an error message indicating that the student does not have a score for the exam.
Use case ends.
2c. The score is invalid.
2c1. AvengersAssemble displays an error message indicating that the score is invalid.
Use case ends.
User requests to select an exam (UC15) to delete scores for.
User requests to delete scores for a student for the selected exam.
AvengersAssemble displays a message that the scores have been deleted.
Use case ends.
2a. The student does not exist.
2a1. AvengersAssemble displays an error message indicating that the student does not exist.
Use case ends.
2b. The student does not have a score for the exam.
2b1. AvengersAssemble displays an error message indicating that the student does not have a score for the exam.
Use case ends.
User requests to select an exam (UC15) to view statistics of scores for.
AvengersAssemble displays the statistics of scores for the selected exam.
Use case ends.
2a. There are no scores for the exam.
2a1. AvengersAssemble does not display any statistics.
Use case ends.
User requests to exit the application.
AvengersAssemble exits the application.
Use case ends.
- Should work on any mainstream OS as long as it has
Java 11or above installed. - Should be able to hold up to 2000 persons without a noticeable sluggishness in performance for typical usage.
- A user with above average typing speed for regular English text (i.e. not code, not system admin commands) should be able to accomplish most of the tasks faster using commands than using the mouse.
- A user should be able to import up to 2000 persons from an external source without a noticeable sluggishness in performance for typical usage.
- The application should provide comprehensive documentation and help resources to assist users in understanding how to use the software effectively.
- OS : Operating System
- Mainstream OS: Windows, Linux, MacOS
- CLI: Command Line Interface
- CSV: Comma Separated Values - a file format used to store tabular data
- MSS: Main Success Scenario
- UI: User Interface
- GUI: Graphical User Interface
- API: Application Programming Interface - used to define how the components of this software interact with each other
- Matric: Matriculation number of a student
Initial launch.
- Test case: Launching the app for the first time.
- Download the jar file and copy into an empty folder.
- Open Terminal and type the following:
Expected: Shows the GUI with a set of sample persons. The window size may not be optimal.java -jar avengersassemble.jar
- Test case: Launching the app for the first time.
Saving window preferences.
- Prerequisites:
- Launch the app.
- Resize the window.
- Close the app.
- Test case: Launch the app.
Expected: The most recent window size and location is retained.
- Prerequisites:
Shutdown.
- Test case:
exit
Expected: The GUI closes and the application exits.
- Test case:
Saving of data.
- Prerequisites:
- The app is a clean state.
- The app is a clean state.
- Test case: Launch and exit the app.
Expected: A newdata/avengersassemble.jsonfile is created. This is the storage file.
- Prerequisites:
Dealing with missing or corrupted data files.
- Prerequisites:
- There is an existing storage file in the default location.
- There is an existing storage file in the default location.
- Test case: Delete the storage file, then launch and exit the app.
Expected: A newdata/avengersassemble.jsonfile populated with sample data is created. - Test case: Corrupt the
data/avengersassemble.jsonfile by adding random text to it.
Expected: The app should ignore the corrupted file and create a new emptydata/avengersassemble.jsonfile when launched and interacted with.
- Prerequisites:
Getting more information on the usage of the app.
- Test case:
help
Expected: Link to the user guide is copied to the clipboard. Status message shows that the link has been copied. The link should be accessible from a browser.
- Test case:
Clearing all contact information from the app.
- Prerequisites:
- Ensure that there is at least one person and exam in the app.
- Ensure that there is at least one person and exam in the app.
- Test case:
clear
Expected: All persons and exams are deleted from the list. Status message shows that all persons and exams have been deleted from the app.
- Prerequisites:
Importing data from a CSV file
- Prerequisites
- There is a file at
C:\path\to\file.csvwith the following content:
name,email,address,phone Alice,alice@gmail.com,wonderland,123- Initially, the persons list is empty.
- There is a file at
- Test case:
import i|C:\path\to\file.csv
Expected: The person with the following details is added:- Name:
Alice - Email:
alice@gmail.com - Address:
wonderland - Phone:
123
- Name:
- Prerequisites
Importing data from a CSV File that does not exist
- Prerequisites
- No CSV file at the path
C:\path\to\file.csv
- No CSV file at the path
- Test case:
import i|C:\path\to\file.csv
Expected: Error message shown in the error report. No change in list of persons.
- Prerequisites
Importing data from a file that is not a CSV file
- Prerequisites
- There is a file at the path
C:\path\to\file.txt
- There is a file at the path
- Test case:
import i|C:\path\to\file.txt
Expected: Error message shown in the error report. No change in list of persons.
- Prerequisites
Importing data from a CSV File with duplicate compulsory headers in header row
- Prerequisites
- A CSV file with duplicate compulsory headers (e.g. 2 header columns named 'name') at the path
C:\path\to\file.csvwith the following content:name,email,address,phone,name Alice,alice@gmail.com,wonderland,123,bob - Initially, the persons list is empty.
- A CSV file with duplicate compulsory headers (e.g. 2 header columns named 'name') at the path
- Test case:
import i|C:\path\to\file.csv
Expected: First occurrence of the header is used. Columns with duplicate headers are ignored. The person with the following details is added:- Name:
Alice - Email:
alice@gmail.com - Address:
wonderland - Phone:
123
- Name:
- Prerequisites
Importing data from a CSV file with missing compulsory headers in header row
- Prerequisites
- A CSV file with missing compulsory headers at the path
C:\path\to\file.csvwith the following content (missing thenameheader):email,address,phone alice@gmail.com,wonderland,123
- A CSV file with missing compulsory headers at the path
- Test case:
import i|C:\path\to\file.csv - Expected: Error message shown that
nameheader is missing in the error report. No change in list of persons.
- Prerequisites
Importing data from a CSV file with missing compulsory values in a row
- Prerequisites
- A CSV file with missing compulsory values in a row at the path
C:\path\to\file.csvwith the following content:name,email,address,phone Alice,,wonderland,123 Bob,bob@gmail.com,town,123 - Initially, the persons list is empty.
- A CSV file with missing compulsory values in a row at the path
- Test case:
import i|C:\path\to\file.csv - Expected: Error message in the results in the display indicating that import has failed with errors. Only one person with the following details is added:
- Name:
Bob - Email:
bob@gmail.com - Address:
town - Phone:
123
- Name:
- Prerequisites
Importing data from a CSV file with extra headers in header row
- Prerequisites
- A CSV file with extra headers in header row at the path
C:\path\to\file.csvwith the following content:name,email,address,phone,extra Alice,alice@gmail.com,123,123,extra- Initially, the persons list is empty.
- A CSV file with extra headers in header row at the path
- Test case:
import i|C:\path\to\file.csv - Expected: Only the compulsory headers are read. Optional headers are read if present. Extra headers are ignored. The person with the following details is added:
- Name:
Alice - Email:
alice@gmail.com - Address:
123 - Phone:
123
- Name:
- Prerequisites
Importing data from a CSV file with unequal number of values in a row as the number of headers
- Prerequisites
- A CSV file with unequal number of values in a row as the number of headers at the path
C:\path\to\file.csvwith the following content:name,email,address,phone Alice,alice@gmail.com,wonderland,123,123 Bob,bob@gmail.com,town,123 - Initially, the persons list is empty.
- A CSV file with unequal number of values in a row as the number of headers at the path
- Test case:
import i|C:\path\to\file.csv
Expected: Error message in the results in the display indicating that import has failed with errors. Only one person with the following details is added:- Name:
Bob - Email:
bob@gmail.com - Address:
town - Phone:
123
- Name:
- Prerequisites
Importing data from an empty CSV file
- Prerequisites
- An empty CSV file at the path
C:\path\to\file.csv
- An empty CSV file at the path
- Test case:
import i|C:\path\to\file.csv - Expected: A message that no person is imported is shown. No change in list of persons.
- Prerequisites
Adding a person with all fields.
- Prerequisites:
- No persons in the list.
- No persons in the list.
- Test case:
add n|Alice p|98765432 a|Hall e|e09123456@u.nus.edu m|A1234567X r|R2 s|S1 t|excelling
Expected: A person with the following fields is added to the list:- Name:
Alice - Phone:
98765432 - Address:
Hall - Email:
e09123456@u.nus.edu - Matric:
A1234567X - Reflection:
R2 - Studio:
S1 - Tags:
excelling,student
- Name:
Note: If a
Matricnumber is provided, the person is automatically tagged as astudent.- Test case (missing
AddressandPhonefields):add n|Alice e|e09123456@u.nus.edu
Expected: An error message is shown indicating that theAddressandPhonefields are missing.
- Prerequisites:
Adding a person with repeated prefixes.
- Prerequisites:
- No persons in the list.
- No persons in the list.
- Test case (repeating
Namefield):add n|Ali n|Ali p|98765432 a|Hall e|test@test.com m|A1234567X
Expected: An error message is shown indicating that theNamefield is repeated.
- Prerequisites:
Adding a person whose
Emailalready exists.- Prerequisites:
- A person with email
e1234567@u.nus.edualready exists in the list.
- A person with email
- Test case (
Emailalready exists):add n|Alice p|987 a|Hall e|e1234567@u.nus.edu
Expected: An error message is shown indicating that the email already exists.
- Prerequisites:
Adding a person with only compulsory fields.
- Prerequisites:
- No persons in the list.
- No persons in the list.
- Test case:
add n|Alice p|98765432 a|Hall e|e09123456@u.nus.edu
Expected: A person with the following fields is added to the list:- Name:
Alice - Phone:
98765432 - Address:
Hall - Email:
e09123456@u.nus.edu
- Name:
- Prerequisites:
Adding a person with matriculation number
- Prerequisites:
- No persons in the list.
- No persons in the list.
- Test case:
add n|Alice p|98765432 a|Hall e|alice@example.com m|A1234567X
Expected: A person with the following fields is added to the list:- Name:
Alice - Phone:
98765432 - Address:
Hall - Email:
alice@example.com - Matric:
A1234567X - Tags:
student
Note that thestudenttag is automatically added to the new person.
- Name:
- Test case:
add n|Alice p|98765432 a|Hall e|alice@example.com
Expected: A person with the following fields is added to the list:- Name:
Alice - Phone:
98765432 - Address:
Hall - Email:
alice@example.com
Note that there is no automatic tagging.
- Name:
- Prerequisites:
Editing a person with all fields.
- Prerequisites:
- Start with the provided sample data.
- Start with the provided sample data.
- Test case:
edit 1 n|new name p|123 a|new home e|newemail@eg.com m|A0000000X r|R1 s|S1 t|tag1 t|tag2
Expected: The first person’s details are updated with all the new values. - Other successful test cases to try: Include a combination of updating some fields and not updating others.
Expected: Similar to above.
- Prerequisites:
Editing a person with repeated prefixes.
- Prerequisites:
- Start with the provided sample data.
- Start with the provided sample data.
- Test case (repeated
n|prefix):edit 1 n|new name n|new name 2 p|123 a|new address
Expected: An error message is shown indicating that theNamefield is repeated. - Other incorrect
editcommands to try: Commands with repeatedp|,a|,e|,m|,r|,s|,t|prefixes.
Expected: Similar to previous.
- Prerequisites:
Editing a Person's
Emailto an ExistingEmail.- Prerequisites:
- Start with the provided sample data. Note the emails of the first and second person.
- Start with the provided sample data. Note the emails of the first and second person.
- Test case:
edit 1 e|berniceyu@example.com
Expected: An error message is shown indicating that the email already exists.
- Prerequisites:
Deleting a person while all persons are being shown.
- Prerequisites:
- List all persons using the
listcommand. Multiple persons in the list.
- List all persons using the
- Test case:
delete 1
Expected: First person is deleted from the list. Details of the deleted person shown in the status message. - Test case (invalid index):
delete 0
Expected: No person is deleted. Error details shown in the status message. - Other incorrect
deletecommands to try:delete,delete x,...(where x is larger than the list size)
Expected: Similar to previous.
- Prerequisites:
Deleting a person while some persons are being shown.
- Prerequisites:
- Filter persons using the
findcommand. Multiple but not all persons in the list.
- Filter persons using the
- Test case:
delete 1
Expected: First person in the filtered list is deleted. Details of the deleted person shown in the status message. - Test case:
delete 0
Expected: No person is deleted. Error details shown in the status message. - Other incorrect
deletecommands to try:delete,delete x
Expected: Similar to previous.
- Prerequisites:
Deleting a person while no persons are being shown.
- Prerequisites:
- Filter persons using the
findcommand such that there are no persons in the list, or delete all persons withclear.
- Filter persons using the
- Test case:
delete 1
Expected: No person is deleted. Error details shown in the status message.
- Prerequisites:
Deleting a proper subset of all persons.
- Prerequisites:
- Filter persons using the
findcommand such that there are multiple, but not all, persons in the list.
- Filter persons using the
- Test case:
deleteShown
Expected: All persons currently shown are deleted, and the list is updated to show all remaining persons. - Other successful test cases:
deleteShown x
Expected: Similar to previous, as extraneous parameters for single-word commands are treated as typos and ignored.
- Prerequisites:
Deleting all persons.
- Prerequisites:
- Filter persons using the
findcommand such that all persons are shown, or list all persons withlist.
- Filter persons using the
- Test case:
deleteShown
Expected: An error is shown indicating that all persons cannot be deleted at once. - Other incorrect
deleteShowncommands to try:deleteShown x
Expected: Similar to previous.
- Prerequisites:
Starting with sample data.
- Prerequisites:
- Start with the provided sample data.
- Start with the provided sample data.
- Test case:
list
Expected: All persons are shown in the list. - Other successful test cases:
list x
Expected: Similar to previous, as extraneous parameters for single-word commands are treated as typos and ignored.
- Prerequisites:
Starting with a filtered list.
- Prerequisites:
- Filter persons using the
findcommand such that there are multiple, but not all, persons in the list.
- Filter persons using the
- Test case:
list
Expected: All persons in the overall list are shown.
- Prerequisites:
Finding persons by contact details.
- Prerequisites:
- Ensure that there are multiple persons in the app.
- Ensure that there are multiple persons in the app.
- Test case:
find n|Alice
Expected: Persons with the name "Alice" are shown. Status message shows the number of persons found. - Test case:
find e|alice
Expected: Persons with emails that contain the word "alice" are shown. Status message shows the number of persons found. - Test case:
find p|123
Expected: Persons with phone numbers that contain the digits "123" are shown. Status message shows the number of persons found. - Test case:
find a|Ang Mo Kio
Expected: Persons with addresses that contain the word "Ang Mo Kio" are shown. Status message shows the number of persons found. - Test case:
find t|student
Expected: Persons with the tag "student" are shown. Status message shows the number of persons found. - Test case:
find m|A123
Expected: Persons with matriculation numbers containing "A123" are shown. Status message shows the number of persons found. - Test case:
find r|R01
Expected: Persons with the reflection "R01" are shown. Status message shows the number of persons found. - Test case:
find s|S01
Expected: Persons with the studio "S01" are shown. Status message shows the number of persons found.
- Prerequisites:
Finding persons by score.
- Prerequisites:
- Ensure that there are multiple persons in the app.
- Ensure that at least one exam is added using the
addExamcommand. For this example, we shall add a new exam with nametest examand maximum score100. - Ensure an exam is selected using the
selectExamcommand. For this example, we shall select thetest exam.
- Test case:
find lt|50
Expected: Persons with scores less than 50 are shown. Status message shows the number of persons found. - Test case:
find mt|50
Expected: Persons with scores more than 50 are shown. Status message shows the number of persons found. - Test case:
find lt|-1
Expected: An error message is shown indicating that thescoreprovided is invalid. - Test case:
find mt|101
Expected: An error message is shown indicating that thescoreprovided is greater than the maximum score of the selected exam.
- Prerequisites:
Finding persons by multiple prefixes.
- Prerequisites:
- Ensure that there are multiple persons in the app.
- Ensure that there are multiple persons in the app.
- Test case (multiple unique prefixes):
find n|Alice e|Alice
Expected: An error message is shown indicating that the format of the command is incorrect. - Similar incorrect test cases to try: Any combination of two or more different prefixes
Expected: Similar to previous. - Test case (multiple duplicate prefixes):
find n|Alice n|Bob
Expected: An error message is shown indicating that the prefixnis duplicated. - Similar incorrect test cases to try: Duplicated
p|,a|,e|,m|,r|,s|,t|,mt|,lt|prefixes.
Expected: Similar to previous.
- Prerequisites:
Copying the emails of all persons.
- Prerequisites:
- Ensure that there are multiple persons in the app.
- Ensure all persons are displayed using the
listcommand.
- Test case:
copy
Expected: All emails are copied to the clipboard. Status message shows the number of emails copied.
- Prerequisites:
Copying the emails of a specific group.
- Prerequisites:
- Ensure that there are multiple persons in the app.
- Filter the person list using the
findcommand.
- Test case:
copy
Expected: All emails of the currently displayed persons are copied to the clipboard. Status message shows the number of emails copied.
- Prerequisites:
Exporting data while all persons are displayed.
- Prerequisites:
- Start with the provided sample data.
- List all persons using the
listcommand.
- Test case:
export
Expected: A file namedaddressbookdatacontainingavengersassemble.csvis created in the same directory where the JAR file of the Avengers Assemble is located. All currently displayed persons and their details are exported to the CSV file.
- Prerequisites:
Exporting data while person list is filtered.
- Prerequisites:
- Start with the provided sample data.
- Filter the person list using the
findcommand.
- Test case: Similar to previous.
Expected: Similar to previous.
- Prerequisites:
Exporting data with exams and exam scores added.
- Prerequisites:
- Start with the provided sample data.
- Add an exam using the
addExamcommand. For this example, we shall add an exam with nameTest Exam. - List all persons using the
listcommand.
- Test case:
export
Expected: A file namedaddressbookdatacontainingavengersassemble.csvis created in the same directory where the JAR file of the Avengers Assemble is located. All currently displayed persons and their details are exported to the CSV file. A column with column headingExam:Test Examis present in the same CSV file, but no values are present in that column. - Test case: Add exam scores to persons in displayed list using
addScore, thenexport
Expected: A file namedaddressbookdatacontainingavengersassemble.csvis created in the same directory where the JAR file of the Avengers Assemble is located. All currently displayed persons and their details are exported to the CSV file. A column with column headingExam:Test Examis present in the same CSV file, with corresponding exam scores for each person included in that column.
- Prerequisites:
Adding an exam with valid data
- Prerequisites:
- No exams in the exams list.
- No exams in the exams list.
- Test case:
addExam n|Midterm s|100
Expected: New exam is added to the exams list. Status message shows the exam added. - Other test cases to try:
addExam n|Final s|100
Expected: New exam is added to the exams list. Status message shows the exam added.
- Prerequisites:
Adding an exam that already exists
- Prerequisites:
- An exam of name: Final, Score: 100 exists in the exams list.
- An exam of name: Final, Score: 100 exists in the exams list.
- Test case:
addExam n|Final s|100
Expected: Error message shown in the error report. No change in the exams list.
- Prerequisites:
Adding an exam with missing fields
- Prerequisites:
- No exams in the exams list.
- No exams in the exams list.
- Test case (missing score):
addExam n|Final
Expected: Error message shown in the error report. No change in the exams list.
- Prerequisites:
Deleting an exam
- Prerequisites:
- Exactly one exam in the exams list. Hence, exam has an index of 1.
- Exactly one exam in the exams list. Hence, exam has an index of 1.
- Test case:
deleteExam 1
Expected: First exam is deleted from the exams list. Status message shows the exam deleted. - Test case (index out of bounds):
deleteExam 2
Expected: No exam is deleted. Error message shown. No change in the exams list. - Test case (no index):
deleteExam
Expected: No exam is deleted. Error message shown. No change in the exams list.
- Prerequisites:
Selecting an exam
- Prerequisites:
- Exactly one exam in the exams list. Hence, exam has an index of 1.
- Exactly one exam in the exams list. Hence, exam has an index of 1.
- Test case:
selectExam 1
Expected: First exam is selected. Status message shows the exam selected. - Test case:
selectExam 0
Expected: No exam is selected. Error message shown. No change in the exams list. - Test case (index out of bounds):
selectExam 2
Expected: No exam is selected. Error message shown. No change in the exams list. - Test case (no index):
selectExam
Expected: No exam is selected. Error message shown. No change in the exams list.
- Prerequisites:
Deselecting an exam
- Prerequisites:
- An exam has been selected.
- An exam has been selected.
- Test case:
deselectExam
Expected: Selected exam is deselected. Status message shows the exam deselected. - Test case (no exam selected):
deselectExam
Expected: No exam is deselected. Error message shown. No change in the exams list.
- Prerequisites:
Importing exam scores from a CSV file.
- Prerequisites:
- Add an
Examto the sample data:addExam n|Midterm s|100. - Create a CSV file with the following content:
Contents of/path/to/file.csv:
- Add an
email,Exam:Midterm alexyeoh@example.com,50- Test case:
importExamScores i|/path/to/file.csv
Expected: The person with the email ofalexyeoh@example.comnow has aMidtermscore of50.
- Prerequisites:
Importing an invalid file.
- Prerequisites:
- Start with sample data and the
Midtermexam. - Create a file named
invalid.json.
- Start with sample data and the
- Test case:
importExamScores i|invalid.json
Expected: An error message is shown indicating that the file is not a CSV file.
- Prerequisites:
Importing a CSV file with incorrect formatting.
- Prerequisites:
- Start with sample data and the
Midtermexam. - Create a CSV file with the following content:
Contents of/path/to/file.csv:
- Start with sample data and the
email,Exam:Midterm,email alexyeoh@example.com,50,alexyeoh@example.com- Test case:
importExamScores i|/path/to/file.csv
Expected: An error message is shown indicating that the email header should exist only in the first column. - Other incorrect
importExamScorescommands to try: CSV files where email is not the first header.
Expected: Similar to previous.
- Prerequisites:
Importing a CSV file with duplicate entries.
- Prerequisites:
- Start with sample data and the
Midtermexam. - Create a CSV file with the following content:
Contents of/path/to/file.csv:
- Start with sample data and the
email,Exam:Midterm,Exam:Midterm alexyeoh@example.com,50,60- Test case:
importExamScores i|/path/to/file.csv
Expected: A message is shown indicating that there are duplicate entries in the CSV file, and only the first instance has been kept. TheMidtermscore for the person with the email ofalexyeoh@example.comis50.
- Prerequisites:
Importing a CSV File with invalid entries.
- Prerequisites:
- Start with sample data and the
Midtermexam. - Create a CSV file with the following content:
Contents of/path/to/file.csv:
- Start with sample data and the
email,Exam:Midterm,Exam:Finals
alexyeoh@example.com,101,50
berniceyu@example.com,50,60
nonexistent@example.com,100,100
Test case:
importExamScores i|/path/to/file.csv
Expected: A message is shown indicating that there are invalid entries in the CSV file, and all other valid entries have been imported. The errors shown are as follows:- The score for
alexyeoh@example.comfor theMidtermexam is invalid. - The person with the email
nonexistent@example.comdoes not exist in the given list. - The
Finalsexam does not exist. Note that theMidtermscore for the person with the email ofberniceyu@example.comis50.
- The score for
Other incorrect
importExamScorescommands to try: CSV files with a mix of invalid scores, nonexistent emails, and nonexistent exams.
Expected: Similar to previous.
- Prerequisites:
Adding a score to a person while all persons are displayed.
- Prerequisites:
- Ensure at least one exam is added using the
addExamcommand. For this example, we shall add a new exam with nametest examand maximum score100. - Ensure an exam is selected using the
selectExamcommand. For this example, we shall selecttest examfrom above. - Ensure all persons are displayed using the
listcommand.
- Ensure at least one exam is added using the
- Test case:
addScore 1 s|100
Expected: A score of100is added to the first person in the list of displayed persons. The score and the name of the corresponding person will be shown in the status message. - Test case:
addScore 2 s|50.25
Expected: A score of50.25is added to the second person in the list of displayed persons.The score and the name of the corresponding person will be shown in the status message. - Test case (invalid index input):
addScore 0 s|100
Expected: No score is added to any persons. Error details are shown in the status message. - Test case (no index input):
addScore s|100
Expected: No score is added to any persons. Error details are shown in the status message. - Test case (no score input):
addScore 3 s|
Expected: No score is added to any persons. Error details are shown in the status message. - Test case (score larger than maximum score is input):
addScore 3 s|101
Expected: No score is added to any persons. Error details are shown in the status message. - Test case (negative score input):
addScore 3 s|-50
Expected: No score is added to any persons. Error details are shown in the status message. - Test case (person already contains a score):
addScore 1 s|50.25
Expected: No score is added to any persons. Error details are shown in the status message. - Other incorrect
addScorecommands to try:addScore,addScore INDEX s|100(whereINDEXis larger than the list size),addScore 3 s|SCORE(whereSCOREis non-numeric, is less than 0, more than the maximum score of the selected exams, and/or has more than 2 digits in its fractional part)
Expected: No score is added to any persons. Error details are shown in the status message.
- Prerequisites:
Adding a score to a person while person list is filtered.
- Prerequisites:
- Ensure at least one exam is added using the
addExamcommand. For this example, we shall add a new exam with nametest examand maximum score100. - Ensure an exam is selected using the
selectExamcommand. For this example, we shall selecttest examfrom above. - Filter the person list using the
findcommand.
- Ensure at least one exam is added using the
- Test case: Similar to previous.
Expected: Similar to previous.
- Prerequisites:
Editing a score of a person while all persons are displayed.
- Prerequisites:
- Ensure at least one exam is added using the
addExamcommand. For this example, we shall add a new exam with nametest examand maximum score100. - Ensure an exam is selected using the
selectExamcommand. For this example, we shall selecttest examfrom above. - Ensure all persons are displayed using the
listcommand. - Ensure that one person in the list has a score for the selected exam using the
addScorecommand. For this example, we shall add a score of100to the first person in the list.
- Ensure at least one exam is added using the
- Test case:
editScore 1 s|90
Expected: The score of100is edited to90for the first person in the list of displayed persons. The score and the details of the corresponding person will be shown in the status message. - Test case (invalid index input):
editScore 0 s|90
Expected: No person's score is edited. Error details are shown in the status message. - Test case (no index input):
editScore s|90
Expected: No person's score is edited. Error details are shown in the status message. - Test case (no score input):
editScore 1 s|
Expected: No person's score is edited. Error details are shown in the status message. - Test case (score larger than maximum score is input):
editScore 1 s|101
Expected: No score is added to any persons. Error details are shown in the status message. - Test case (person does not contain any score):
editScore 2 s|90
Expected: No score is added to any persons. Error details are shown in the status message. - Other incorrect
editScorecommands to try:editScore,editScore INDEX s|90(whereINDEXis larger than the list size),editScore 1 s|SCORE(whereSCOREis non-numeric, is less than 0, more than the maximum score of the selected exam, and/or has more than 2 digits in its fractional part)
Expected: No score is added to any persons. Error details are shown in the status message.
- Prerequisites:
Editing a score of a person while person list is filtered.
- Prerequisites:
- Ensure at least one exam is added using the
addExamcommand. For this example, we shall add a new exam with nametest examand maximum score100. - Ensure an exam is selected using the
selectExamcommand. For this example, we shall selecttest examfrom above. - Filter the person list using the
findcommand. - Ensure that one person in the list has a score for the selected exam using the
addScorecommand. For this example, we shall add a score of100to the first person in the list.
- Ensure at least one exam is added using the
- Test case: Similar to previous.
Expected: Similar to previous.
- Prerequisites:
Deleting a score of a person while all persons are displayed.
- Prerequisites:
- Ensure at least one exam is added using the
addExamcommand. For this example, we shall add a new exam with nametest examand maximum score100. - Ensure an exam is selected using the
selectExamcommand. For this example, we shall selecttest examfrom above. - Ensure all persons are displayed using the
listcommand. - Ensure that one person in the list has a score for the selected exam using the
addScorecommand. For this example, we shall add a score of100to the first person in the list.
- Ensure at least one exam is added using the
- Test case:
deleteScore
Expected: The score of100is deleted from the first person in the list of displayed persons. The details of the corresponding person will be shown in the status message. - Test case (invalid index input):
deleteScore 0
Expected: No person's score is deleted. Error details are shown in the status message. - Test case (person does not contain any score):
deleteScore 2
Expected: No person's score is deleted. Error details are shown in the status message. - Other incorrect
deleteScorecommands to try:deleteScore,deleteScore INDEX(whereINDEXis larger than the list size)
Expected: No person's score is deleted. Error details are shown in the status message.
- Prerequisites:
Deleting a score of a person while person list is filtered.
- Prerequisites:
- Ensure at least one exam is added using the
addExamcommand. For this example, we shall add a new exam with nametest examand maximum score100. - Ensure an exam is selected using the
selectExamcommand. For this example, we shall selecttest examfrom above. - Filter the person list using the
findcommand. - Ensure that one person in the list has a score for the selected exam using the
addScorecommand. For this example, we shall add a score of100to the first person in the list.
- Ensure at least one exam is added using the
- Test case: Similar to previous.
Expected: Similar to previous.
- Prerequisites:
Mean and median of exam scores while all persons are displayed.
- Prerequisites:
- Ensure at least one exam is added using the
addExamcommand. For this example, we shall add a new exam with nametest examand maximum score100. - Ensure an exam is selected using the
selectExamcommand. For this example, we shall selecttest examfrom above. - Ensure all persons are displayed using the
listcommand.
- Ensure at least one exam is added using the
- Initially, no scores added to any persons in the list
Expected: "No scores available" is displayed at the bottom, right corner of the GUI. - Use
addScoreto add a score of50to the first person in the list
Expected: A mean score of50and a median score of50is displayed at the bottom, right corner of the GUI. - Use
addScoreto add a score of25to the second person in the list and a score of27.7to the third person in the list
Expected: the calculated mean value of the three scores (rounded to two decimal places),50,25and27.7, and the median of the three scores, are displayed at the bottom, right corner of the GUI.
- Prerequisites:
Acknowledgements
This project is based on the AddressBook-Level3 project created by the SE-EDU initiative.
Features related to the creation and reading of CSV files were made possible through the use of the OpenCSV library.
Our project made use of AI assistance from GitHub Copilot to finish small snippets of code and to provide suggestions.
Setting Up, Getting Started
Refer to the guide Setting up and getting started.
Design
Architecture

The Architecture Diagram given above explains the high-level design of the App.
Given below is a quick overview of main components and how they interact with each other.
Main components of the architecture
Main (consisting of classes Main and MainApp) is in charge of the app launch and shut down.
The bulk of the app's work is done by the following four components:
Commons represents a collection of classes used by multiple other components.
How the architecture components interact with each other
The Sequence Diagram below shows how the components interact with each other for the scenario where the user issues the command delete 1.

Each of the four main components (also shown in the diagram above),
For example, the Logic component defines its API in the Logic.java interface and implements its functionality using the LogicManager.java class which follows the Logic interface. Other components interact with a given component through its interface rather than the concrete class (reason: to prevent outside component's being coupled to the implementation of a component), as illustrated in the (partial) class diagram below.

The sections below give more details of each component.
UI Component
The API of this component is specified in Ui.java

The UI consists of a MainWindow that is made up of parts e.g.CommandBox, ResultDisplay, PersonListPanel, StatusBarFooter etc. All these, including the MainWindow, inherit from the abstract UiPart class which captures the commonalities between classes that represent parts of the visible GUI.
The UI component uses the JavaFx UI framework. The layout of these UI parts are defined in matching .fxml files that are in the src/main/resources/view folder. For example, the layout of the MainWindow is specified in MainWindow.fxml
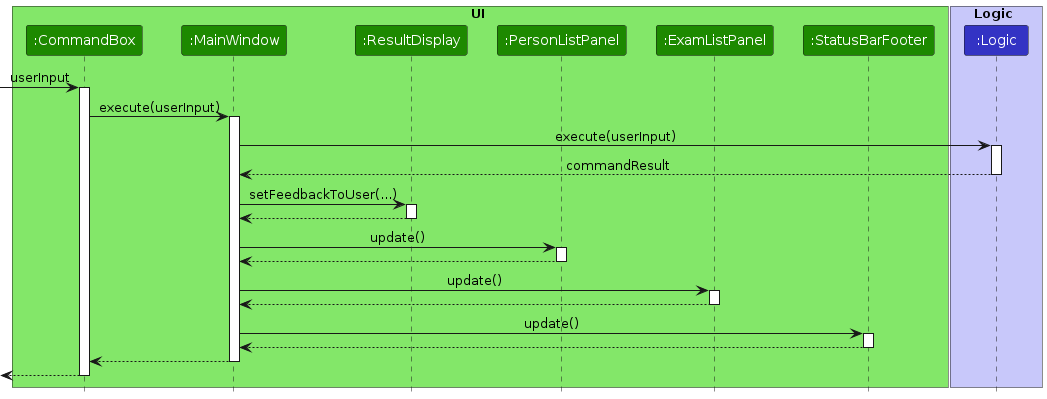
The CommandBox takes in user input which is passed onto the Logic component for the user input to be parsed and executed. A CommandResult is returned after execution and the feedback is displayed to the user through the ResultDisplay component of the UI.
For the updating of other components in the UI, after each command execution, MainWindow runs an update that calls the update method on PersonListPanel, ExamListPanel and StatusBarFooter.
PersonListPanel and ExamListPanel update themselves by retrieving the filteredPersonList and examList from the Model component and updating the displayed lists accordingly.
StatusBarFooter contains the mean and median feature, and it updates itself by retrieving ScoreStatistics
from the Model on update.
In summary, the UI component:
The sequence diagram below illustrates a more in-depth view of the interactions within the UI component
Considerations For UI
Dynamic UI Updates
The UI is designed to update dynamically based on changes in the Model. We narrowed down to two design choices for updating the UI components. They are:
We chose the second design choice as having a centralized update method would allow for easier maintenance, as there is a clear indicator of how UI components are updated from MainWindow. Adding extensions would also be more straightforward as future developers would know where to look for the update logic.
With listeners, the update logic would be scattered across multiple UI component classes, making it much harder to search and add upon the update logic.
One of our main goals was to make our codebase easy to understand and maintain, and we felt that the centralized update method would be more in line with this goal despite the slight increase in coupling and inefficiency.
Logic Component
API : Logic.java
Here's a (partial) class diagram of the Logic component:

How the Logic component works:
Here are the other classes in Logic (omitted from the class diagram above) that are used for parsing a user command:

How the parsing works:
Example of Parsing User Input: delete Command
The sequence diagram below illustrates the interactions within the Logic component, taking a simple execute("delete 1") API call as an example.

Note: The lifeline for DeleteCommandParser should end at the destroy marker (X) but due to a limitation of PlantUML, the lifeline continues till the end of diagram.
The following is a more detailed explanation on how user input is parsed into a Command object (not mentioned above for simplicity).
Using Argument Tokenizer and Argument Multimap
Mandatory Arguments and Multiple Arguments
Validation of Arguments
Note: Some commands do not require any arguments (e.g., help, clear, list, exit). In such cases, the XYZCommand class is directly instantiated by the AddressBookParser class without the parsing of arguments. As such, any arguments passed to these commands are ignored.
Considerations for Logic
The Logic component is designed to be the central component that executes all user commands.
This design choice was made to ensure that all commands are executed in a consistent manner, and to prevent the duplication of command execution logic across different components.
By centralizing the command execution logic in the Logic component, we ensure that all commands are executed in the same way, regardless of the component that initiates the command execution.
This design choice also allows for easier maintenance and extensibility, as any changes to the command execution logic can be made in a single location.
Model Component
API : Model.java

The Model component,
Note: An alternative (arguably, a more OOP) model is given below relating to the Person class. It has a Tag list in the AddressBook, which Person references. This allows AddressBook to only require one Tag object per unique tag, instead of each Person needing their own Tag objects.
However, we opted not to use this model. As much as possible, we tried to keep the attributes of Person unlinked to other classes to prevent complications in our saving, import and export functionalities.

Storage Component
API : Storage.java

Saving of Data
The Storage component uses the Jackson library to convert objects to JSON format. The conversion methods are predefined in the JsonAdapted classes for their corresponding objects.
The Logic class stores a StorageManager object that implements the methods in the Storage class. For every command that is executed, Logic uses StorageManager to save the updated AddressBook through the saveAddressBook method.
The StorageManager class calls on the JsonAddressBookStorage class to convert all objects in the AddressBook to JSON formatting. The converted JSON objects are consolidated in the JsonSerializableAddressBook class and it is serialized to JSON format and saved using the saveJsonToFile method.
The sequence diagram below illustrates how data is saved within the Storage component when the user issues a command.

Loading of Data
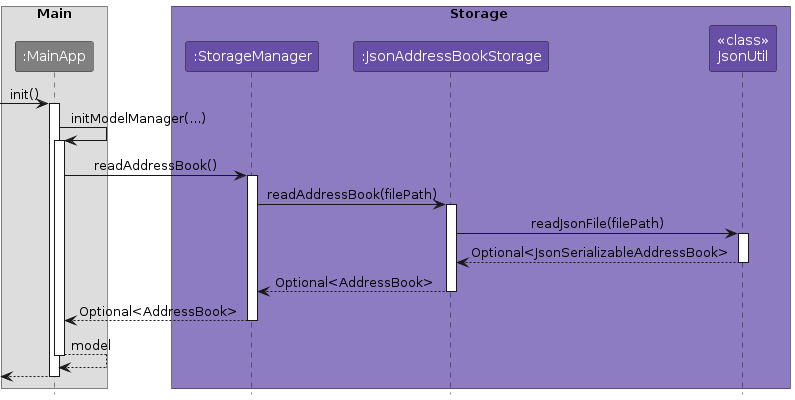
When the application is initialized, the Storage component reads the JSON objects from the save file and converts them back to objects that can be used to initialize the Model component.
This is done using the readJsonFile method of the JsonUtil class which utilizes the methods defined in the JsonAdapted classes to convert the saved JSON data back to objects that can be used by the Model component.
The sequence diagram below illustrates how data is loaded within the Storage component when the application is initialized.
In summary, the Storage component:
Common Classes
Classes used by multiple components are in the seedu.addressbook.commons package.
These classes provide utility functions that are used across different components such as
CollectionUtil, StringUtil, JsonUtil etc. It also contains app wide constants and exceptions.
Implementation
This section describes some noteworthy details on how certain features are implemented
General Features
As these general features do not require any arguments, the AddressBookParser directly instantiates the corresponding command classes.
Help Command : help
The help command utilizes the java.awt.Toolkit class to copy the user guide link to the user's clipboard.
Executing the Command
On execution of the HelpCommand, the copyToClipboard method is called which retrieves the system clipboard
through Toolkit.getDefaultToolkit().getSystemClipboard() and copies the user guide link to the clipboard by using
setContents method.
Design Considerations
We designed the help command to copy the user guide link directly to the clipboard as we wanted our application to be CLI optimized. This allows our target users to easily access the user guide without having to use their mouse to navigate to the user guide link.
Clear Command : clear
The clear command allows users to clear all persons and exams from the persons and exams list.
Executing the Command
The ClearCommand simply sets the AddressBook in the Model component to a new AddressBook object, effectively clearing all persons and exams from the persons and exams list.
Design Considerations
We designed the clear command to clear all persons and exams from their respective lists to provide users with a quick and easy way to reset the application to its initial state. This is useful for users who want to start over or clear the application for a fresh start.
List Command : list
The list command allows users to list all persons in the persons list.
Executing the Command
The ListCommand retrieves the filteredPersonList from the Model component and returns a CommandResult object containing the list of persons to be displayed on the UI.
Design Considerations
We designed the list command to list all persons in the persons list to provide users with a quick and easy way to view all persons in the persons list. This is useful to revert the UI back to the default view after a find command has been executed which filters the persons displayed on the UI.
Contact Management Features
All contacts are stored as Person objects in the UniquePersonList object under the AddressBook of the Model component.
There is an additional filteredPersons list stored in the Model component that stores the persons currently displayed in the PersonListPanel on the UI. This list is updated whenever the user issues a command that might change the persons displayed in the PersonListPanel.
Add Person Command : add
The add command allows users to add a person to the persons list.
The user can specify the person's:
and optionally provide additional information such as their:
Parsing User Input
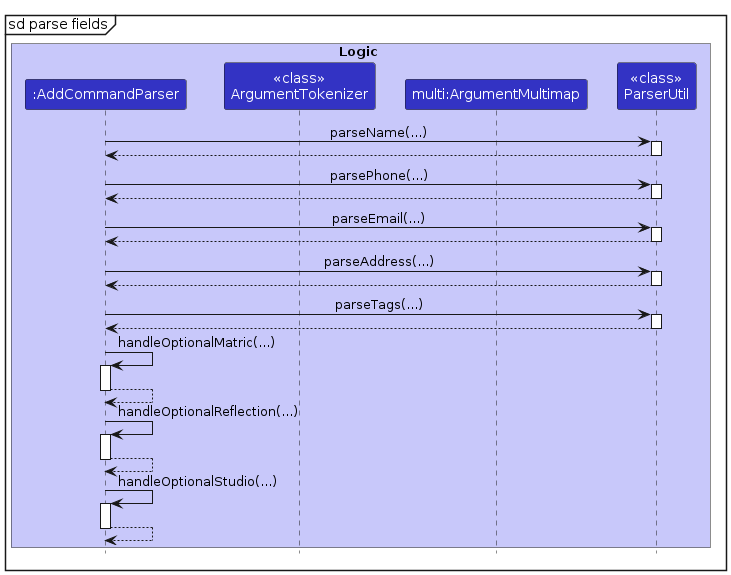
The AddCommandParser class is responsible for parsing user input to extract the details of the person to be added. It uses the ArgumentTokenizer to tokenize the input string, extracting prefixes and their associated values. It ensures that all mandatory fields are present and that there are no duplicate prefixes in the user input.
Executing the Command
The AddCommand class creates a new Person object with the parsed details.
The Person object is then added to the UniquePersonList through the addPerson method in the Model component.
Sequence Diagram
The sequence diagram below illustrates a more in-depth view of the interactions regarding the parsing of user input.
It takes an add command: execute(add n|Dohn Joe p|98765432 a|123 e|dohn@gm.com m|A1234567X s|S1 r|R1) as an example.
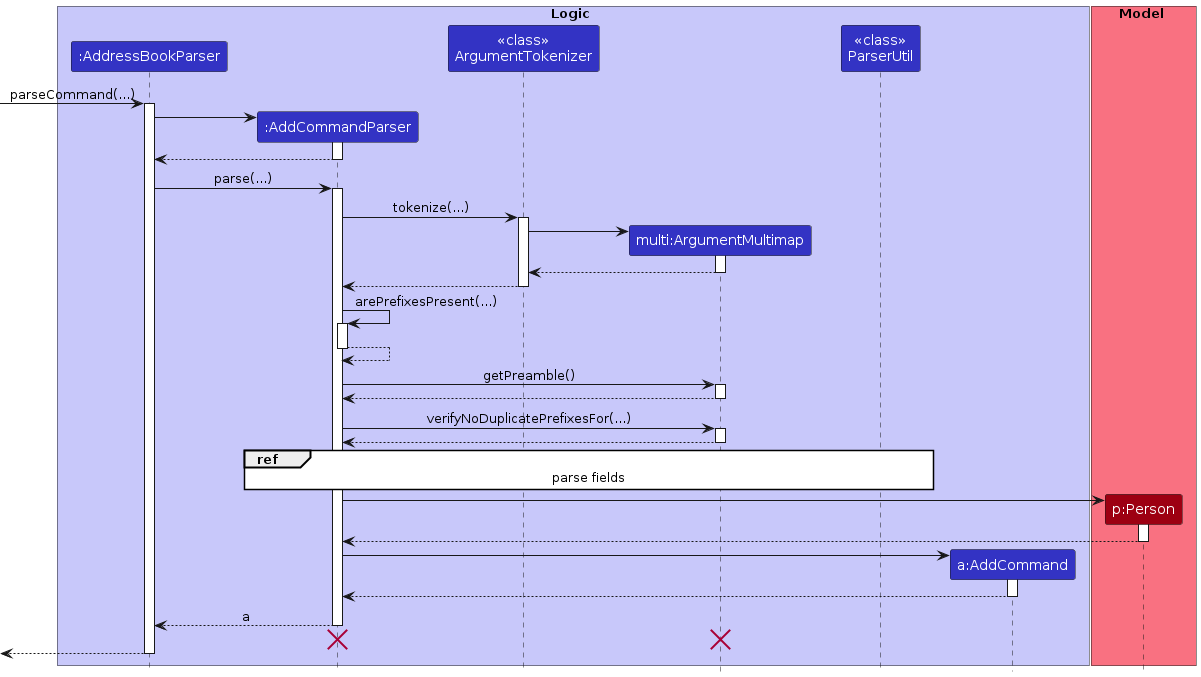
Note: The lifeline for AddCommandParser should end at the destroy marker (X) but due to a limitation of PlantUML, the lifeline continues till the end of diagram.
The parsing is detailed as follows:
Design Considerations
Use of Email Field as Unique Identifier
We have chosen to use the Email field as a unique identifier. Due to the real-world implementation of email addresses, and specifically in NUS, email addresses are unique to each person. This allows for easy identification of persons and prevents the creation of duplicate persons with the same email address.
This is opposed to using the Name field as a unique identifier, as an app with our proposed scale will likely be handling a large number of persons potentially having the same name. This would make it difficult to identify or keep track of persons with the same name.
Compulsory and Non-compulsory Fields
We have chosen to make the following fields compulsory as they are essentials and most likely available to the head TA:
The following fields are optional as they may not be available for all persons:
Edit Person Command : edit
The edit command allows a user to edit the details of an existing person.
Parsing User Input
The EditCommandParser class is responsible for parsing user input to extract the index of the person to be edited and the new details of the person.
It uses the ArgumentTokenizer class to tokenize the user input string, extracting the index of the person to be edited and the new details of the person. It ensures that the index is valid and that there are no duplicate prefixes in the user input.
Executing the Command
The EditCommand first retrieves the person to be edited from the Model component.
This is done by first retrieving the filteredPersonList from the Model component using the getFilteredPersonList method
The person to be edited is then retrieved from the filteredPersonList using the index provided by the user.
The EditCommand then creates a new Person object with the new details provided by the user and the selected person's existing details. The Person object is then updated in the UniquePersonList through the setPerson method in the Model component.
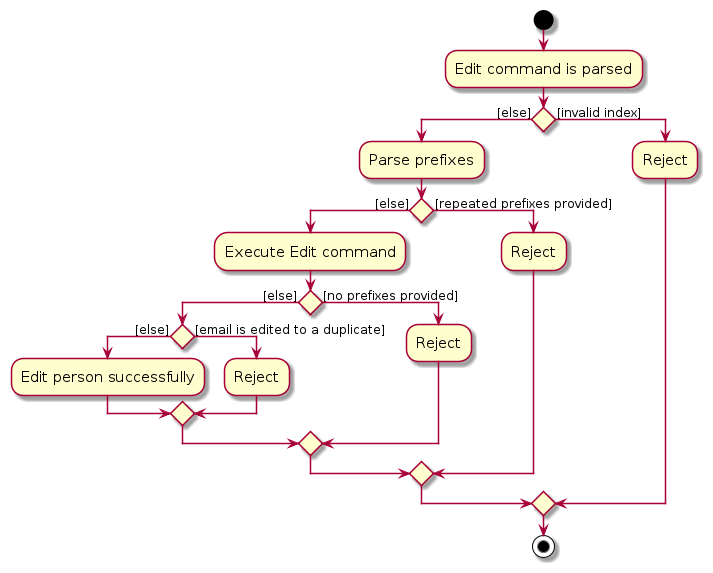
Activity Diagram
The activity diagram below illustrates the workflow involved in executing the edit command. In practice, a Reject activity will result in a CommandException being thrown.
Delete Person Command : delete
The delete command allows a user to delete a person with the specified index.
Parsing User Input
The DeleteCommandParser class is responsible for parsing user input to extract the index of the person to be deleted. It uses the ArgumentTokenizer to tokenize the input string, extracting the index of the person to be deleted and ensuring that the index is valid.
Executing the Command
The DeleteCommand class first retrieves the person to be deleted from the Model component. This is done by first retrieving the filteredPersonList from the Model component using the getFilteredPersonList method. The person to be deleted is then retrieved from the filteredPersonList using the index provided by the user. The DeleteCommand then deletes the person from the UniquePersonList through the deletePerson method in the Model component.
Sequence Diagram
For more details on the implementation of the delete command, refer to the Delete Command Sequence Diagram.
Design Considerations
We have chosen to implement the delete command to accept the index of the person to be deleted to maximize convenience for the user. The numbering of the lists will be displayed to the user, making indexing very intuitive.
Find Command : find
The find command lets users search for persons by substring matching. The user can select any parameter to search under:
NAME, EMAIL, TAG, MATRIC, REFLECTION, STUDIO, and TAGS can all be used. E.g. to search for all persons under studio S2, the user can use find s|s2.
The user can also use two other prefixes: lt and mt to search for persons with scores less than or more than a certain value respectively.
E.g. find mt|50 will return all persons with scores more than 50.
The find feature makes use of the predicate classes PersonDetailPredicate and ExamPredicate, as well as the method updateFilteredPersonList
to update the model to show only persons that fulfill the criteria that the user has keyed in.
Parsing User Input
The FindCommandParser class is responsible for parsing user input to extract search criteria. It uses the ArgumentTokenizer to tokenize the input string,
extracting prefixes and their associated values. Next, the method verifyNoDuplicatePrefixesFor ensures that there are no duplicate prefixes in the user input.
Following that, the extractPrefixForFindCommand method ensures that only one valid, non-empty prefix is provided in the input.
After which, the extractValidKeyword method ensures that the keyword provided in the input is valid in the case that the prefix is mt| or lt|,
since these two prefixes specifically require a numerical value as the keyword instead of a string value.
Executing the Command
The FindCommand class is responsible for executing the command for filtering the list in the application.
Using the prefix and keyword from parsing user input, a FindCommand is created. the execute method is then called by the LogicManager.
Creating Predicate
Note: The PersonDetailPredicate and ExamPredicate classes implement the Predicate interface to filter contacts based on the search criteria.
A brief overview of the two classes is given below:
The find command first checks if an exam is required by checking if the prefix is mt| or lt|.
If an exam is required, the selectedExam is retrieved from the model and passed to the ExamPredicate constructor along with the prefix and keyword.
Otherwise, the PersonDetailPredicate class is created with the prefix and keyword.
Updating Filtered Person List
The ModelManager class implements the Model interface and manages the application's data. It maintains a filteredPersons list,
which is a filtered list of contacts based on the applied predicate. The updateFilteredPersonList method implemented in ModelManager
updates the filtered list based on the predicate provided.
When the FindCommand is executed, the updateFilteredPersonList method is called with either the PersonDetailPredicate or ExamPredicate as a parameter.
This updates the filteredPersons list to show only persons that fulfill the conditions set in the test method in either of the predicates.
User Interface Interaction
After the filteredPersons list is updated, the user interface is updated such that the PersonListPanel now shows persons that fulfill the predicate generated by the original user input.
The following sequence diagram illustrates the find command with the user input find n|Alice.
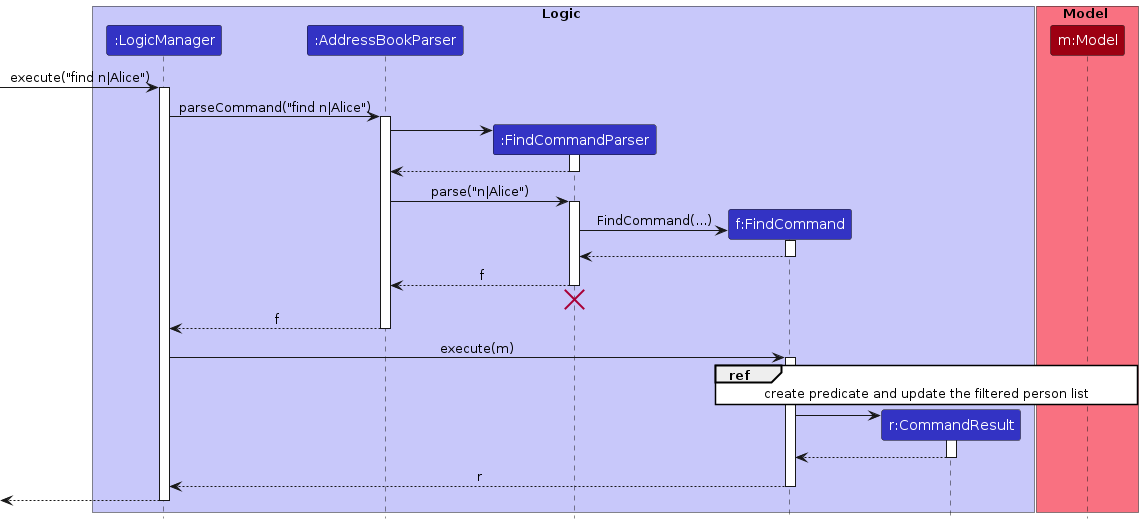
The next sequence diagram details the creation of the predicate, as well as the updating of the filteredPersons list in the Model component.
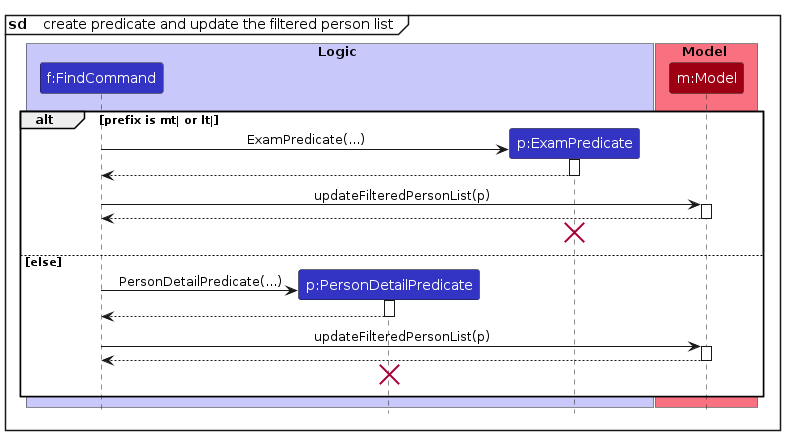
The following activity Diagram illustrates the user execution of the find command.
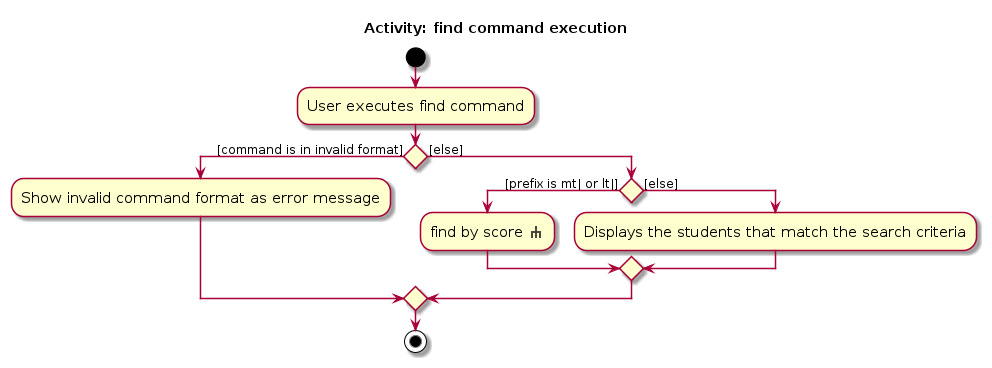
The next activity diagram is an expansion of the previous diagram, detailing the case where the user searches for contacts based on exam scores.

Design Considerations
User Interface Consistency
The choice of implementing the command to use prefixes to determine the filter criteria ensures consistency with other commands in the application. As this command follows a similar structure to all other commands, it is easier for users to learn and use the application.
Flexibility in Search Criteria
By allowing users to specify search criteria using different prefixes (name, phone, email, etc.), the implementation offers flexibility. Users can search for contacts based on various details, enhancing the usability of the feature.
In the context of our potential users, we considered that users would likely have to sometimes filter students by their classes, or filter people by their roles (student, tutor, professor). So we opted to implement this feature with the flexibility of using all prefixes to account for all these potential use cases.
Furthermore, with consideration that our potential users will interact with exam scores, we wanted to integrate the find functionality
to search for contacts based on exam scores. Hence, we decided to introduce the mt| and lt| prefixes to allow users to search for contacts based on exam scores.
Two Predicate Classes
The implementation of two predicate classes, PersonDetailPredicate and ExamPredicate, allows for a clear separation of concerns.
The PersonDetailPredicate class is responsible for filtering contacts based on details like name, phone number, etc.,
while the ExamPredicate class is responsible for filtering contacts based on exam scores.
The alternative would be to have a single predicate class that handles all filtering, but this would make this supposed class more complex and harder to maintain.
Predicate-based Filtering
As the Model class was built prior to the implementation of this feature, we did our best to re-use available methods
instead of unnecessarily reprogramming already existing logic. Hence, we decided to craft the command around the idea of a
custom predicate as the Model class already had a updateFilteredPersonList method implemented that would filter persons using a predicate.
Extensibility
This design allows for easy extension to accommodate future enhancements or additional search criteria.
New prefixes can be added to support additional search criteria without significant changes as we merely need to update our Predicate logic.
This ensures that the implementation remains adaptable to evolving requirements and we can upgrade and improve the feature whenever required.
Delete Shown Command : deleteShown
The deleteShown command relies on the filteredPersons list in the Model component to delete the persons currently displayed in the PersonListPanel.
Executing the Command
The deleteShown command first retrieves the filteredPersons list from the Model component using the getFilteredPersonList method. The deleteShown command then iterates through the filteredPersons list and deletes all currently shown Persons from the UniquePersonList.
If the currently filtered list does is not showing between 0 and the total number of existing persons, the deleteShown command will throw a CommandException.
Updating Filtered Person List
After deleting all persons currently displayed in the PersonListPanel, the filteredPersons list in the Model component is updated to show all remaining persons in the persons list.
The following activity diagram illustrates the workflow of the execution of the deleteShown command:
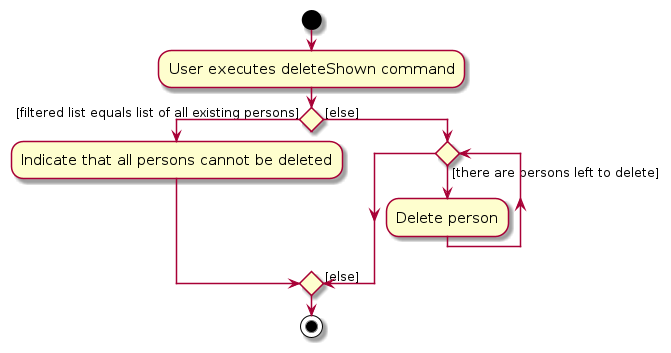
Design Considerations
Reliance on find Command
Similarly to the copy command, the deleteShown command is designed to be used with the find command, which filters the persons displayed in the PersonListPanel. Consequently, the flexibility of the deleteShown command relies heavily on the implementation of the find command. Due to this dependency, any changes to the find command may affect the functionality of the deleteShown command.
Import Contacts Command : import
The import command allows users to import contacts from a CSV file. Users can specify the file path of the CSV file to
import contacts from and with the validation and checking of the CSV rows, person objects can be added to the persons list in the application.
Parsing User Input
The ImportCommandParser class is responsible for parsing user input to extract the file path of the CSV file to be imported. It uses the ArgumentTokenizer to tokenize the input string, extracting the file path of the CSV file to be imported.
Executing the Command
The ImportCommand class first makes use OpenCSV library which parses the CSV file into a List<String[]>, with each String[]
representing a row in the CSV file. The List<String[]> is further parsed row by row by the readCsvFile method, which
returns a Pair. The key of the returned Pair is a personsData list containing the Person objects successfully parsed from the CSV file and the value is an error report containing all the errors that occurred during the process of reading from the CSV file.
The ImportCommand then iterates through the personsData list and adds each Person object to the Model component
through repeated use of the AddCommand. Errors that occur during this process are also added to the error report.
In summary, The import process is done in the following steps:
Handling duplicate persons
Duplicate records in the imported CSV file is handled by AddCommand, which will check if the person already exists in the model. If the person already exists, the AddCommand throws a CommandException which is caught by the ImportCommand and added to an error report.
Handling invalid CSV files
Invalid files are handled by ImportCommand, with the help of ImportCommandParser and CsvUtil. ImportCommandParser will check if is a CSV file.
CsvUtil will check if the CSV file is valid and will return a list of persons and an error report. The error report will be displayed to the user if there are any errors.
Overall, the conditions checked are:
If the file is not valid, an error message will be returned.
Handling duplicate headers in the CSV file
Handled by CsvUtil. The first occurrence of the header will be used and the rest will be ignored.
The sequence diagrams below illustrates the interactions within the Logic component when the user issues the command import.
Parsing
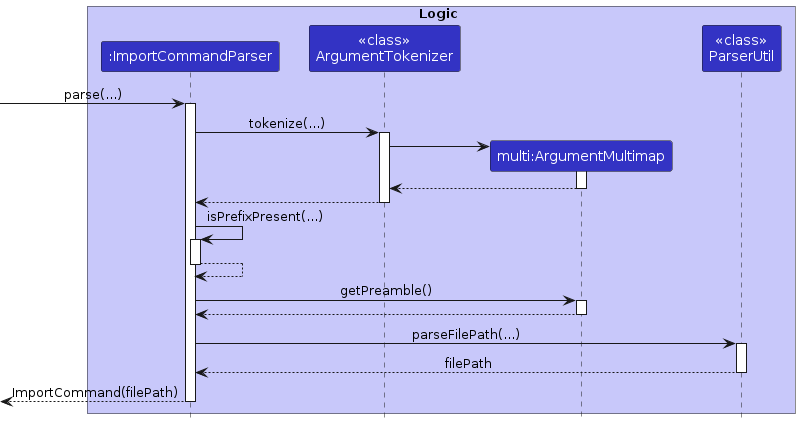
Execution
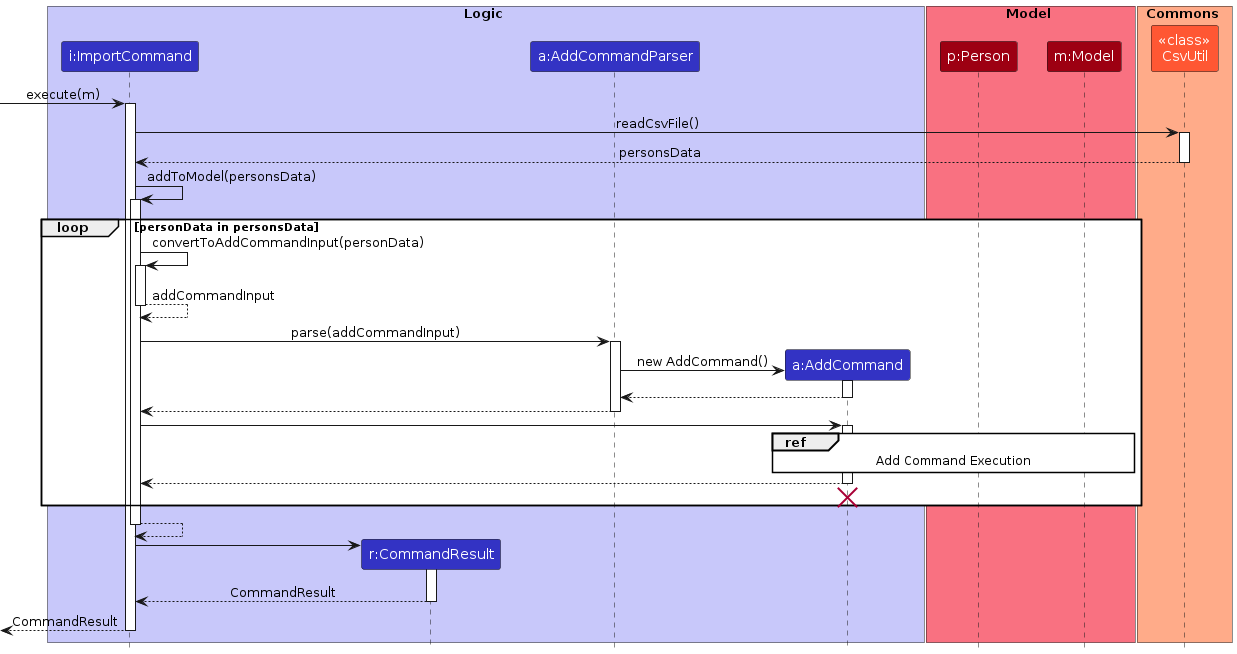
Reference Diagram for each addCommand in importCommand
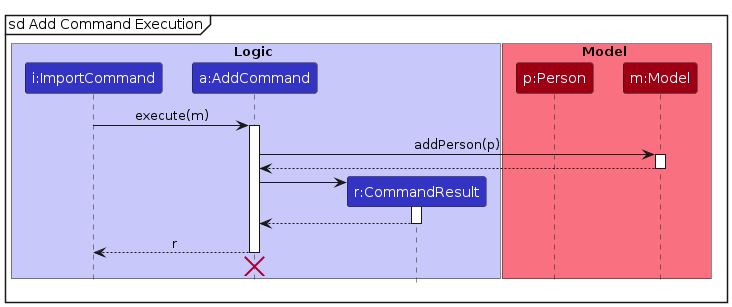
Design Considerations
Usage of AddCommand
The main concern in the increased coupling between ImportCommand and AddCommand. However, we established that this coupling was actually a good thing, as the incorporation of the AddCommand allowed us to reuse the validation and error handling that was already implemented in the AddCommand. Furthermore, should we ever need to change the validation and error handling in the AddCommand, the ImportCommand would automatically inherit these changes. By making AddCommand the gate in which all persons are added to the model, we ensure that all persons added to the model are validated and handled in the same way.
Copy Command : copy
The copy command enables users to quickly copy the email addresses of the persons currently displayed to them in the
PersonListPanel. The copied emails are stored in the users' clipboard and can be pasted into an email client.
This feature is useful when users need to send emails to a group of persons.
The copy command is a child of the command class and relies on the filteredPersons list in the Model component,
as well as the java.awt package to copy the emails of all currently displayed persons to the users' clipboard.
Parsing User Input
The CopyCommand class is instantiated directly by the AddressBookParser class when the user inputs the copy command.
This is because the copy command does not require any additional arguments from the user.
Executing the Command
The CopyCommand class is responsible for executing the command for obtaining the emails of the filtered persons and copying them to the clipboard.
It iterates through the filteredPersons list in the Model component and extracts the email addresses of each person.
The email addresses are then concatenated into a single string, separated by commas, and copied to the clipboard using the java.awt package.
User Interface Interaction
After the CopyCommand is executed, the UI component updates the ResultDisplay to show a message indicating that the emails have been copied to the clipboard.
The following activity diagram summarizes the steps involved in executing the copy command:
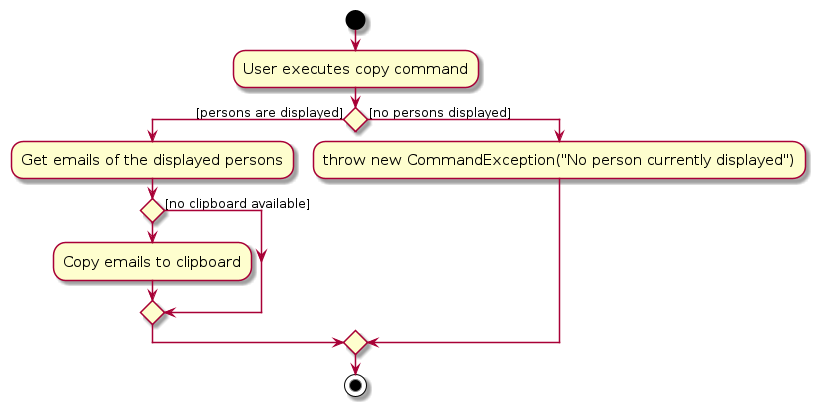
Considerations
Reliance on find Command
The copy command is designed to be used with the find command, which filters the persons displayed in the PersonListPanel.
Consequently, the flexibility of the copy command relies heavily on the implementation of the find command.
Due to this dependency, any changes to the find command may affect the functionality of the copy command.
Extensibility
Due to the simplicity of the copy command, there are limited opportunities for extending its functionality.
However, future enhancements could include the ability to copy other details of persons, such as phone numbers or addresses.
Alternative Implementations
Alternative 1: Copying emails of all persons
Copies the emails of all persons in the persons list, regardless of whether they are currently displayed in the PersonListPanel.
However, this approach may lead to users copying a large number of emails unintentionally, which could be overwhelming.
Furthermore, it may not be clear to users which emails are being copied.
Alternative 2: Copying emails into a file
Instead of copying the emails to the clipboard, the emails could be saved into a file. This approach would allow users to access the emails at a later time and would prevent the loss of copied emails if the clipboard is cleared. However, it may be less convenient for users who want to paste the emails directly into an email client.
Export Command : export
The export command allows users to export the details of each person currently displayed in the PersonListPanel to a CSV file. The CSV file is generated in the file ./addressbookdata/avengersassemble.csv.
The user can first use the find feature to filter out the relevant persons, which will be displayed in the PersonListPanel.
The export feature also relies on the Jackson Dataformat CSV module and the Jackson Databind module to write the details of persons to the CSV file ./addressbookdata/avengersassemble.csv.
Parsing User Input
The export command does not require any additional arguments from the user. Hence, an ExportCommandParser class is not required.
AddressBookParser directly creates an ExportCommand object.
Executing the Command
Data Retrieval
The sequence diagram illustrates the interactions between the Logic and Model components when data is being retrieved from Model when export is executed:
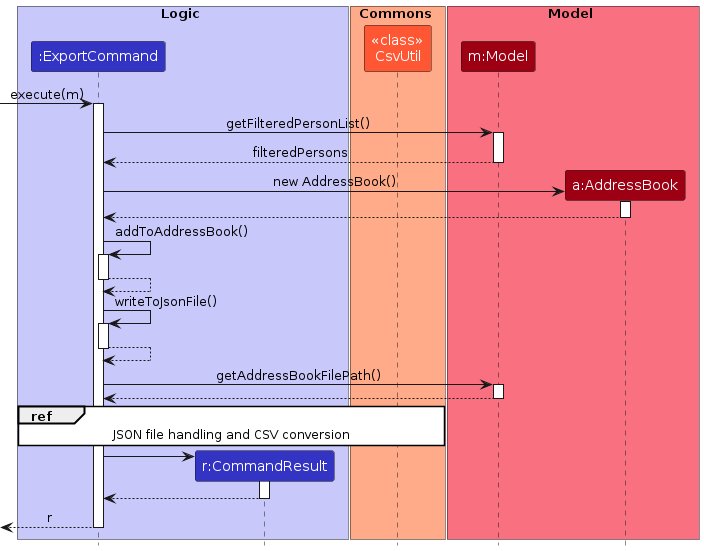
JSON File Handling
The contents of both the JSON files retrieved in the above section is read with the readJsonFile() method in ExportCommand and returned as JSON trees, filteredJsonTree and unfilteredJsonTree.
This method uses Jackson's ObjectMapper.
CSV Conversion
A CSV file, avengersassemble.csv, to write the data to, is created.
Its directory is also created using the createCsvDirectory() method in ExportCommand if the directory does not exist.
The CSV schema is dynamically built based on the structure of the JSON array using the buildCsvSchema() method in CsvUtil. This method relies on the Jackson Dataformat CSV module to build the CSV schema.
The CSV schema and JSON data are used to write to the CSV file using Jackson's CsvMapper.
The following sequence diagram shows the interactions within the different classes in the JSON file handling section and CSV conversion section when the export command is executed:
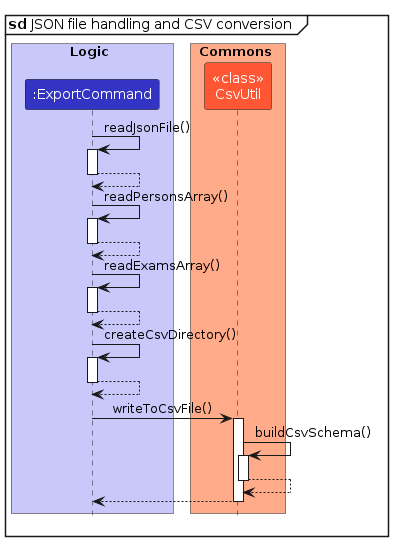
Design Considerations
Obtaining Exam Names from exams Array in the Address Book File Path
Adding Exam: to Exam Names in the CSV Column Headings
Since users have the flexibility to determine the names of exams added, there's a possibility of adding an exam with the same name as a field (e.g. reflection).
This could lead to confusion when mapping the CSV schema and JSON data.
Therefore, appending Exam: to the beginning of exam names in the CSV column headings can help mitigate this potential confusion.
Feature: Addition of Optional Fields (Matric)
The optional Matric field enables the user to store the matriculation number of a person. The field is stored as a Matric in the Person object.
Note: The optional Studio and Reflection fields are similarly implemented.
Implementation Details
The Matric class is a simple wrapper class that ensures it is valid according to NUS matriculation number format and is not empty.
The Matric field is used by the add and edit commands.
Parsing User Input: add
For the add command, as opposed to the name and other fields, the parser does not check if a prefix for Matric is present. This is because we define the Matric field to be optional as contacts (e.g. professors) do not need to have a matriculation number.
The parser also verifies that there are no duplicate prefixes for Matric in a single add command. A new Person is then created with the Matric field set to the parsed Matric object.
If there is no Matric field present, the Matric field of the new Person object is set to null.
Parsing User Input: edit
For the edit command, the parser will add or update the Matric field of the person being edited.
Feature: Automatic Tagging of Persons
A student tag is automatically added during the parsing of the add command based on the presence of the Matric field of the person being added.
Implementation Details
During the parsing of the add command, the parser will check if the Matric field is present, indicating that they are a student.
The parser also generates Tag objects based on the user input. The existing tags are updated with the new automatically generated tag.
The activity diagram is as follows:
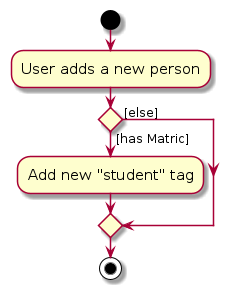
Exam Features
There are 4 main commands that are used to interact with the exam feature: addExam, deleteExam, selectExam and deselectExam.
All exams are stored in the UniqueExamList object in AddressBook of the Model component. The Model component also stores the currently selected exam in the selectedExam field.
Add Exam Command : addExam
The addExam command allows users to add an exam to the application.
The user can specify the name of the exam and the maximum score of the exam.
The exam is then added and stored in the UniqueExamList.
Parsing User Input
The AddExamCommandParser is responsible for parsing user input to extract the name and the maxScore of the exam.
It uses the ArgumentTokenizer to tokenize the input string, extracting name and maxScore.
It ensures that name and maxScore are valid and present in the user input, and that there are no duplicate prefixes in the user input.
The name and maxScore are then used to instantiate an AddExamCommand.
Executing the Command
The AddExamCommand class creates a new Exam object with the parsed arguments
It adds the Exam to the UniqueExamList through the addExam method in the Model component.
If the exam already exists in the list, a CommandException is thrown.
Delete Exam Command : deleteExam
The deleteExam command allows users to delete an exam from the application.
The user can specify the index of the exam to be deleted.
The exam is then removed from the UniqueExamList.
Parsing User Input
The DeleteExamParser is responsible for parsing user input to extract the index of the exam to be deleted.
It uses the ArgumentTokenizer to tokenize the input string, extracting the index.
It ensures that the index is valid and present in the user input, and that there are no other prefixes in the user input.
The index is used to instantiate a DeleteExamCommand.
Executing the Command
The DeleteExamCommand uses the index to delete the exam from the UniqueExamList in the Model component.
It first retrieves the UniqueExamList by using the getExamList method in the Model component.
It then retrieves the exam from the UniqueExamList using the user provided index.
If the index is greater than the size of the list, a CommandException is thrown.
Using the retrieved exam, it then deletes the exam from the UniqueExamList through the deleteExam method in the Model component.
Sequence Diagrams Illustrating Exam Modification
The following two sequence diagram illustrates the interactions between the Logic and Model when an exam is modified. This diagram uses the addExam command as an example.
Parsing
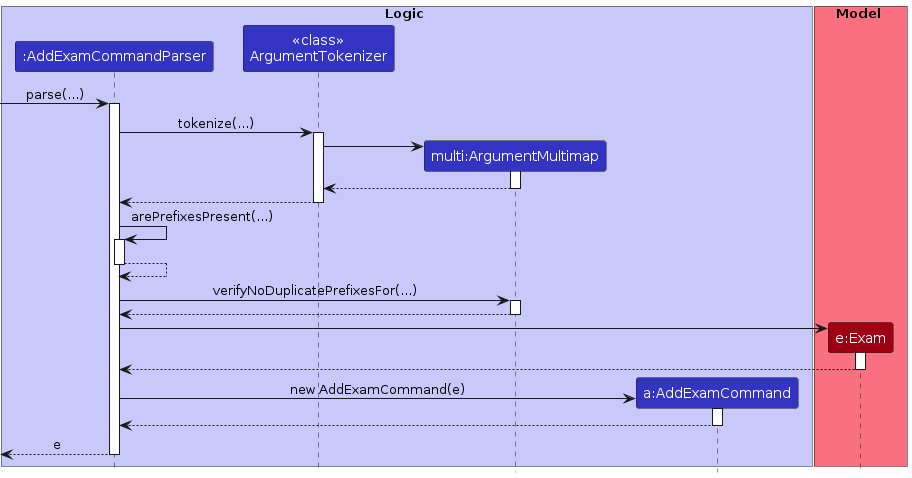
Execution
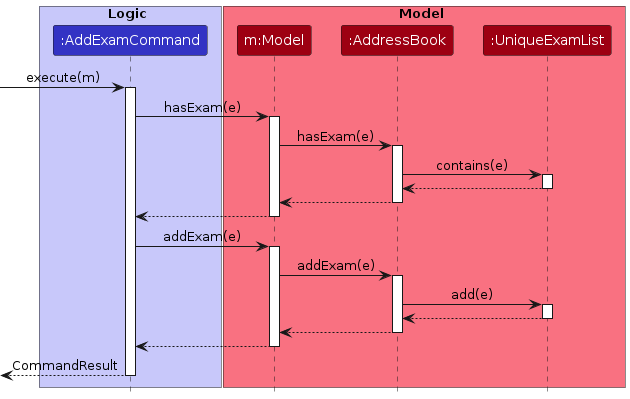
Note: deleteExam follows a similar structure, differing in the arguments parsed and the methods called on the Model component (e.g. deleting from UniqueExamList instead of adding to it).
Select Exam Command : selectExam
The selectExam command allows users to select an exam from the UniqueExamList.
The selection of exams is heavily used in conjunction with our exam score features.
Parsing User Input
The SelectExamCommandParser is responsible for parsing user input to extract the index of the exam to be selected.
It uses the ArgumentTokenizer to tokenize the input string, extracting the index.
It ensures that the index is valid and present in the user input, and that there are no other prefixes in the user input.
Executing the Command
The SelectExamCommand uses the index to select an exam from the UniqueExamList in the Model component.
It first retrieves the UniqueExamList by using the getExamList method in the Model component.
It then retrieves the exam from the UniqueExamList using the user provided index.
If the index is greater than the size of the list, a CommandException is thrown.
Using the retrieved exam, it then sets the selectedExam field in the Model component using the selectExam method.
Deselect Exam Command : deselectExam
The deselectExam command allows users to deselect the currently selected exam.
Parsing User Input
The deselectExam command does not take any arguments from the user.
Hence, a DeselectExamCommandParser is not required. AddressBookParser directly creates a DeselectExamCommand object.
Executing the Command
The DeselectExamCommand uses the deselectExam method in the Model component to deselect the currently selected exam.
It sets the selectedExam field in the Model component to null.
If there is no exam selected, a CommandException is thrown.
Sequence Diagrams Illustrating Exam Selection
The following sequence diagram illustrates the interactions between the Logic and Model when the SelectExamCommand is executed.
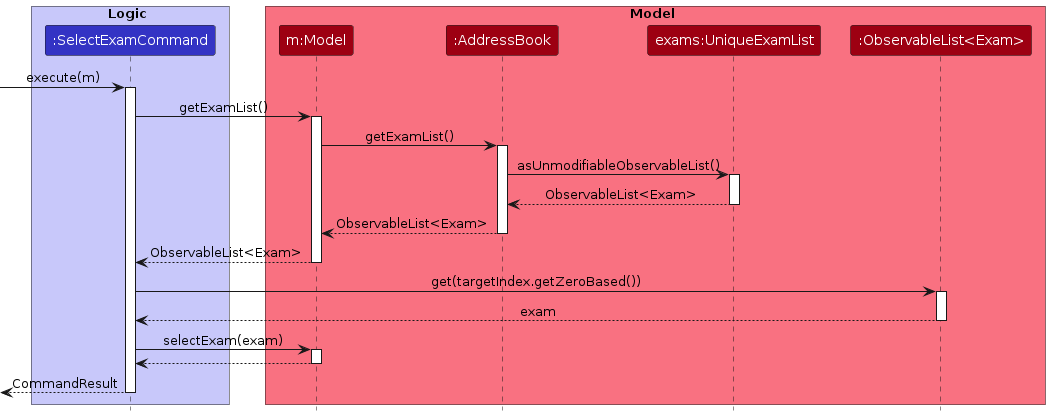
Notes:
Considerations for Exam Features
Using a Selection System for Exams
We decided to implement a selection system for exams to complement the exam score feature. The application would only display the scores of the selected exam, making it easier for users to manage and view the scores.
Our alternative design was to display the scores of all exams at once on every person. However, this alternative design would have made the UI cluttered and less user-friendly. The selection system allows users to focus on the scores of a specific exam, making it easier to view and manage the scores.
Using Index for Exam Selection
We were initially torn between the selection of exams using the exam name or the index. We eventually settled on using the index as it is easier for users to type and remember short numeric codes rather than potentially long and complex exam names which are more prone to typographical errors.
Allowing Deselection of Exams
We decided to allow users to deselect exams as the exam scores and score statistics are displayed based on the selected exam. Deselecting the exam allows users to get rid of the displayed scores and statistics when they are no longer needed.
Extensibility
The design of the exam feature allows for easy extension to accommodate future enhancements or additional functionalities. Methods for managing exams are implemented in the Model component, and the updating of UI for Exams is abstracted into the UI component, Making it easy to add new commands or features related to exams.
Exam Score Features
There are 3 main commands that are used to interact with exam scores of each person: addScore, editScore and deleteScore.
Add Score Command : addScore
The addScore command allows users to add a score for an exam to a person displayed in the application.
The user should select the exam they want to add a score for, then specify the index of the person they want to add a score for, and the score they want to add.
The score is then stored in a hashmap named scores within the Person object in the Model component.
This hashmap maps the selected exam (an Exam object) to the specified score (a Score object).
Parsing User Input
The AddScoreCommandParser is responsible for parsing the user input to extract the index of the person in the displayed list to add a score to, and the score to add.
It uses the ArgumentTokenizer to tokenize the input string, extracting the index and score.
It also ensures that the index and score input value is valid, and that there are no duplicate prefixes in the user input.
The index and score is then used in instantiating the AddScoreCommand by the AddScoreCommandParser.
The following sequence diagram illustrates the parsing of an addScore command with the user input addScore 1 s|100:
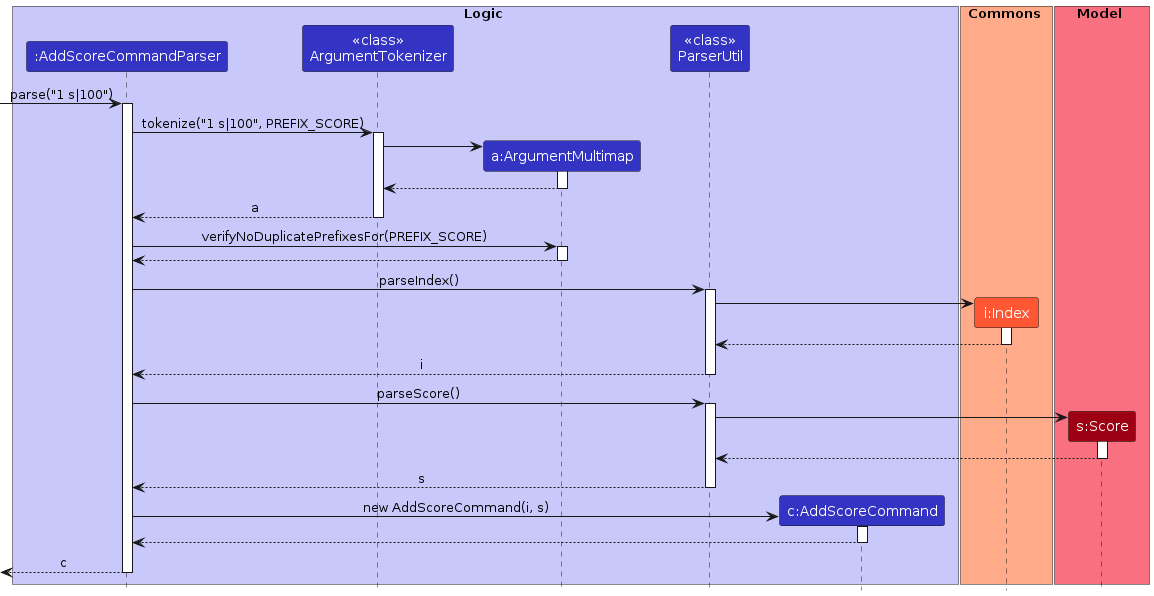
Executing the Command
The execute method in AddScoreCommand retrieves the filteredPersons list in Model, and validates the target index against the list of filtered persons to ensure it is not out of bounds.
It then fetches the person to add the score for based on the target index.
It also retrieves the currently selected exam from the Model, and validates that the score to be added is not more than the maximum score of the selected exam.
It adds the score to the person's existing scores hashmap using the addExamScoreToPerson method in the Model.
The following sequence diagram illustrates the execution of an addScore command:
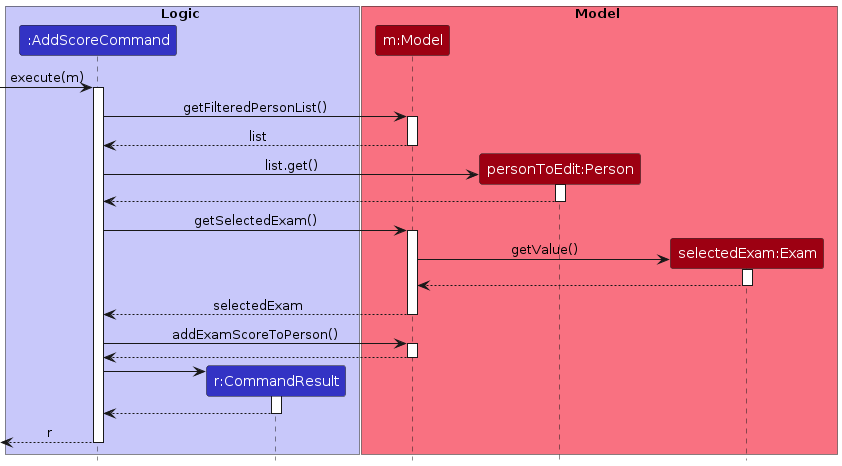
Edit Score Command : editScore
The editScore command allows users to edit a score for an exam of a person displayed in the application.
The user should select the exam they want to edit the score for, then specify the index of the person they want to edit the score for, and the new score they want to edit to.
The updated score is then stored in a hashmap named scores within the Person object in the Model component.
This hashmap maps the selected exam (an Exam object) to the updated specified score (a Score object).
Parsing User Input
The EditScoreCommandParser is responsible for parsing the user input to extract the index of the person in the displayed list to edit the score for, and the new score to edit to.
It uses the ArgumentTokenizer to tokenize the input string, extracting the index and score.
It also ensures that the index and score input value is valid, and that there are no duplicate prefixes in the user input.
The index and score is then used in instantiating the EditScoreCommand by the EditScoreCommandParser.
Executing the Command
The execute method in EditScoreCommand retrieves the filteredPersons list in Model, and validates the target index against the list of filtered persons to ensure it is not out of bounds.
It then fetches the person to edit the score for based on the target index.
It also retrieves the currently selected exam from the Model, and validates that the score to be added is not more than the maximum score of the selected exam.
It updates the score for the selected exam in the person's existing scores hashmap using the addExamScoreToPerson method in Model.
Delete Score Command : deleteScore
The deleteScore command allows users to delete a score for an exam from a person displayed in the application.
The user should select the exam they want to delete the score for, then specify the index of the person they want to delete the score for.
The key-value pair (exam-score) is removed from the scores hashmap within the Person object.
This operation removes both the selected exam (key) and the score (value), effectively deleting the score from Person.
Parsing User Input
The DeleteScoreCommandParser is responsible for parsing the user input to extract the index of the person in the displayed list to delete the score for.
It uses the ParserUtil to parse the input string, extracting the index.
It also ensures that the index is valid, and that there are no duplicate prefixes (i.e. there is only one index value) in the user input.
The index is then used in instantiating the DeleteScoreCommand by the DeleteScoreCommandParser.
The following sequence diagram illustrates the parsing of an deleteScore command with the user input deleteScore 1:
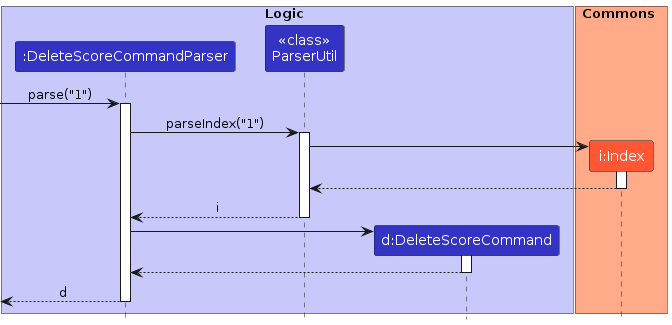
Executing the Command
The execute method in DeleteScoreCommand retrieves the filteredPersons list in Model, and validates the target index against the list of filtered persons to ensure it is not out of bounds.
It then fetches the person to delete the score for based on the target index.
It also retrieves the currently selected exam from the Model.
It removes the score for the selected exam in the person's existing scores hashmap using the removeExamScoreFromPerson method in Model.
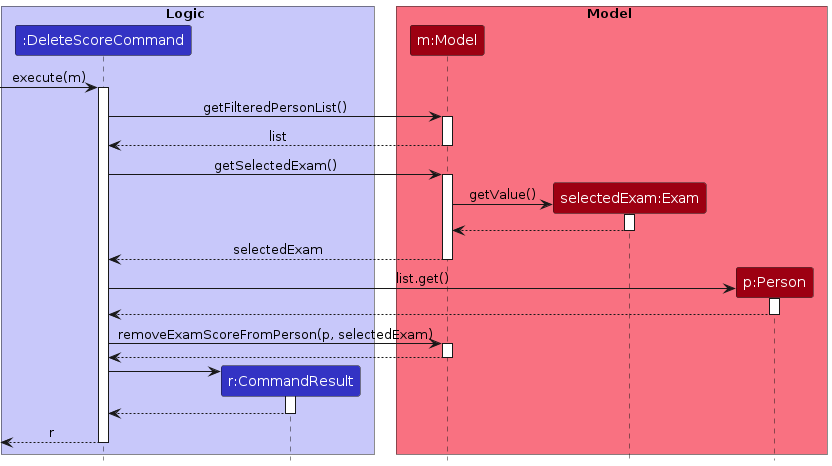
Import Exam Scores Command : importExamScores
The importExamScores command lets users import exam scores corresponding to existing exams and persons from a CSV file.
Parsing User Input
The ImportExamScoresParser class is responsible for parsing the user input. It uses the ArgumentTokenizer to tokenize the input string, extracting the file path of the CSV file to be imported.
Executing the Command
Parsing CSV File
The ImportExamScoresCommand class reads the CSV file with the given file path.
The CSV file is parsed with the OpenCSV library and a List<String[]> is created, with each String[] representing a row in the CSV file.
File Validation
After parsing, a mapping of Exam objects to an inner mapping of an email string to a Double score is created. This mapping is used to validate the data in the CSV file.
If the file is invalid, an error message is returned.
The validation workflow for the file is as follows:
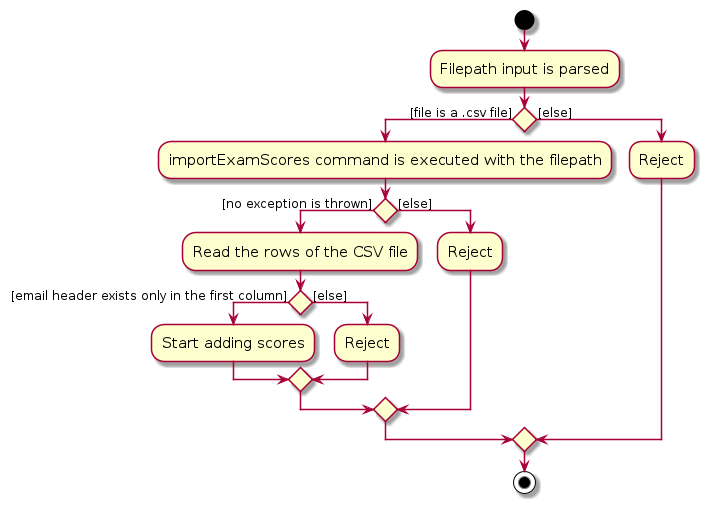
If the file is valid, any invalid entries will be ignored, with the rest being successfully processed.
A column will be ignored if:
A row will be ignored if:
A cell will be ignored if:
Value Validation
For every valid row:
The Double is parsed into a Score object.
The Model object is then used to:
Concrete Examples of Validation
For concrete examples of the validation process, refer to the manual testing section of the importExamScores command.
Score Statistics Feature
The exam statistics feature allows users to view the mean and median scores of the selected exam. The statistics are displayed in the StatusBarFooter element of the UI on the right side.
The statistics are automatically updated whenever the selected exam is changed or when there are potential modifications to the scores of the selected exam.
When there are no scores for the selected exam, the statistics are displayed as No scores available. When no exam is selected, the statistics are not displayed at all.
Storage of Exam Statistics
The ScoreStatistics class is used to store the mean and median scores of the selected exam. The Model component stores the ScoreStatistics object for the currently selected exam as a SimpleObjectProperty<ScoreStatistics>.
Updating of Exam Statistics
the ModelManager class implements a updateSelectedExamStatistics and getSelectedExamStatistics method to update the statistics.
updateSelectedExamStatistics is called whenever the selected exam is changed or when there are potential modifications to the scores of the selected exam (deletion of a Person, adding of Score, etc.). This ensures that the selectedExamStatistics object is always kept up-to-date with the scores of the selected exam.
The sequence diagram below illustrates the interactions within the Model component when the score statistics are updated using the selectExam command as an example.

User Interface Interaction
The StatusBarFooter element of the UI is initialized with an ObservableValue<ScoreStatistics> object. This object is bound to the selectedExamStatistics object in the Model component and is retrieved using the getSelectedExamStatistics method.
Whenever a command is executed, the StatusBarFooter retrieves the updated statistics and displays them on the right side of the footer which can be seen at the bottom of the UI.
Considerations for Exam Statistics Command
Storage of Exam Statistics
There were considerations to just avoid the storage of the statistics and calculate them on the fly whenever needed. However, this would have been inefficient as the statistics would have to be recalculated every time the selected exam is changed or when there are potential modifications to the scores of the selected exam. By storing the statistics, we can limit recalculations to only when necessary.
Furthermore, storing the statistics allows us to maintain the code structure of our UI component, which is designed to observe and retrieve data from the Model component. If the statistics were to be calculated on the fly, the UI component would have to either calculate the statistics itself or request the Model component to calculate the statistics, which would have complicated the code structure by introducing more dependencies between the UI and Model components.
Using ScoreStatistics Class
The ScoreStatistics class was used to store the mean and median scores of the selected exam. This class was chosen as it provides a clean and structured way to store the statistics. The class also provides extensibility, as additional statistics can easily be added in the future by extending the class.
Planned Enhancements
Enhance Input Validation for find Command
Currently, the find command only validates the lt and mt prefixes, where other prefixes are not validated. This means that users may search for persons with fields that do not exist to begin with, which is guaranteed to return no results.
Planned Implementation
We plan to enhance the find command to validate all prefixes other than lt and mt. This will ensure that users are not able to search for persons with fields that do not exist in the Person object.
However, we need to be careful about overzealous input validation where users may still want to search for fields using incomplete parts of a field, and hence we have to balance these two considerations.
For example, an extreme case will be to search for persons with the Name field with ~, which is disallowed to begin with as ~ is not a valid character for a name. We plan to inform the user outright that the search is invalid and will not return any results.
Update UI to Wrap Text
Currently, the ResultDisplay box does not wrap text, which means that long lines of text will extend beyond the width of the box. This results in the need for two scroll bars, a horizontal one for the result box and a vertical one for the currently shown list of persons. This is not ideal as it makes the UI less optimized for the target audience, who prefer using a CLI-optimized application and prefer not to use mouse controls to scroll through scroll boxes.
Planned Implementation
We plan to modify the ResultDisplay box to wrap text so that there is no longer a need for the horizontal scroll bar in the ResultDisplay box.
In the case where the wrapped text still exceeds the height of the ResultDisplay box, we plan to enable it to dynamically adjust its height as needed.
Primary Key: Use Both Matric and Email
Currently, only Email is used as a unique identifier for Person objects. However, this means that two Person objects can have different Emails but the same Matric number. This clashes with the real-life constraint that NUS students, in particular CS1101S students, are put under, where Matriculation numbers are supposed to be unique for each student. Our planned enhancement hence aims to better reflect real-life constraints.
Planned Implementation
Currently, the hasPerson method in the Model class checks for the existence of a Person object based on the Email field. We plan to modify this method to check for the existence of a Person object based on both the Email and Matric fields. This will ensure that two Person objects cannot have the same Matric number.
However, more checking needs to be done to ensure persons cannot have different overall unique identifiers, but the same Email or Matric field. (E.g. two persons cannot have the same Email but different Matric numbers.)
Additionally, some persons such as staff members and course instructors may not have a Matric field. Hence, careful consideration needs to be made to implement this new method of checking for unique identifiers.
UX: Make Sample Data Tags More Relevant and Helpful to the User
Currently, the sample data tags are not very helpful to the user, having tags like friends, neighbors and family. This may pose confusion to users about the context of the application, which is the head TA's management of persons related to CS1101S.
Planned Implementation
Remove all Tag objects that are in the sample data that border on irrelevancy. This can be done by modifying the SampleDataUtil class to not add these tags to the sample data.
Retain all other relevant Tag objects like colleagues and student to better reflect the context of the application.
Documentation, Logging, Testing, Configuration, Dev-Ops
Appendix
Appendix A: Product Scope
Target user profile:
Name: Sarah Johnson, Age: 23, Occupation: Head Tutor for CS1101S
Value proposition:
Problem scope:
Appendix B: User Stories
Priorities: High (must have) - * * *, Medium (nice to have) - * *, Low (unlikely to have) - *
General
| Priority | As a … | I want to … | So that I can… |
|---|---|---|---|
| * * * | potential user exploring the app | see the app populated with sample data | immediately see an example of the app in use |
| * * * | new user | see usage instructions | refer to instructions when I forget how to use the App |
| * * * | new user | easily clear the example data | start using the app with real-life data |
| * * | experienced user | use the application offline | update and interact with it anywhere |
For Contact Management
| Priority | As a … | I want to … | So that I can… |
|---|---|---|---|
| * * * | head tutor using the app | import persons from a CSV file | easily add a large number of persons to the application |
| * * * | new user | save the data I input into the app | don't lose the information I've entered |
| * * * | user | add a new person | make minor additions to the persons in the application |
| * * * | user | update and edit person details | keep my persons list accurate |
| * * * | user | delete a person | remove entries that I no longer need |
| * * * | user | delete a specific group of entries | remove multiple entries that I no longer need more efficiently |
| * * * | user | view all saved contacts | oversee the data stored within my app |
| * * * | user | find a person through their particulars | locate details of persons without having to go through the entire list |
| * * * | head tutor using the app | categorize my persons into groups | manage different groups of students effectively |
| * * * | head tutor using the app | copy email addresses of a group | effectively communicate with target groups |
| * * * | head tutor using the app | export the details of persons to a CSV | easily share the details of a group with others |
For Exam and Score Management
| Priority | As a … | I want to … | So that I can… |
|---|---|---|---|
| * * * | head tutor using the app | import assessment scores from a CSV file | easily add a large number of scores to the application |
| * * * | head tutor using the app | add exams to the app | keep track of student performance |
| * * * | head tutor using the app | delete exams from the app | remove exams that are no longer relevant |
| * * * | head tutor using the app | view scores for a specific exam | analyze student scores |
| * * * | head tutor using the app | add scores to the app | keep track of student performance |
| * * * | head tutor using the app | edit scores in the app | correct errors in the scores |
| * * * | head tutor using the app | delete scores from the app | remove scores that are no longer relevant |
| * * * | head tutor using the app | export scores to a CSV file | easily share the scores with others |
| * * * | head tutor using the app | view statistics of scores | analyze student performance |
Appendix C: Use Cases
(For all use cases below, the System is the AvengersAssemble and the Actor is the user, unless specified otherwise)
Use Case: UC01 — Getting Help
MSS:
Use Case: UC02 — Clearing Sample Data
MSS:
Use Case: UC03 — Importing Person Details from a CSV File
MSS:
Extensions:
Use Case: UC04 — Adding a Person
MSS:
Extensions:
Use Case: UC05 — Editing a Person's Details
MSS:
Extensions:
Use Case: UC06 — Deleting a Person
MSS:
Extensions:
Use Case: UC07 — Deleting All Shown Persons
MSS:
Extensions:
Use Case: UC08 — Listing All Persons
MSS:
Extensions:
Use Case: UC09 — Finding Persons
MSS:
Extensions:
Use Case: UC10 — Copying Email Addresses
MSS:
Extensions:
Use Case: UC11 — Exporting Persons to CSV
MSS:
Extensions:
Use Case: UC12 — Importing Exam Results from a CSV File
MSS:
Extensions:
Use Case: UC13 — Adding an Exam
MSS:
Extensions:
Use Case: UC14 — Deleting an Exam
MSS:
Extensions:
Use Case: UC15 — Selecting an Exam
MSS:
Extensions:
Use Case: UC16 — Deselecting an Exam
MSS:
Extensions:
Use Case: UC17 — Adding Scores to a Student for an Exam
MSS:
Extensions:
Use Case: UC18 — Editing Scores for a Student for an Exam
MSS:
Extensions:
Use Case: UC19 — Deleting Scores for a Student for an Exam
MSS:
Extensions:
Use Case: UC20 — Viewing Statistics of Scores
MSS:
Extensions:
Use Case: UC21 — Exit Application
MSS:
Appendix D: Non-Functional Requirements
Appendix E: Glossary
Appendix F: Instructions for Manual Testing
Given below are instructions to test the app manually.
Note: These instructions only provide a starting point for testers to work on; testers are expected to do more exploratory testing.
Launch and Shutdown
Saving Data
Getting Help: help
Command: help
More information on usage: Getting Help
Clearing All Persons and Exams: clear
Command: clear
More information on usage: Clearing All Entries
Importing Persons: import
Command: import
More information on usage: Importing Persons
The import command requires the use of an external CSV file. The test cases below assume that the tests are run on a Windows system, and that the CSV file is located at the path C:\path\to\file.csv. Please modify the filepath accordingly based on where your file is stored and your operating system.
On MacOS, you can drag the file into the terminal to get the file path.
On Linux, you can use the
pwd command to get the current directory and append the file name to it.
Adding a Person: add
Command: add
More information on usage: Adding a Person
Editing a Person: edit
Command: edit
More information on usage: Editing a Person
Deleting a Person: delete
Command: delete
More information on usage: Deleting a Person
Deleting Shown Persons: deleteShown
Command: deleteShown
More information on usage: Deleting Filtered Persons
Listing All Persons: list
Command: list
More information on usage: Listing All Persons
Finding a Person: find
Command: find
More information on usage: Filtering Persons
Copying Emails: copy
Command: copy
More information on usage: Copying Emails
Exporting Data to a CSV File: export
Command: export
More information on usage: Exporting Data to a CSV File
Adding an Exam: addExam
Command: addExam
More information on usage: Adding an Exam
Deleting an Exam: deleteExam
Command: deleteExam
More information on usage: Deleting an Exam
Selecting an Exam: selectExam
Command: selectExam
More information on usage: Selecting an Exam
Deselecting an Exam: deselectExam
Command: deselectExam
More information on usage: Deselecting an Exam
Importing Exam Scores: importExamScores
Command: importExamScores
More information on usage: Importing Exam Scores
Adding a Persons's Exam Score: addScore
Command: addScore
More information on usage: Adding an Exam Score
Editing a Person's Exam Score: editScore
Command: editScore
More information on usage: Editing an Exam Score
Deleting a Person's Exam Score: deleteScore
Command: deleteScore
More information on usage: Deleting an Exam Score
Mean and Median of Exam Scores
More information on usage: Mean and Median of Exam Scores
Appendix G: Effort
This section aims to showcase the effort put into Avengers Assemble by our team. We will highlight the difficulty level, challenges faced, and effort required in this project.
Difficulty Level
On top of the Person entity originally implemented by AB3, Avengers Assemble also incorporates an additional entity of
Exam, with Score serving as a connection between the two entities.
With this additional entity added, considerations had to be made regarding the implementation of
different features, interactions between each entity, and the management and storage of these
entities. The consideration of these factors turned out to be more challenging than initially anticipated.
Moreover, in addition to enhancing the original features of AB3 to cater to our target users, Avengers Assemble also introduces
many new commands to improve the usability of our application, as well as to handle the diverse behaviors and interactions
of Person and Exam. This required a significant amount of effort to ensure that the new features were
implemented correctly and seamlessly integrated with the existing features.
Compared to the individual project, the group project was lower in intensity for each of us in terms of lines of code, but the coordination and communication required to ensure that the features were implemented correctly and seamlessly integrated with the existing features added a layer of complexity to the project.
Effort Required
Enhancements to Existing Features
Addition of New Fields to Persons
New fields such as recitation, studio, matriculation number, was added to persons to align with the context of our application.
Find
Our team improved on the existing find command of AB3 to allow for more flexibility. With the new improvements, users
can now find not only based on the name field of persons, but also specify their search based on other fields such as
email and recitation. With the addition of the exam score features, we also adapted our find command to allow users
to filter out persons less than or more than a specified score, revamping the way find is used and handled.
Automatic Tagging of Persons
In the context of our application, it is mainly used to store students', instructors' and teaching assistants' contacts.
Hence, on top of the original behavior of the tag feature, we adapted it to automatically tag contacts with a
matriculation number as students.
User Interface
Enhancements were made to the user interface to improve the user experience. The structure of the user interface was
modified to accommodate the new features, and the theme of the application was changed to follow the theme of the
course that we were developing the application for. Furthermore, the logic for the updating of user interface was also
modified to a more developer-friendly approach which would allow developers to understand and modify the user interface
more easily.
New Features
Copy
Our team introduced a new copy command which allows for users to copy the email addresses of the currently displayed persons.
This is to cater to the context of our application, assisting head tutors with the task of making mass announcements.
Import and Export
To facilitate the handling and managing of large amounts of information, our group introduced the import and export feature to
allow for flexible data movement externally and internally. These features required extensive effort due to how bug prone
they were. This is elaborated upon in the challenges section below.
Exams and Exams Scores
The implementation of the exam and exam score features was the most significant addition to our application, requiring adjustments to existing features and the
introduction of many new commands to handle and manage the addition of exams and exam features. This feature was the most
complex and required the most effort to implement, as it involved the introduction of a new entity, Exam, and the management
of scores for each person for each exam. This is further elaborated upon in the challenges section below.
Challenges Faced
Understanding the Existing Codebase
One of the challenges we faced was understanding the existing codebase of AB3. We had to familiarize ourselves with the structure of the codebase, the interactions between the different classes, and the existing features of AB3. This required us to spend time reading through the code, discussing the existing features, and identifying potential areas where conflicts might arise when adding new features. We also had to consider how to integrate our new features using the existing structure in AB3, and how to ensure that the new features did not conflict with the existing features.
Considerations for New Entity Exam and its Interactions with Person
Our team wanted to implement a feature that would allow users to manage and store exam scores for each person.
It was clear from the start that this would require the introduction of a new entity, Exam, to store information about
each exam. However, we found that there was a challenge in determining how to connect the Person entity with the Exam entity, and how to
manage and store the scores for each person for each exam. This required careful consideration and planning to ensure that
the interactions between the two entities were seamless and intuitive for users. We also had to consider how to handle the
storage of these entities and how to manage the data effectively.
Limited User Interface Space for Score Interaction
One of the greatest challenges was designing a user-friendly interface for score interaction within the limited screen space. We had to devise intuitive methods for users to view, input and manage the scores of various exams, without overwhelming the interface. This proved to be a greater challenge than initially anticipated, as we had to consider trade-offs between functionality and user experience. Lowering the complexity of the interface would result in an interface that is easier to read, but might not provide all the necessary information at a glance and require more user interactions to access the information. On the other hand, a more complex interface would provide more information at a glance, but might overwhelm users with too much information. Striking a balance between these two trade-offs was a challenge that required extended discussions and iterations before arriving at a solution that we were satisfied with: the selection system for exams.
Implementation of Exam and Exam Score Features
After coming to a consensus in regard to the user interface, implementation for exam features seemed straightforward. However, it turned out to be a lot more complex to implement than initially anticipated. Our exam features consisted of many sub-features which included the management of exams, the management of scores, the storage of scores in persons, and the importing of scores. As we were working in a collaborative environment, we had to consider how to distribute the workload in a manner that would prevent conflicts. This required early discussions of the structure of the exam and score features, and how they would interact with the existing features of AB3. We drafted up diagrams to visualize the interactions between each feature. This helped us to identify potential conflicts early on and resolve them through distributing the workload effectively and meeting regularly to discuss progress and issues.
Data Management for Exams and Scores
Handling the data for exams and scores was another challenge that we faced. We had to consider how to store the data for
each exam, how to store the scores for each person for each exam, and how to manage the data effectively.
The storage for exams was relatively straightforward, as we could create an additional list in the AddressBook class to store
the exams. However, the storage for scores was more complex. We had to decide whether to store all the exam score data
in corresponding Exam objects, or store each persons' exam scores in their corresponding Person objects.
There was once again another trade-off to consider: storing all exam score data in the Exam objects would make it
easier to implement exam operations, but would require more complex interactions between the score and person objects.
On the other hand, storing each person's score in their corresponding Person object would make it easier to implement
operations on persons, but would require more complex interactions for exam management. We had to consider the pros and cons
of each approach, before deciding on the latter approach, as we concluded that our application was more person-centric.
Bug Fixing and Testing
A significant challenge we faced was the identification and resolution of bugs. Unit tests for our own features were relatively straightforward to implement, but we found that identifying edge cases proved to be tricky. Certain features were also a lot more bug prone than others, such as the import features, which required extensive testing to ensure that all potential errors were caught and proper error messages were displayed. We also had to ensure that the application handled these errors gracefully and did not crash when these errors occurred.
Achievements
Overall, our group successfully implemented the planned features while addressing bugs and managing potential feature flaws. Despite initial hesitations about implementing significant new features like exams and exam scores, we overcame the challenge and achieved our goals.