Avengers Assemble User Guide
Avengers Assemble (AA) is a desktop app for managing contacts, meant for use with a Command Line Interface (CLI) while still having the benefits of a Graphical User Interface (GUI).
The application is designed for Head Tutors of the NUS CS1101S Programming Methodology course, who intend to simplify their administrative tasks relating to contact management between students, other teaching assistants, and course instructors.
This user guide provides a comprehensive overview of the Avengers Assemble's features and functionalities, and aims to guide you through its setup and usage. We will walk you through each feature in a structured manner:
- Installation,
- Basic commands like adding and editing, and
- Advanced commands like filtering and exporting of data.
By following this guide, you will be able to gain a thorough understanding of Avengers Assemble and maximize its potential to streamline your administrative tasks.
Table of Contents
Click below to navigate the user guide:
- Quick Start
- Outline of Application
- Contact Management Features
- Getting Help:
help - Clearing All Entries:
clear - Importing Persons from a CSV File:
import - Adding a Person:
add - Editing a Person:
edit - Deleting a Person:
delete - Deleting Filtered Persons:
deleteShown - Listing All Persons:
list - Filtering Persons:
find - Filtering Persons:
copy - Exporting Data to a CSV File:
export - Exiting the Program:
exit - Exam Management Features
- Importing Exam Scores from a CSV File:
importExamScores - Adding an Exam:
addExam - Deleting an Exam:
deleteExam - Selecting an Exam:
selectExam - Deselecting an Exam:
deselectExam - Adding an Exam Score:
addScore - Editing an Exam Score:
editScore - Deleting an Exam Score:
deleteScore - Mean and Median of Exam Scores
- Additional Information
- FAQ
- Known Issues
- Command Summary
- Command Parameter Summary
Quick Start
Ensure you have
Java 11or above installed in your computer.Download the latest
avengersassemble.jarhere.Copy the file to the folder you want to use as the home folder for our application.
Open a command terminal,
cdinto the folder you put the jar file in, and use thejava -jar avengersassemble.jarcommand to run the application.cd <path_to_the_folder_containing_the_jar_file> java -jar avengersassemble.jarYou should see this when the app starts up. Note how it contains some sample data.

- Refer to the features below for details of each command.
Outline of Application
The image below shows the outline of the application, with the main sections highlighted:
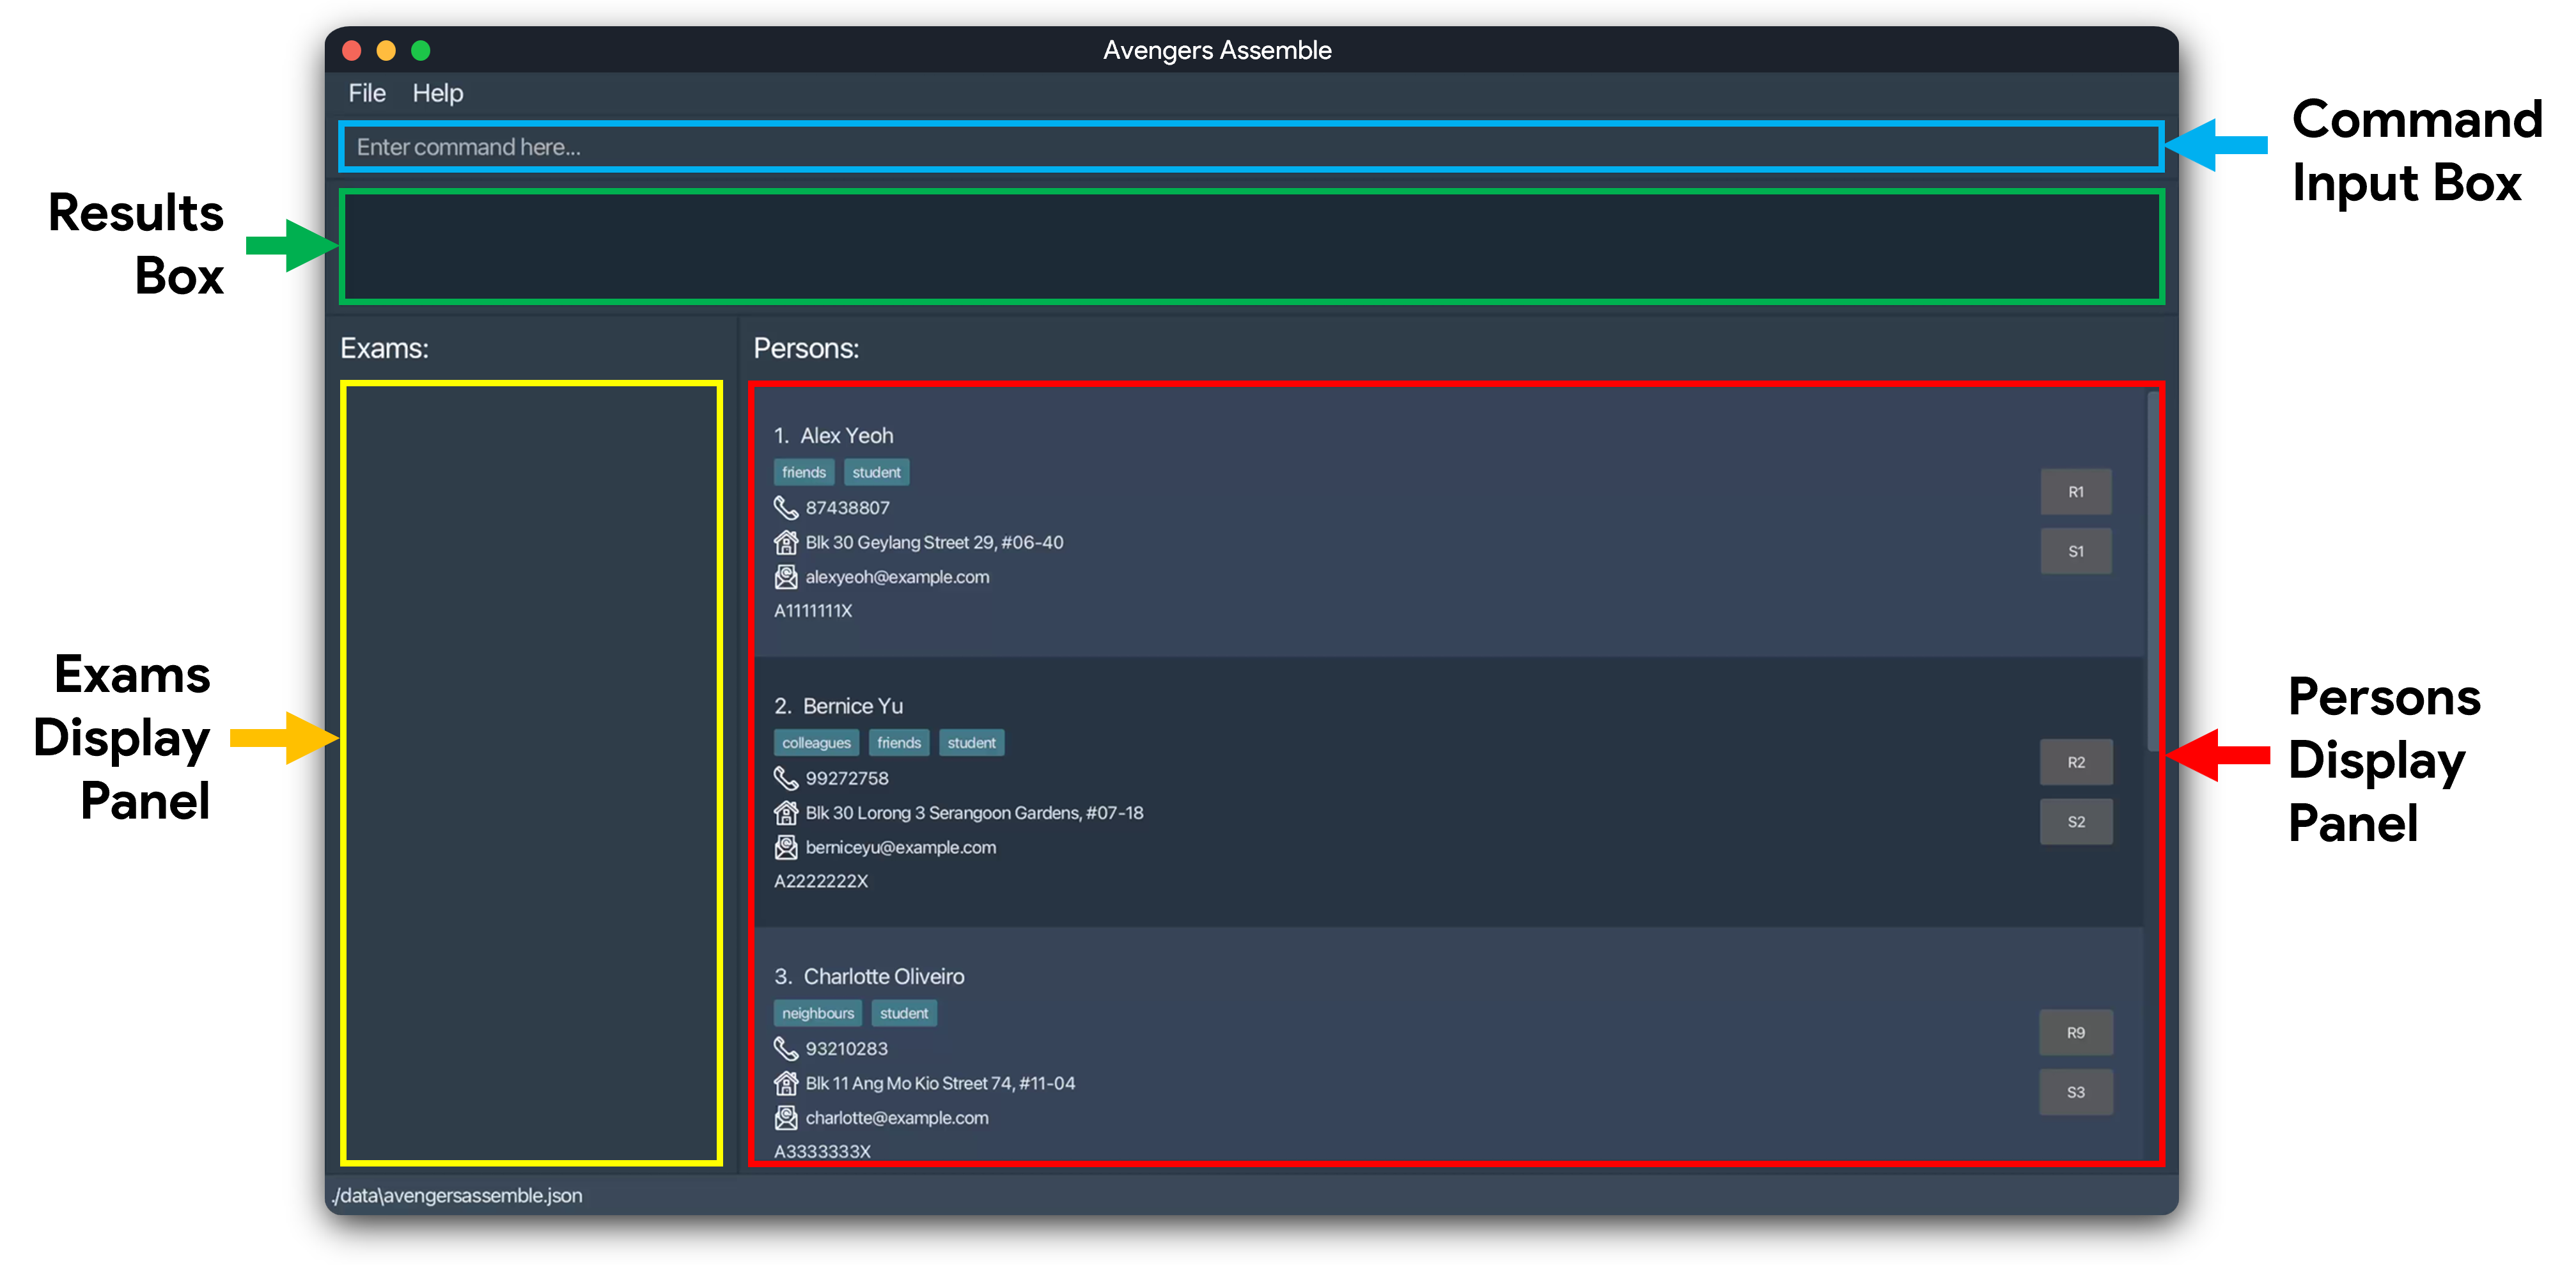
The main sections are as follows:
- Command Input Box:
- This is where you can type your commands.
- Press
Enterto execute the command.
- Results Box:
- This area displays the results of the commands you have executed.
- It will also display any error messages if the command was not executed successfully.
- Persons Display Panel:
- This area displays the list of persons that you have imported or saved into our application.
- Each persons is displayed with an index number, name, email, phone number, address, and tags.
- Each person is also displayed with their matriculation number, studio group, and reflection group if they have been added.
- If an exam is selected, the person's score for that exam will also be displayed if it exists.
- Exams Display Panel:
- This area displays the list of exams that you have added into our application.
- Each exam is displayed with an index number, name, and maximum score.
- Selected exams will be highlighted in the list.
Contact Management Features
These features are designed to help you manage your contacts effectively and centralizes all contact information in one place. You can import contacts from CSV files generated by external sources such as canvas and edurec, manage the contact details of each person in your contact list, and export relevant data as CSV files.
Legend
These boxes might offer you additional information of different types:
Good to know: Provides you with supporting information.
Important: Provides you with more important information that you should know.
Tip: Provides you with tips to use our app more effectively.
Caution: Provides you with warnings about potential issues you might face.
Getting Help : help
Copies the link of our user guide to your clipboard. Paste it into a browser to view it.
Format: help
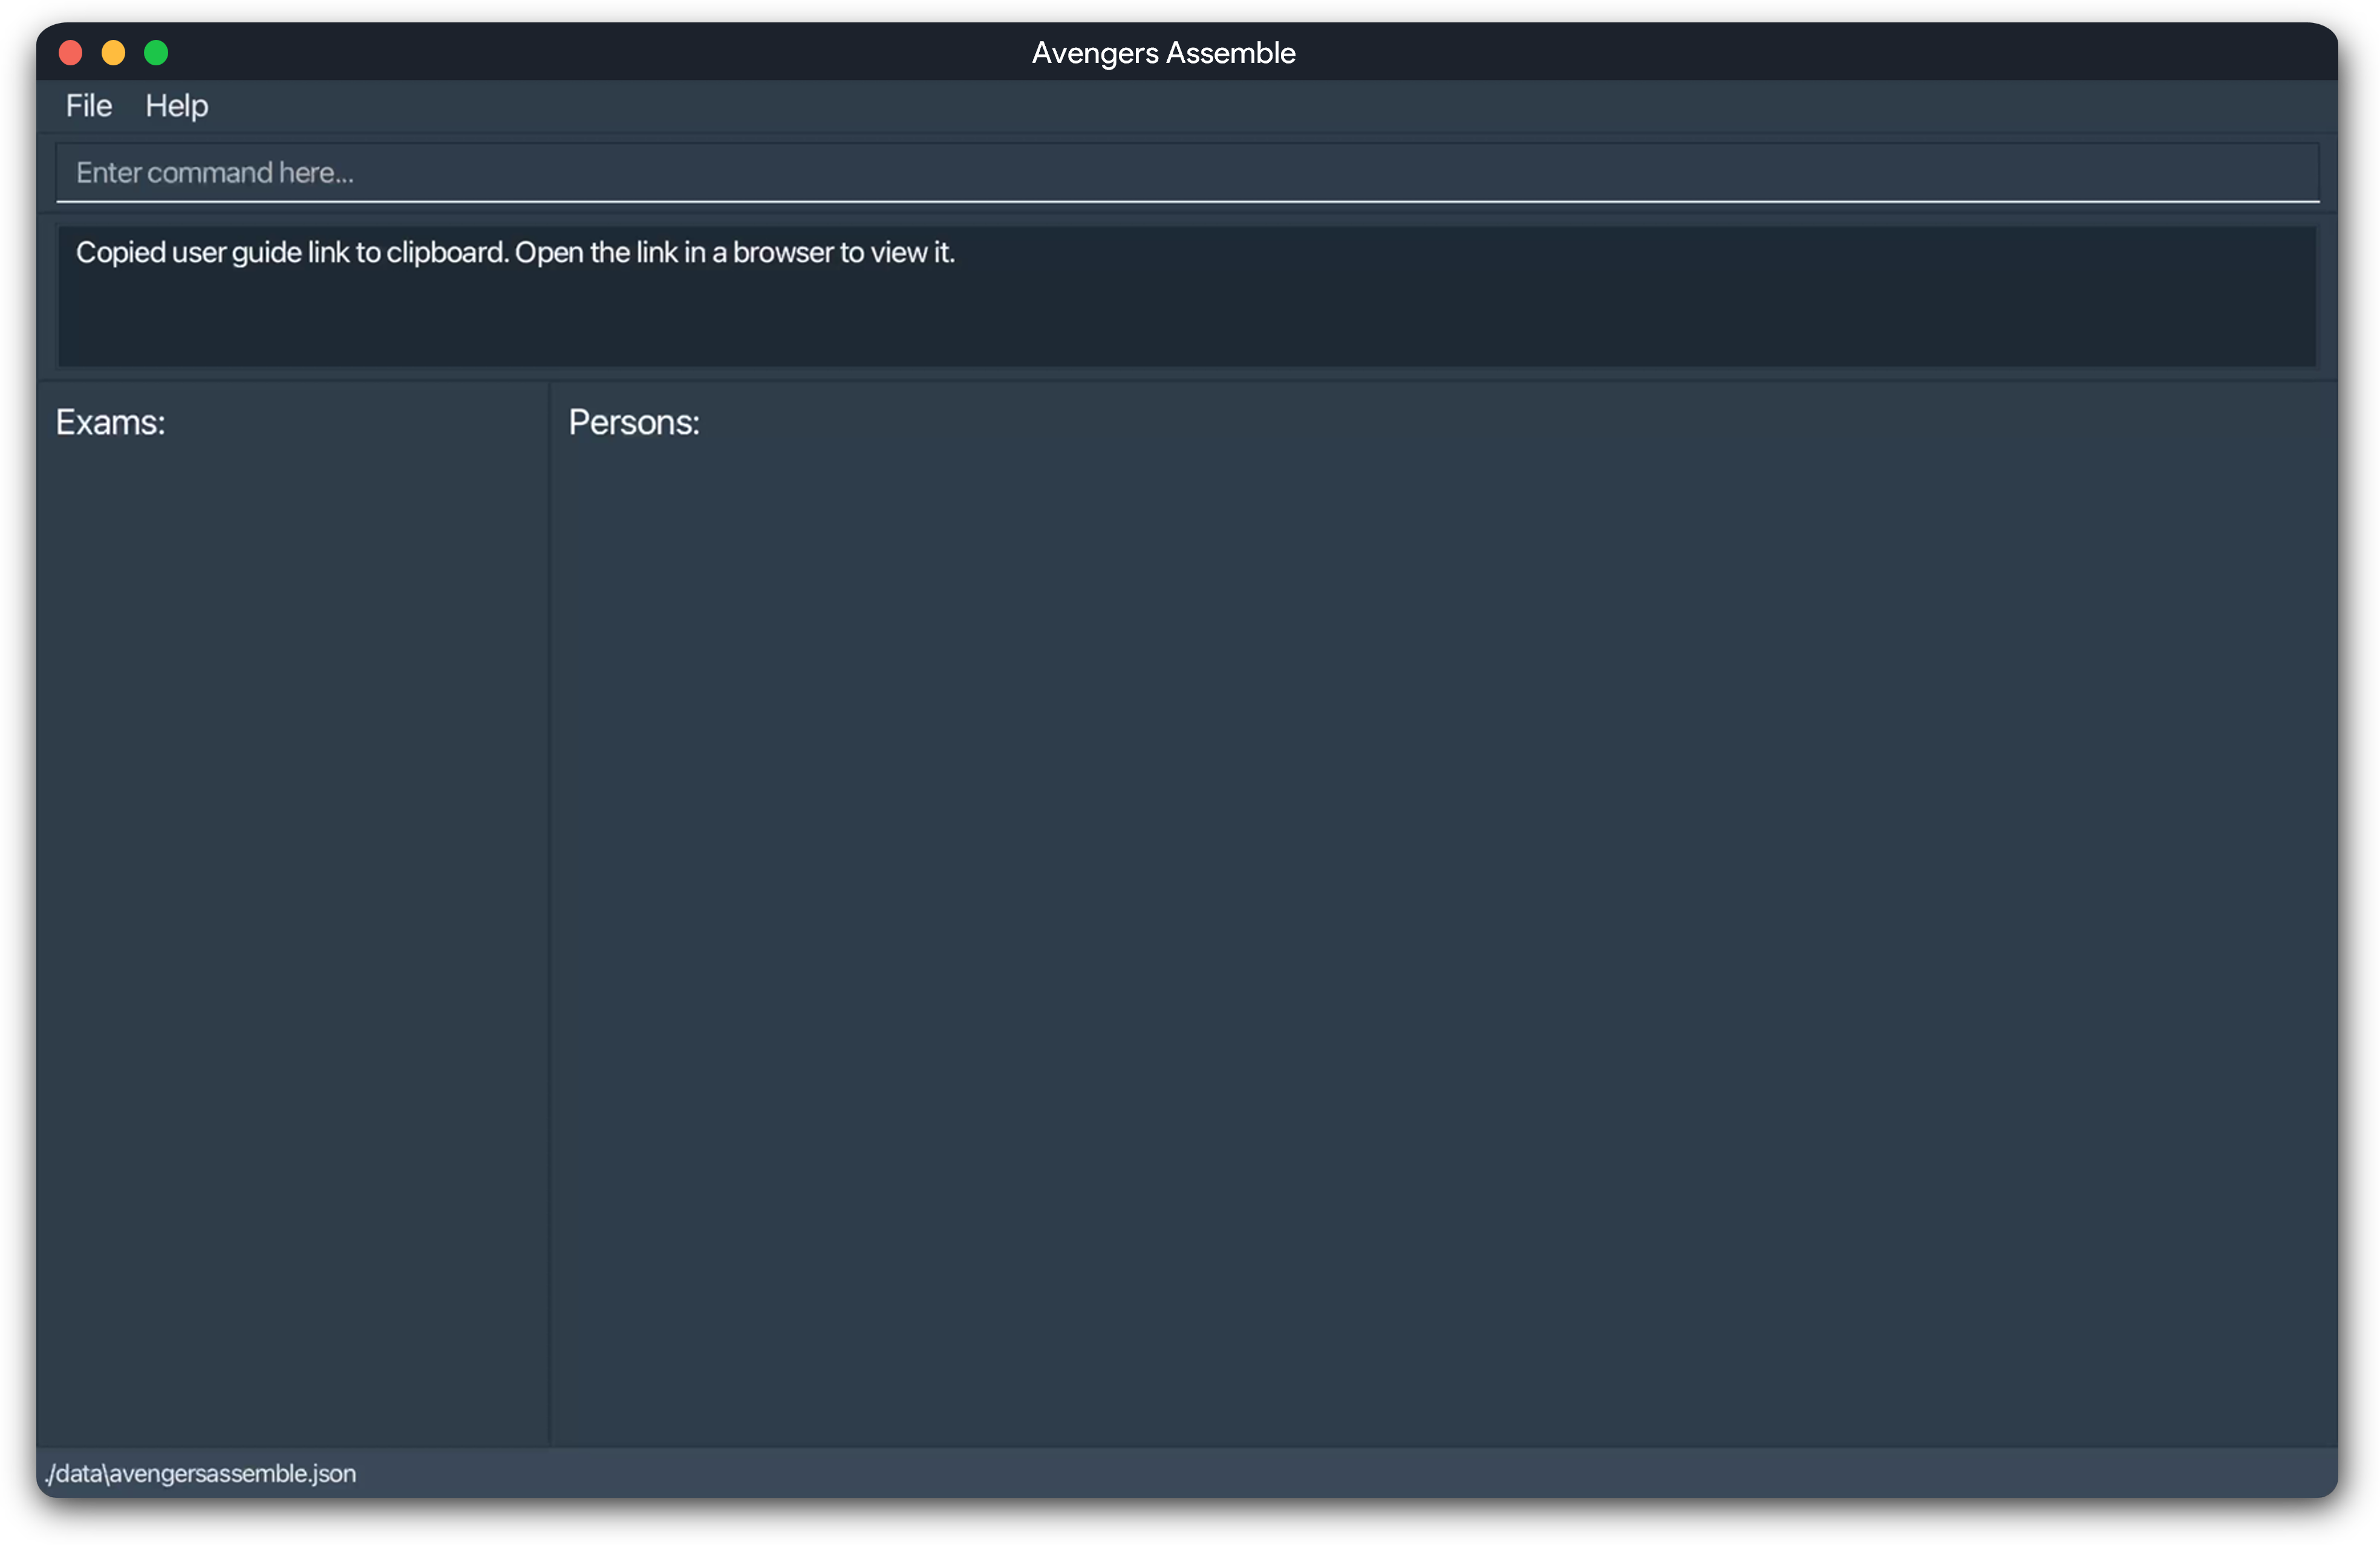
You will see this message when you have successfully copied the link.
Before we proceed with the commands, here are some important points to note on their formatting. These points will also be repeated in the command parameter summary for you to refer to easily at any point in time.
Important:
Words in
UPPER_CASEare the parameters to be supplied by you.e.g. in
add n|NAME,NAMEis a parameter which can be used asadd n|John Doe.Prefixes encased with '[ ]' are optional.
e.g.
n|NAME [t|TAG]can be used asn|John Doe t|friendor asn|John Doe.Prefixes with '…' after them can be used multiple times.
e.g.
[t|TAG]…can be used as(i.e. 0 times),t|friend(i.e 1 time),t|friend t|familyetc.Parameters can be in any order.
e.g. if the command specifies
n|NAME p|PHONE_NUMBER,p|PHONE_NUMBER n|NAMEis also acceptable.Extraneous parameters for commands that do not take in parameters (such as
help,list,exit,copy,exportandclear) will be ignored.e.g. if the command specifies
help 123, it will be interpreted ashelp.
Caution:
- If you are using a PDF version of this document, be careful when copying and pasting commands that span multiple lines as space characters surrounding line-breaks may be omitted when copied over to the application.
Clearing All Entries : clear
Deletes all data from the application. This includes all contact information and examinations.
Format: clear
Caution:
Using clear will delete all data in an irreversible manner. Be sure to back up your relevant data by using the export command before using this command.
Importing Persons from a CSV File : import
Imports all persons and their details from a CSV file of your specification.
Format: import i|FILEPATH
Important:
- The file path should be absolute.
- This command will only import persons' particulars. To import exam scores, take a look at
importExamScores. - All compulsory parameters must be present in the column headings (i.e. the first row) of the CSV file you are importing i.e.
name,email,phoneandaddress. - Only values under accepted column headings are read i.e.
name,email,phone,address,tags,matric,reflectionandstudio - The number of headers must match the number of cells for each row.
- Invalid rows will be skipped and will not be imported!
Example: import i|/Users/johansoo/Desktop/AvengersAssemble/exam_data.csv
imports the data from the CSV file located at /Users/johansoo/Desktop/AvengersAssemble/exam_data.csv
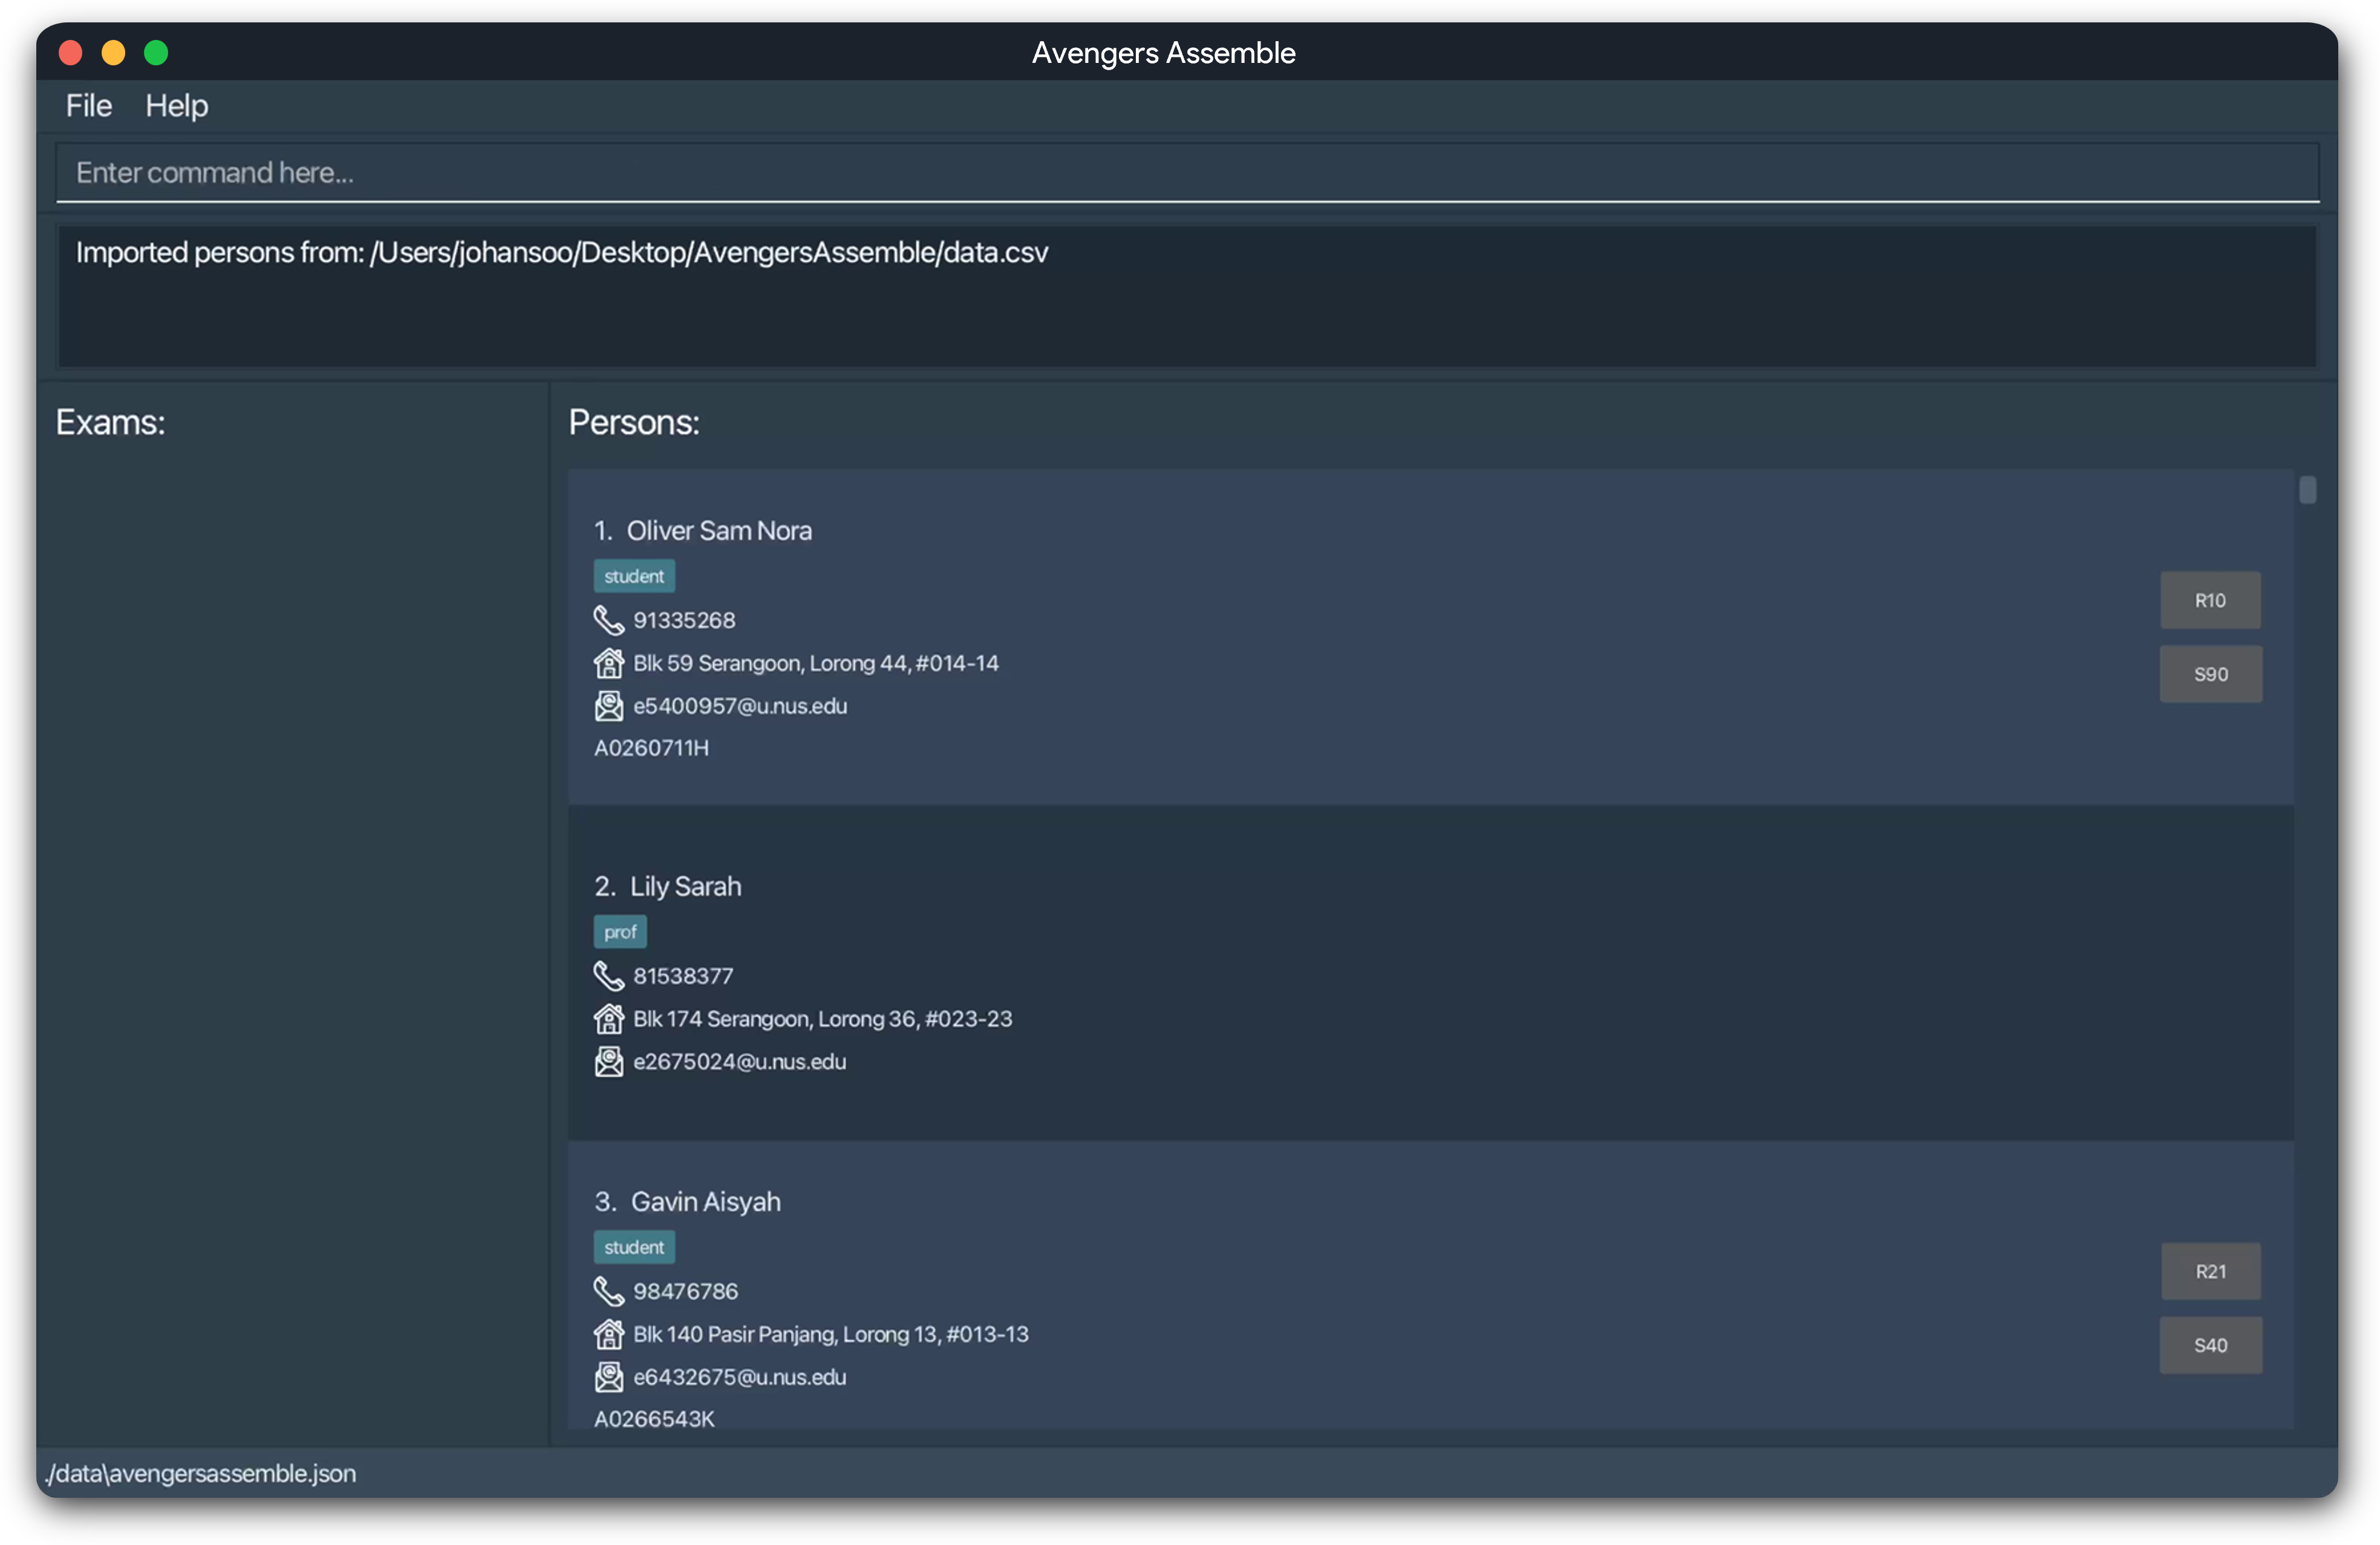
You will see this message once you successfully imported the data, with the app showing the details of the imported persons:
For more details on the input parameter, click here.
Adding a Person : add
Adds a person to your contact list. The person's details are now stored in the application.
Format: add n|NAME p|PHONE_NUMBER e|EMAIL a|ADDRESS [t|TAG]… [m|MATRICULATION_NUMBER] [s|STUDIO] [r|REFLECTION]
Important:
Each person should have a unique email address. Avengers Assemble does not allow for duplicate email addresses to be added.
Tip:
A person can have any number of tags (including 0)
Note: For your convenience, a
studenttag will automatically be added to a contact if they are added with a matriculation number. You are free to edit or remove the tags after the person is added with theeditcommand. For example, a student TA can be added with thestudenttag, and then theTAtag can be added to indicate that they are a TA.
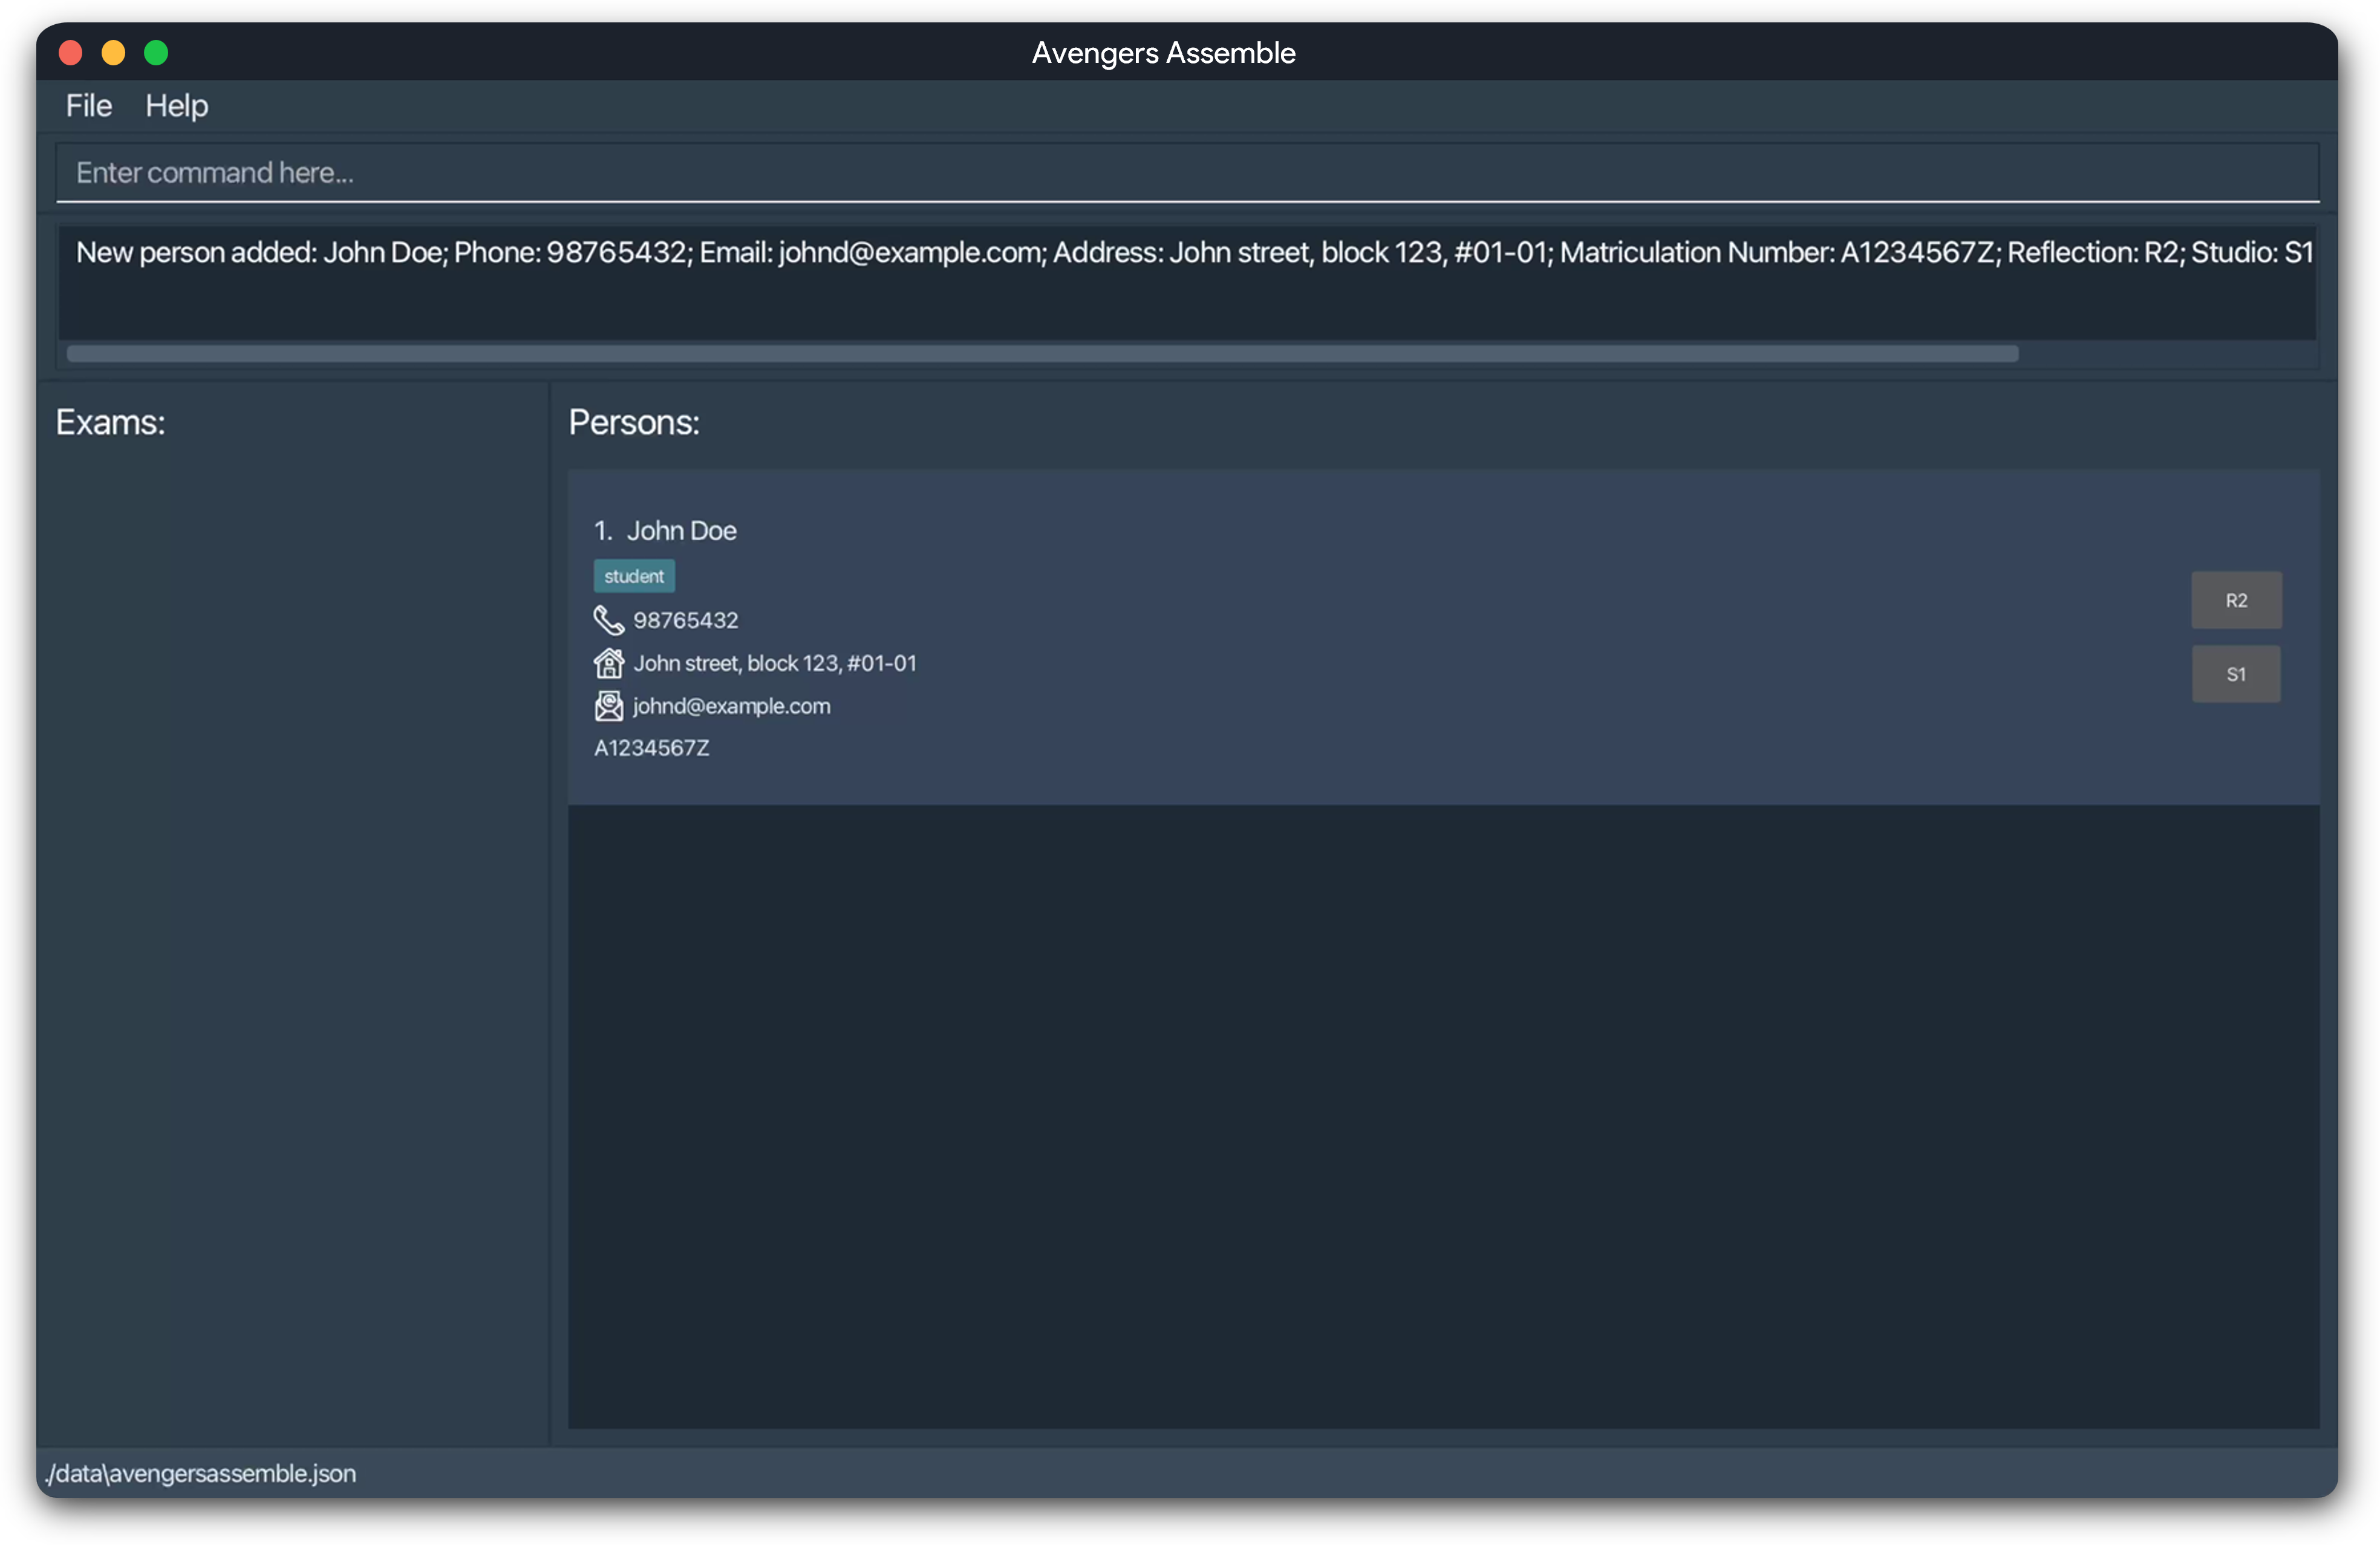
Example: add n|John Doe p|98765432 e|johnd@example.com a|John street, block 123, #01-01 m|A1234567Z s|S1 r|R2
adds a contact John Doe with the respective phone number, email and physical addresses, matriculation number, studio group and reflection group.
You will see this message once you have successfully added a person, indicating their details:
For more details on each parameter, click here.
Editing a Person : edit
Edits the details of an existing person in your contact list.
Format: edit INDEX [n|NAME] [p|PHONE] [e|EMAIL] [a|ADDRESS] [t|TAG]… [m|MATRICULATION_NUMBER] [s|STUDIO] [r|REFLECTION]
Information:
- The person at the specified
INDEXwill be edited. The index must be a positive integer (1, 2, 3, …). - At least one of the optional fields must be provided.
- Existing values will be updated to the new values.
- Editing tags will replace all existing tags i.e. adding of tags is not cumulative.
- You can remove optional fields by typing
t|,m|,r|ors|respectively without any values.
Important:
Updating a matriculation number, studio, or reflection field will not automatically update the tags of the person. You will need to manually update the tags if necessary.
Examples:
edit 2 n|Betsy Crower t|:- Edits the name of the second person to be
Betsy Crowerand clears all existing tags.
- Edits the name of the second person to be
edit 1 p|91234567 e|johndoe@example.com:- Edits the phone number and email address of the first person to be
91234567andjohndoe@example.comrespectively.
- Edits the phone number and email address of the first person to be
You will see this message once you have successfully edited a person, indicating their updated details:
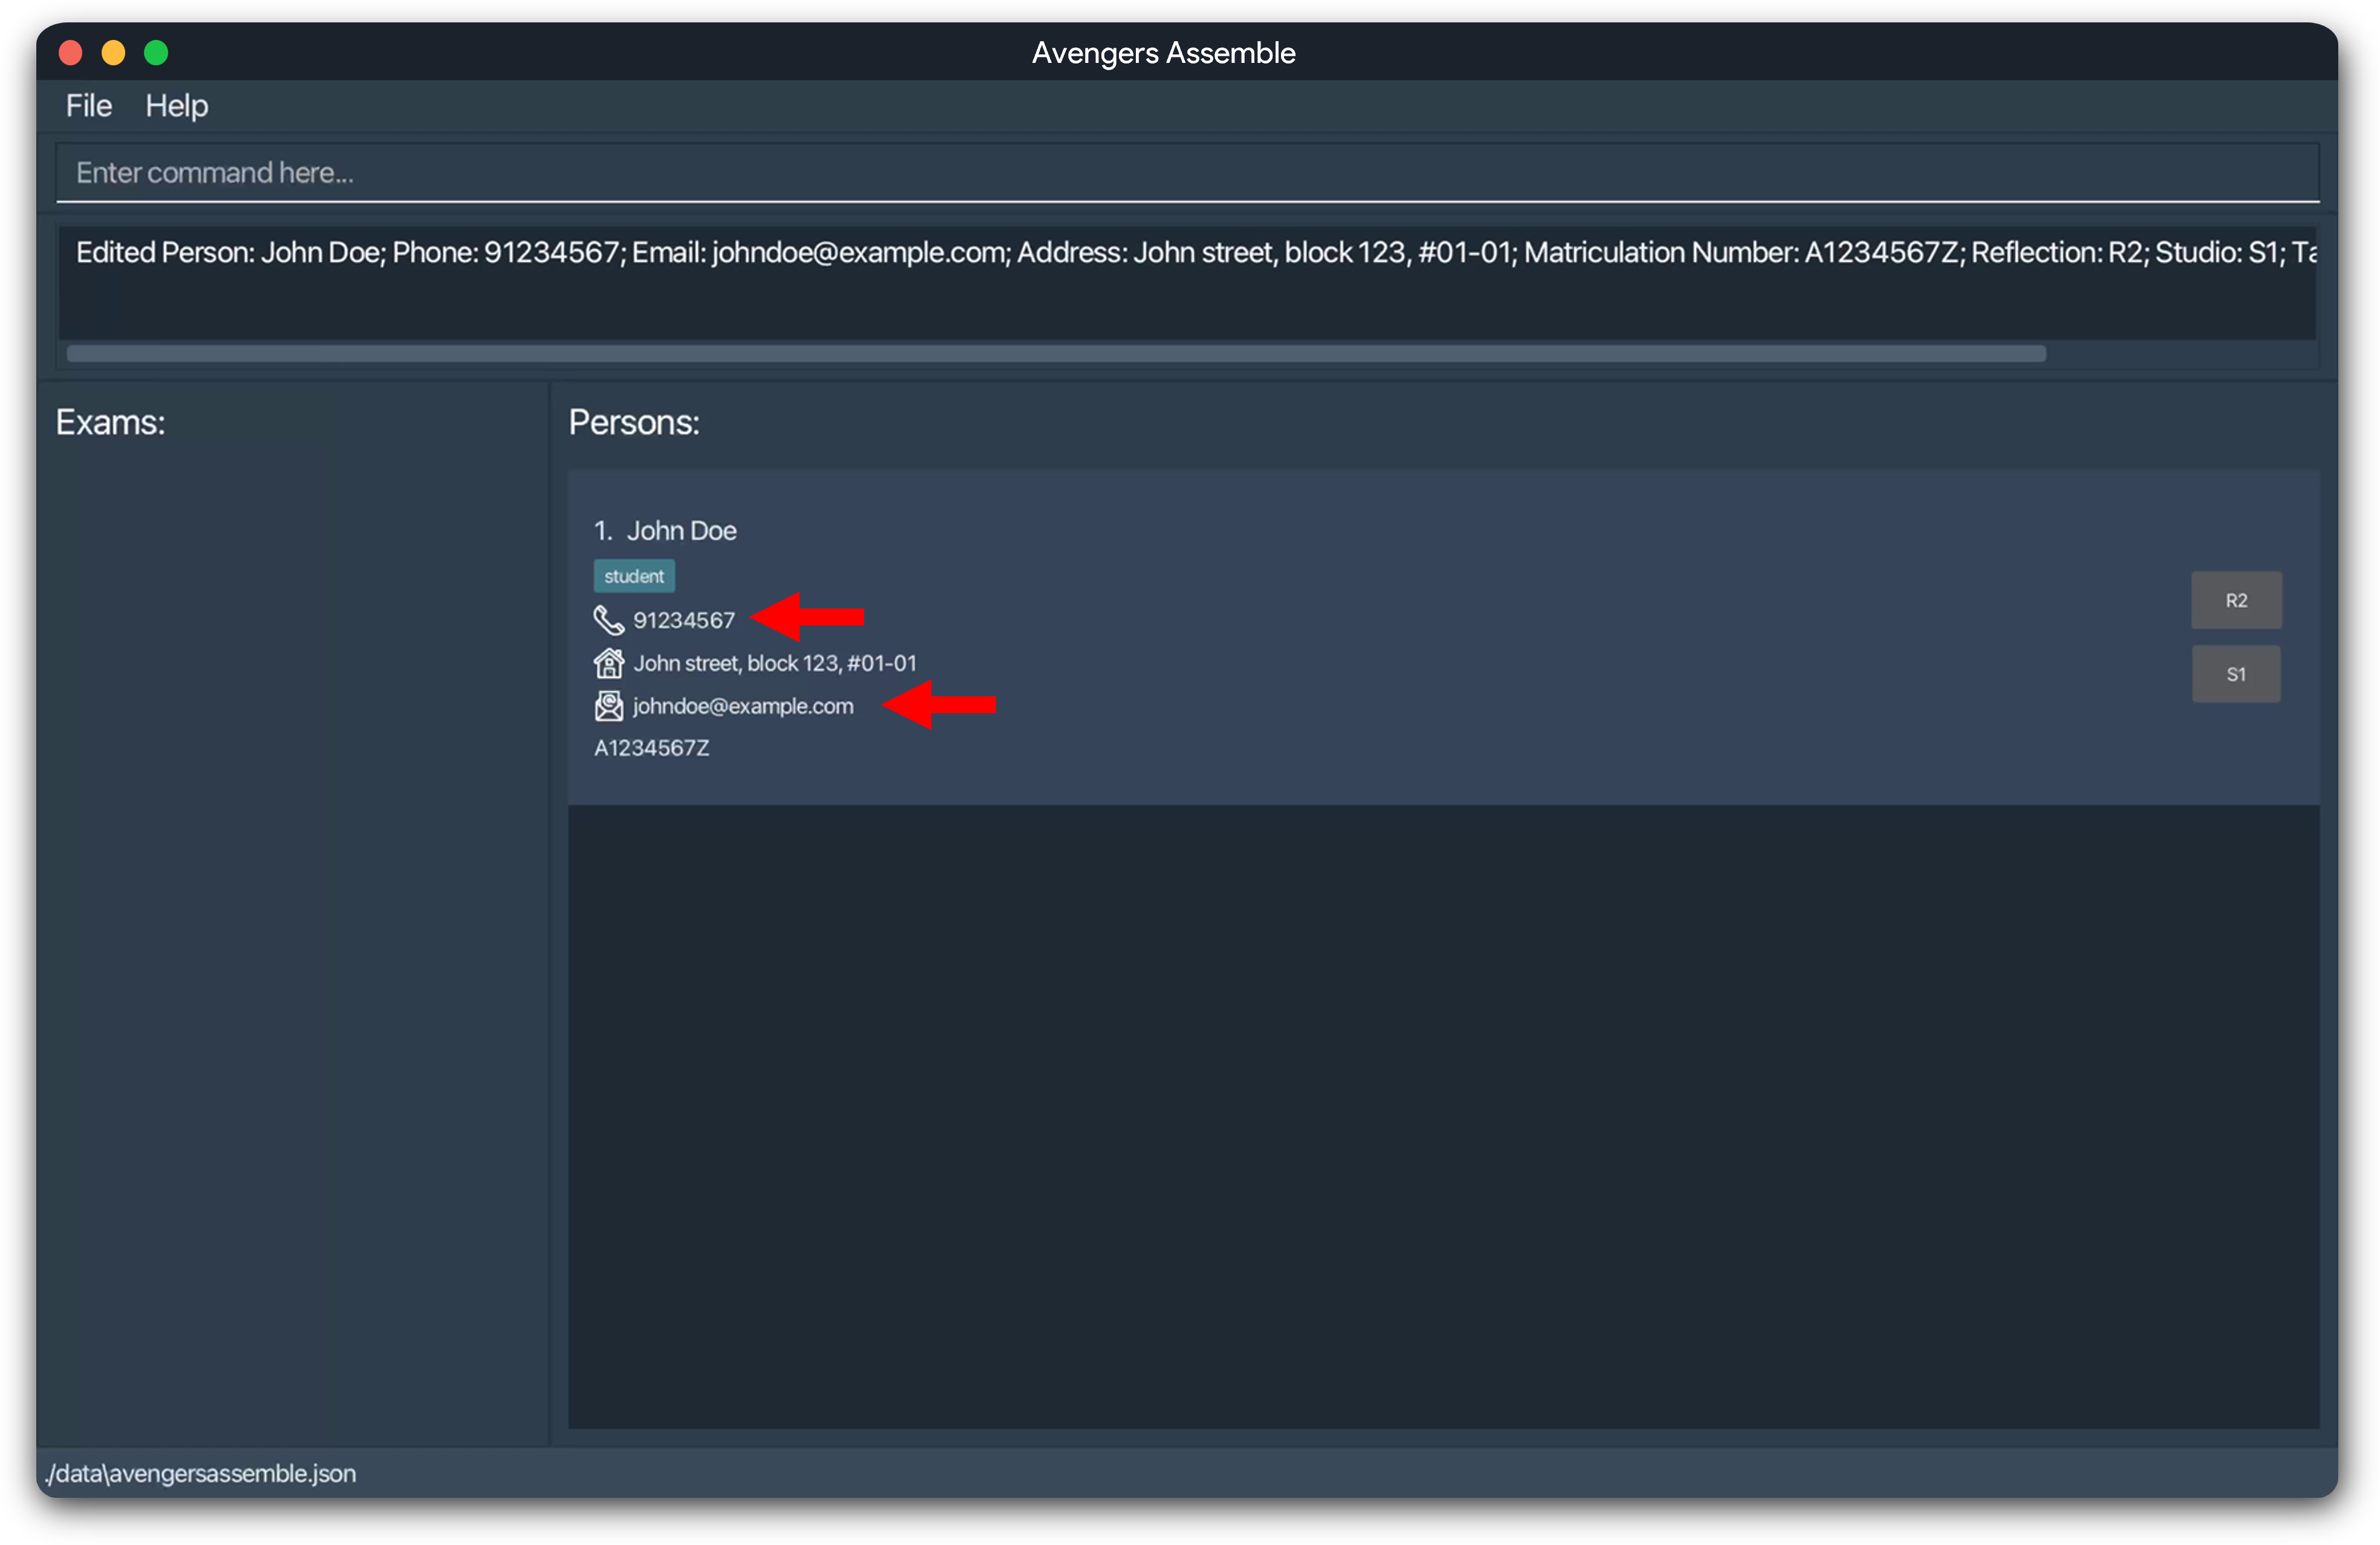
For more details on each parameter, click here.
Deleting a Person : delete
Deletes the specified person from your contact list.
Format: delete INDEX
Important:
The person at the specified INDEX will be deleted. The index must be a positive integer (1, 2, 3, …)
Examples:
find n|Betsyfollowed bydelete 1deletes the first person in the results of thefindcommand.listfollowed bydelete 1deletes the first person stored in the app.
You will see this message once you successfully delete a person from your list, indicating the details of the deleted person:
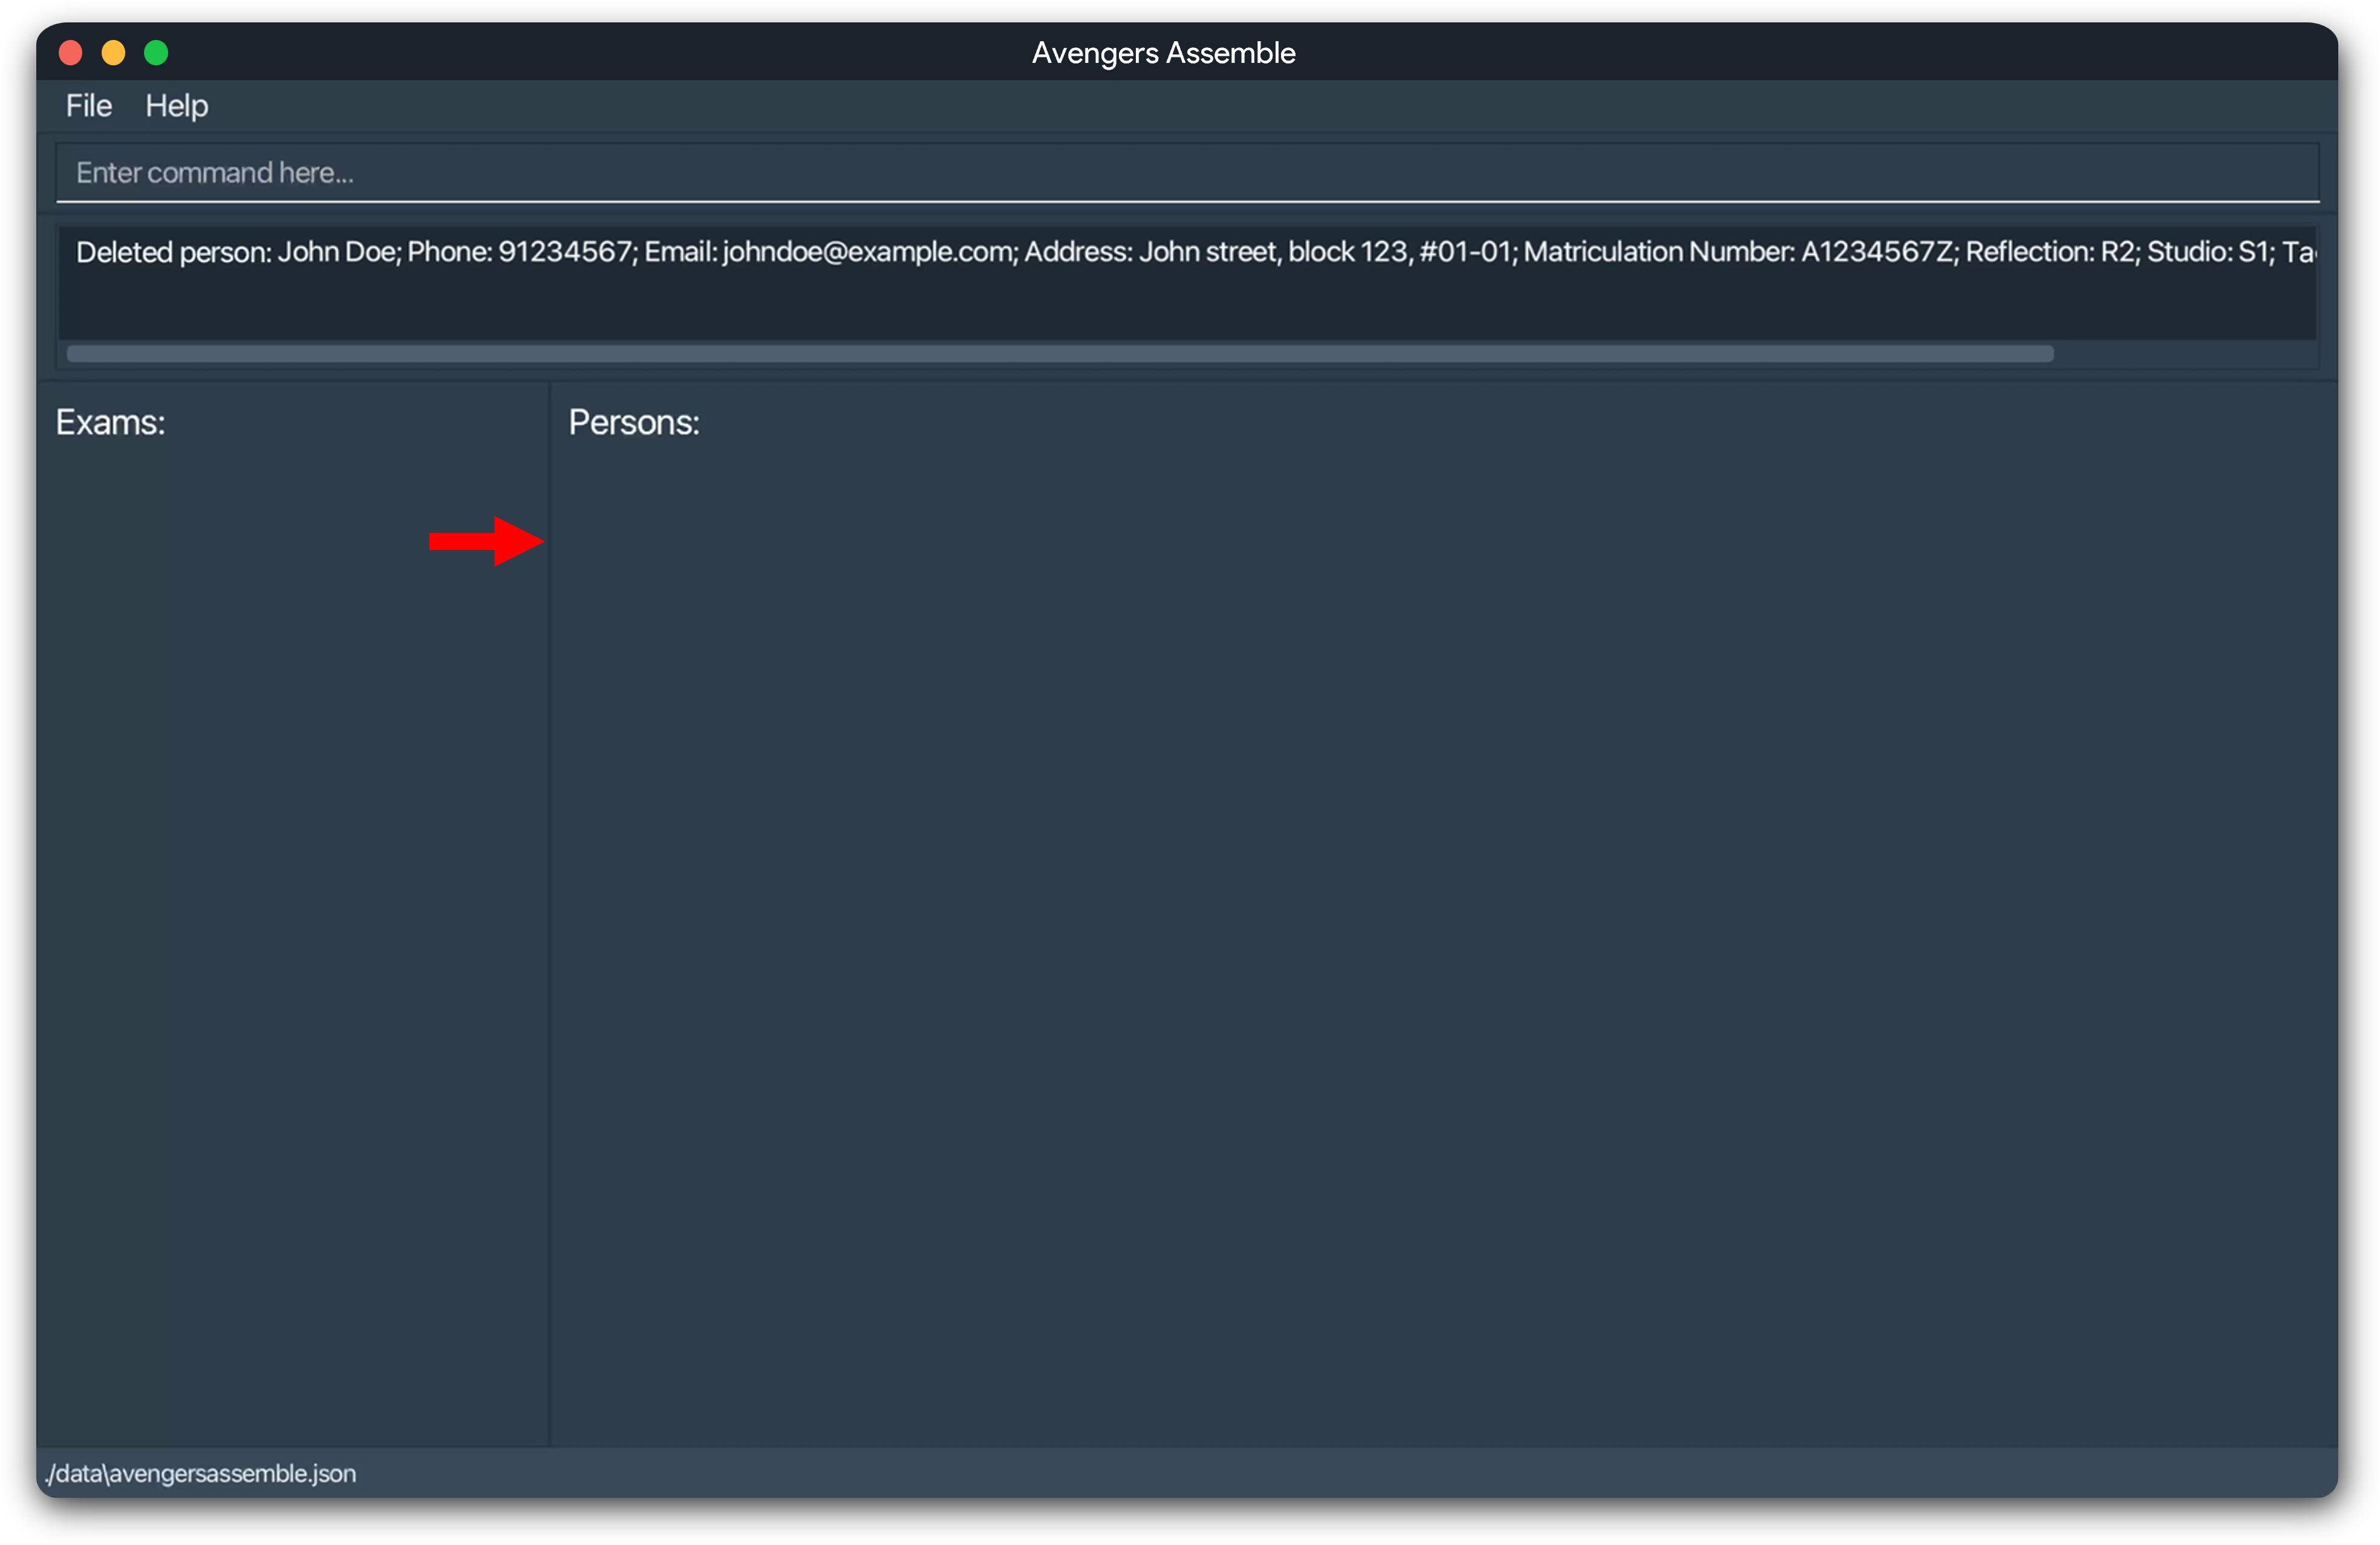
Deleting Filtered Persons : deleteShown
Deletes the current filtered list of persons. Requires a find command to be run first.
Format: deleteShown
Note: The application ignores any extraneous parameters as we assume they are typos.
You will see this message once you have successfully deleted the shown persons from your list.
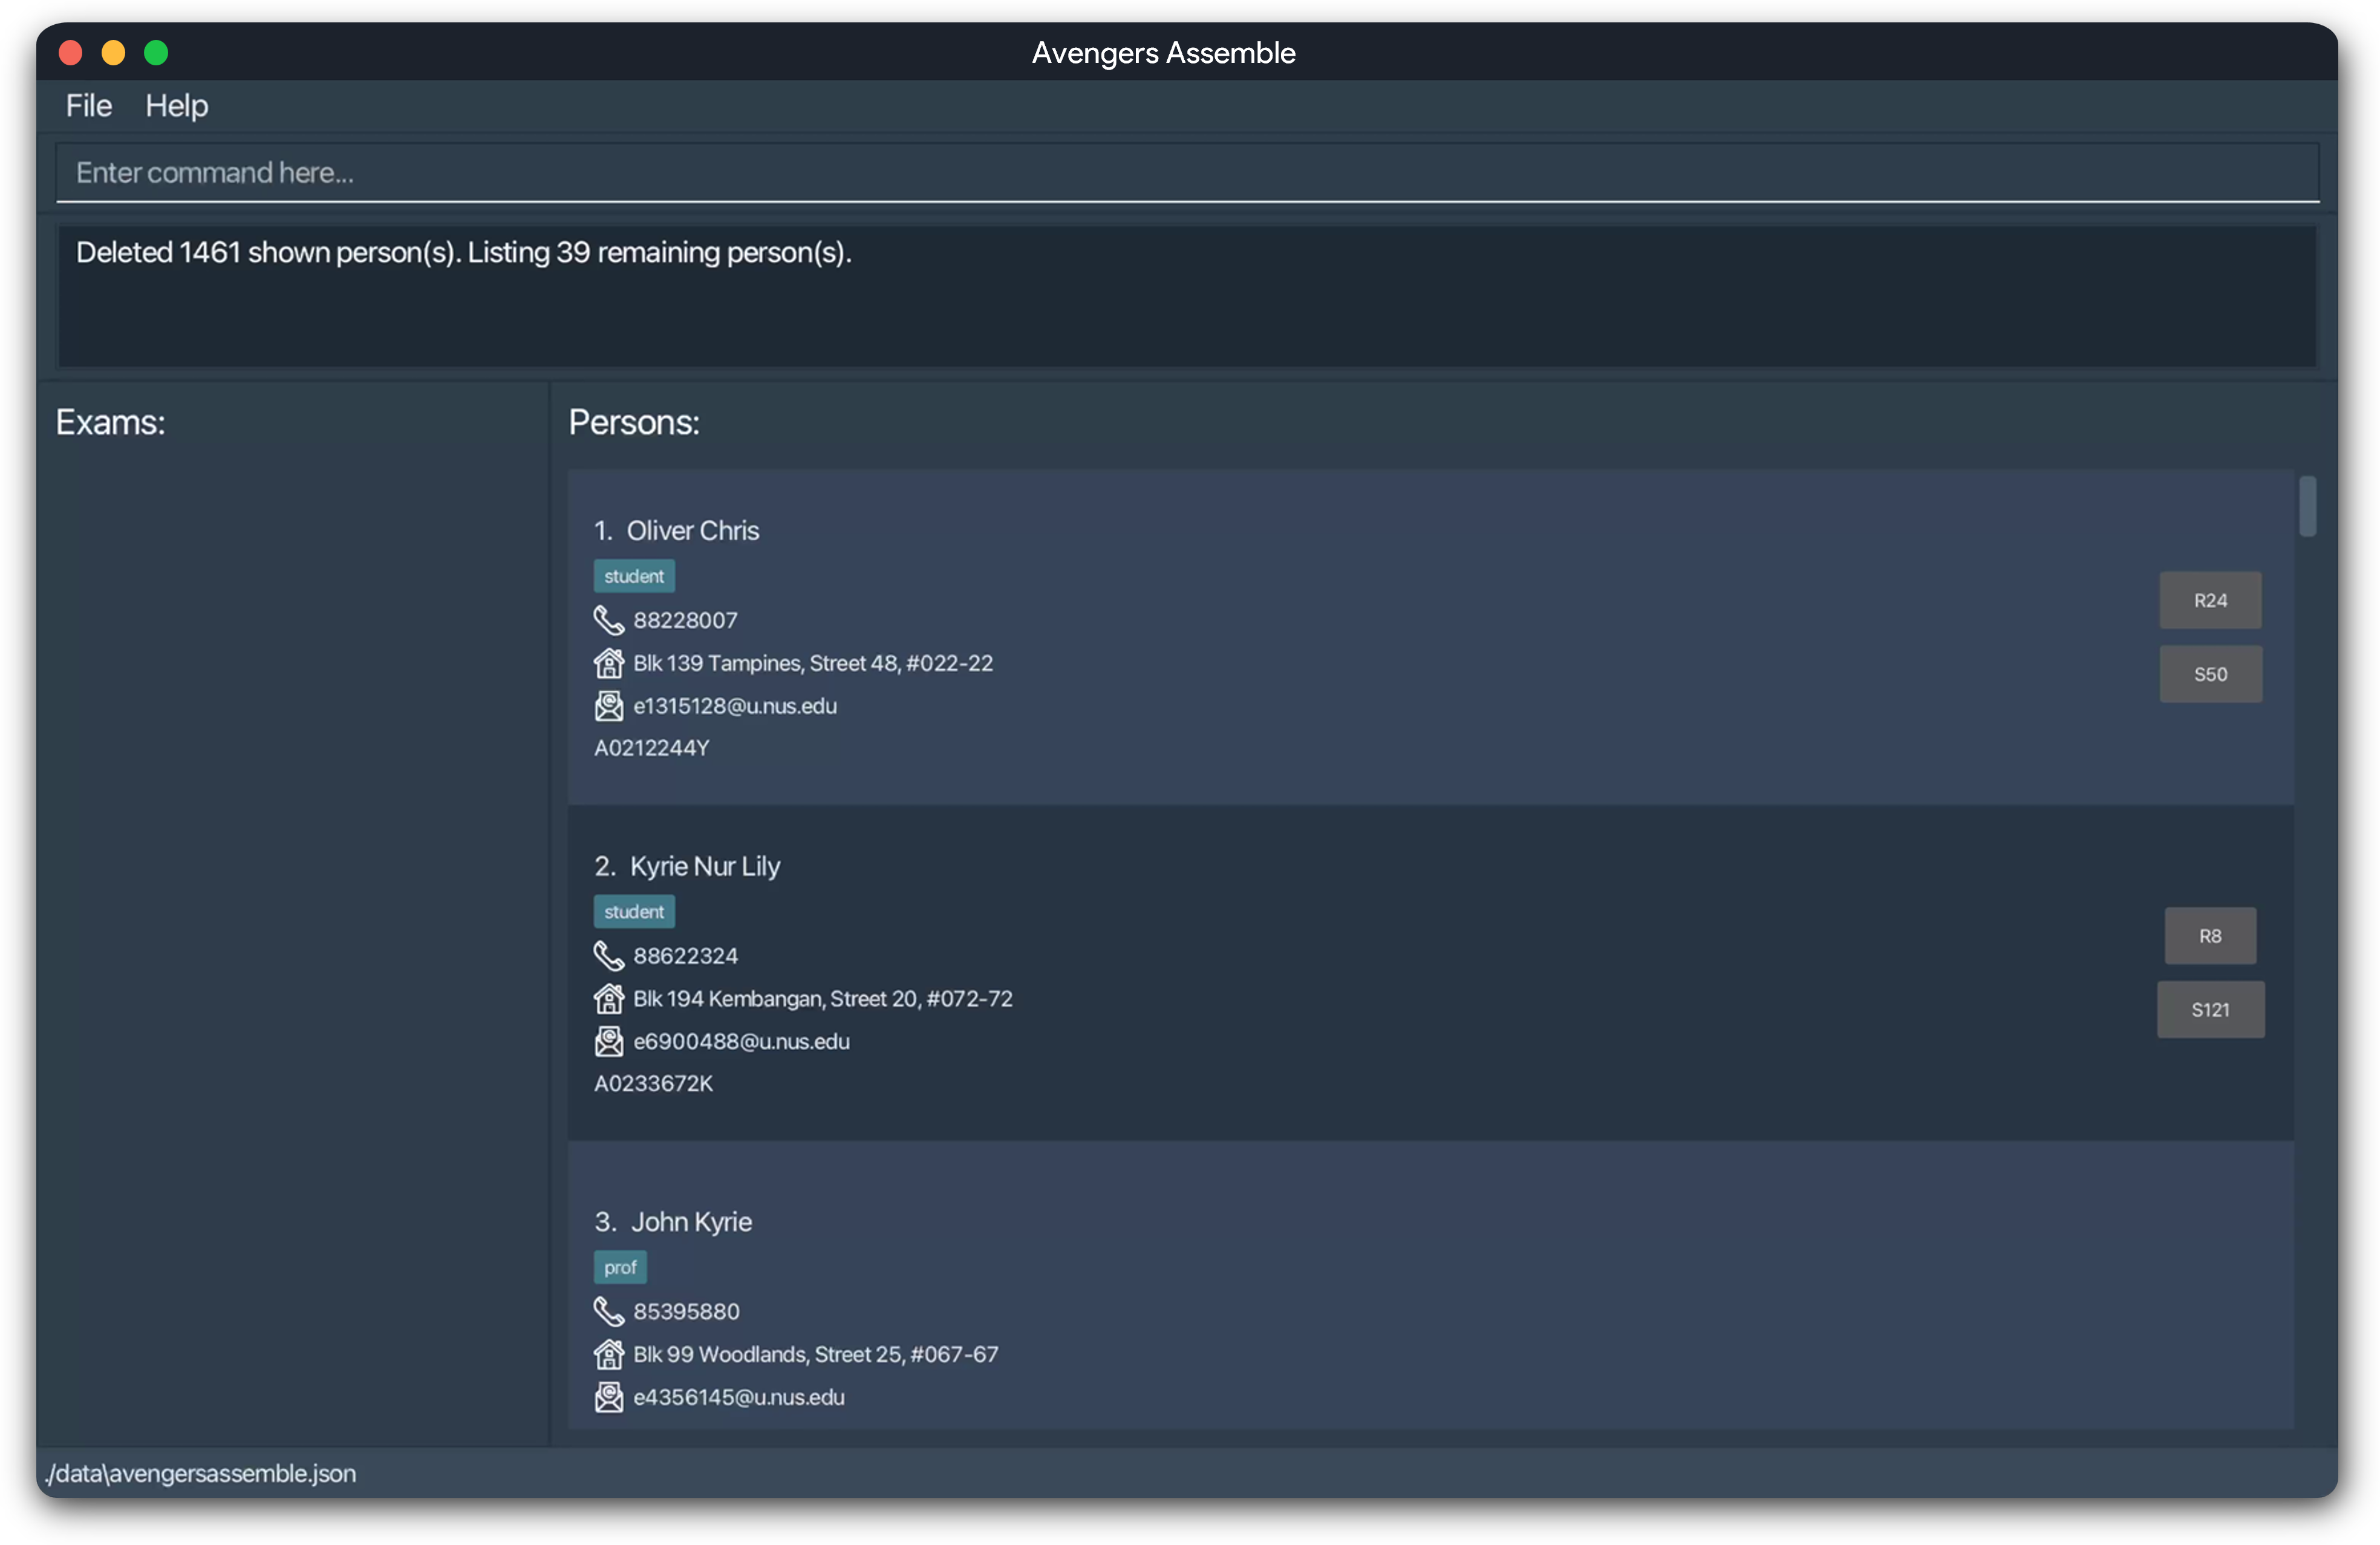
Listing All Persons : list
Displays all the persons in your contact list.
Format: list
Note: The application ignores any extraneous parameters as we assume they are typos.
You will see this message once you have successfully listed all contacts, with the app showing all existing persons in the contact list:
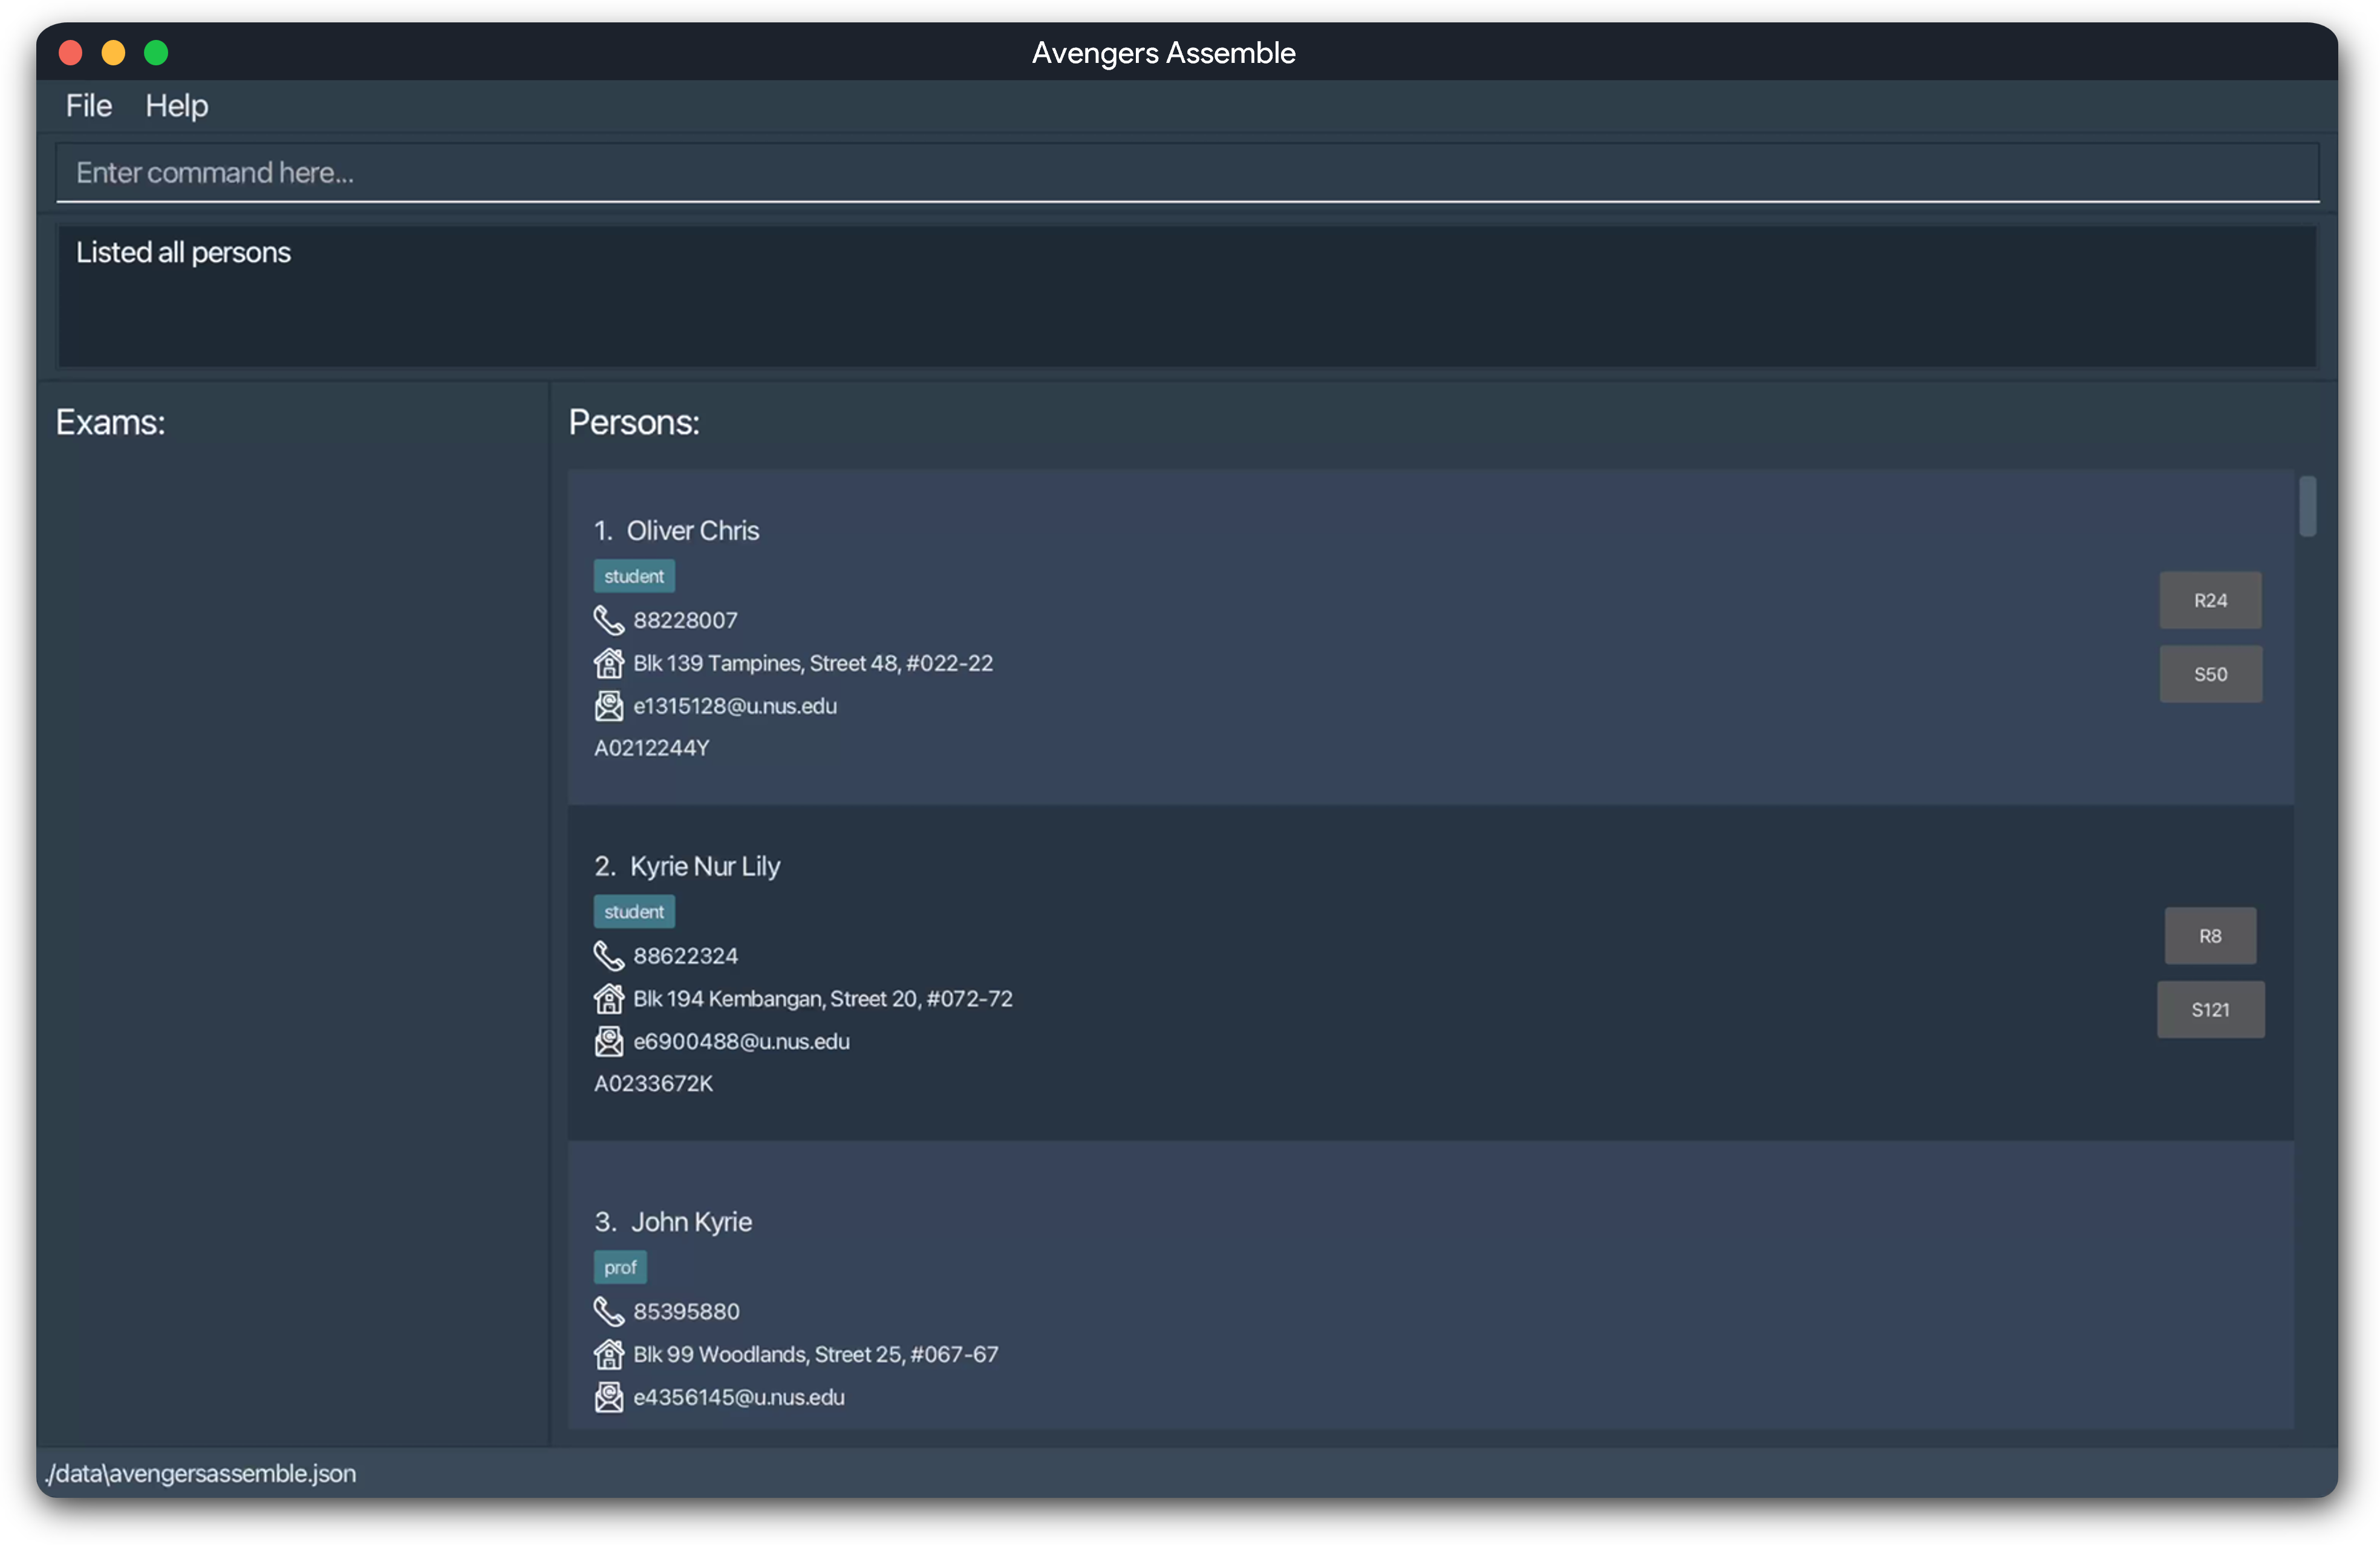
Filtering Persons : find
Filters your contacts based on specific criteria you set.
Format: find PREFIX|KEYWORD
Information:
- Use this command to search for persons using a specific aspect of their details, as specified by the prefix.
- The search will return any result that contains the keyword you have specified or matches the condition provided by the user.
e.g.
find e|johnwill find any person that containsjohnin their email.
e.g.find lt|50will find any person who scored lower than 50 marks for the selected exam.
e.g.find mt|80.55will find any person who scored more than 80.55 marks for the selected exam. - The search is case-insensitive.
- Only one prefix can be used at a time.
Important: An exam must be selected for this command to work with the lt| and mt| prefixes!
You can use the selectExam command to do so.
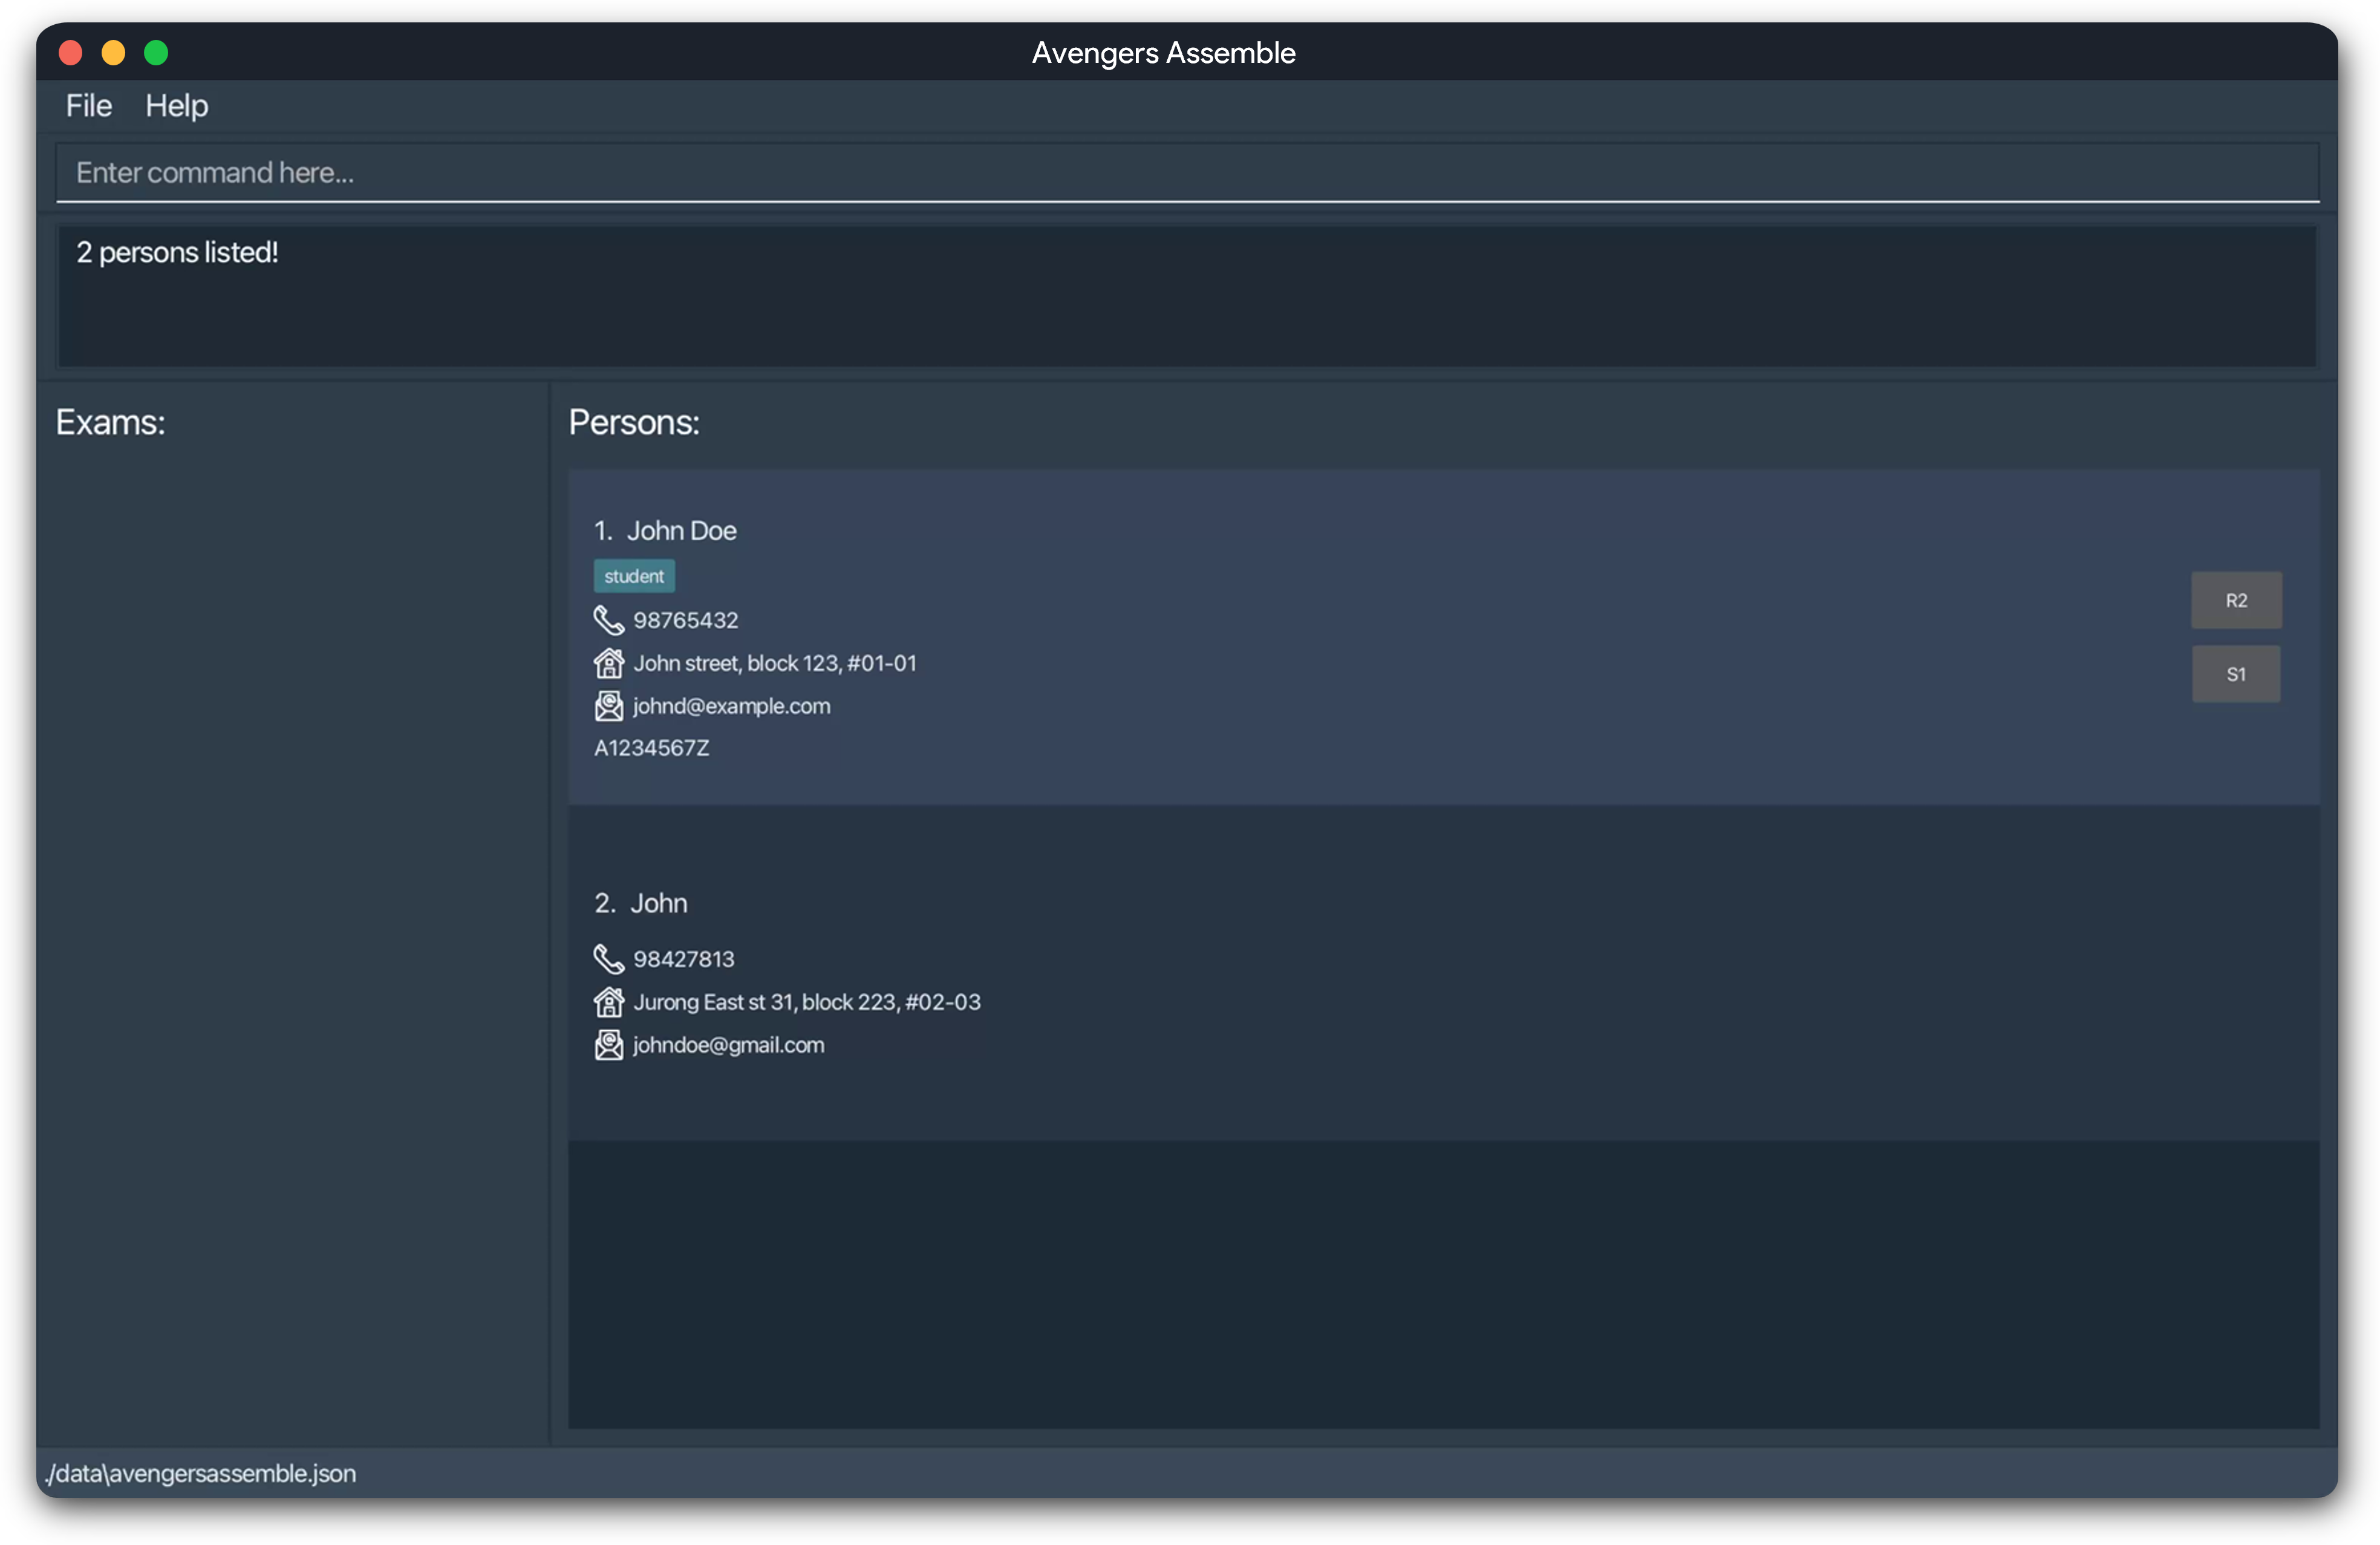
Example: find n|John
returns john and John Doe if they exist in your contact book.
You will see this message once you have successfully found a person, with the app showing all persons that match your search criteria:
For more details on each parameter, click here.
Copying Emails : copy
Copies the emails of currently displayed persons into your clipboard.
Format: copy
Information:
- The emails copied into your clipboard will have semicolons separating them.
- Semicolons are used as delimiters to separate the emails when pasted into any email client.
Note: The application ignores any extraneous parameters as we assume they are typos.
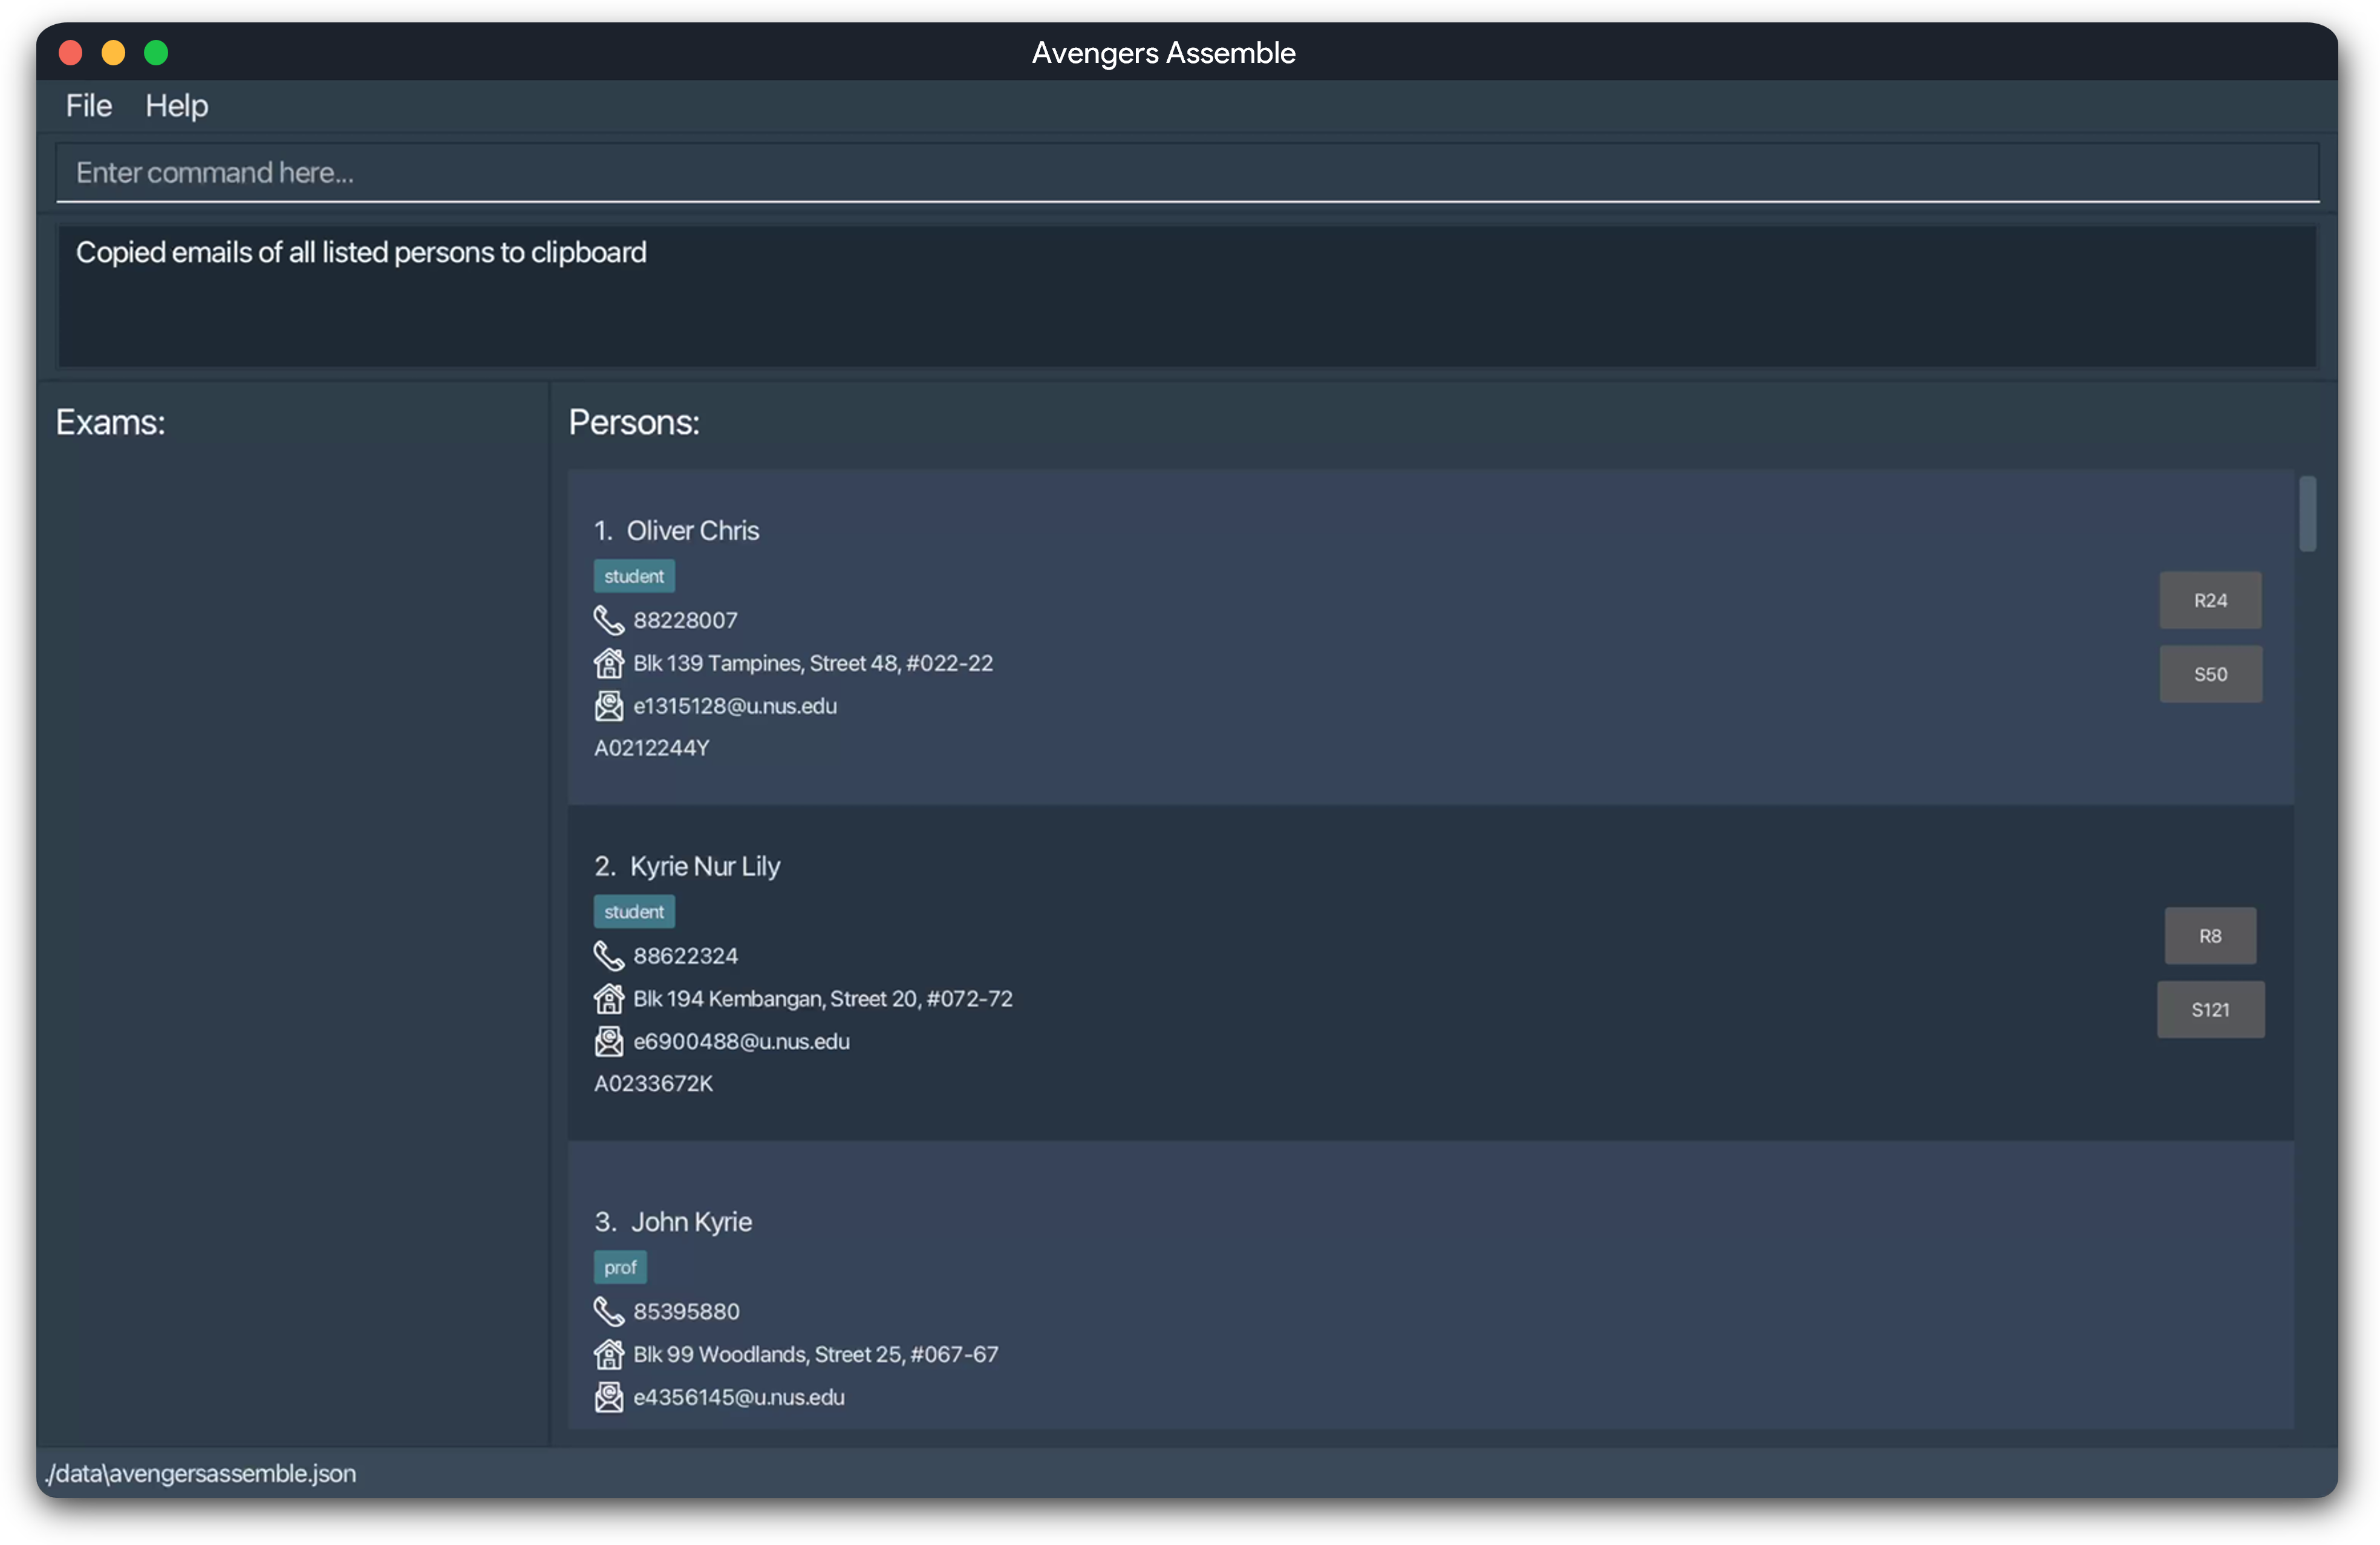
You will see this message once you have successfully copied the emails of the persons shown to you, indicating that they have been copied to the clipboard:
Exporting Data to a CSV File : export
Exports currently displayed persons and their details to a CSV file of your specification.
Format: export
By default, the file will be stored in
addressbookdata/avengersassemble.csv.
Caution:
When performing an export, the current information will overwrite any existing CSV files with the same name. If you want to preserve the exported data, you should rename it or save it in a separate location.
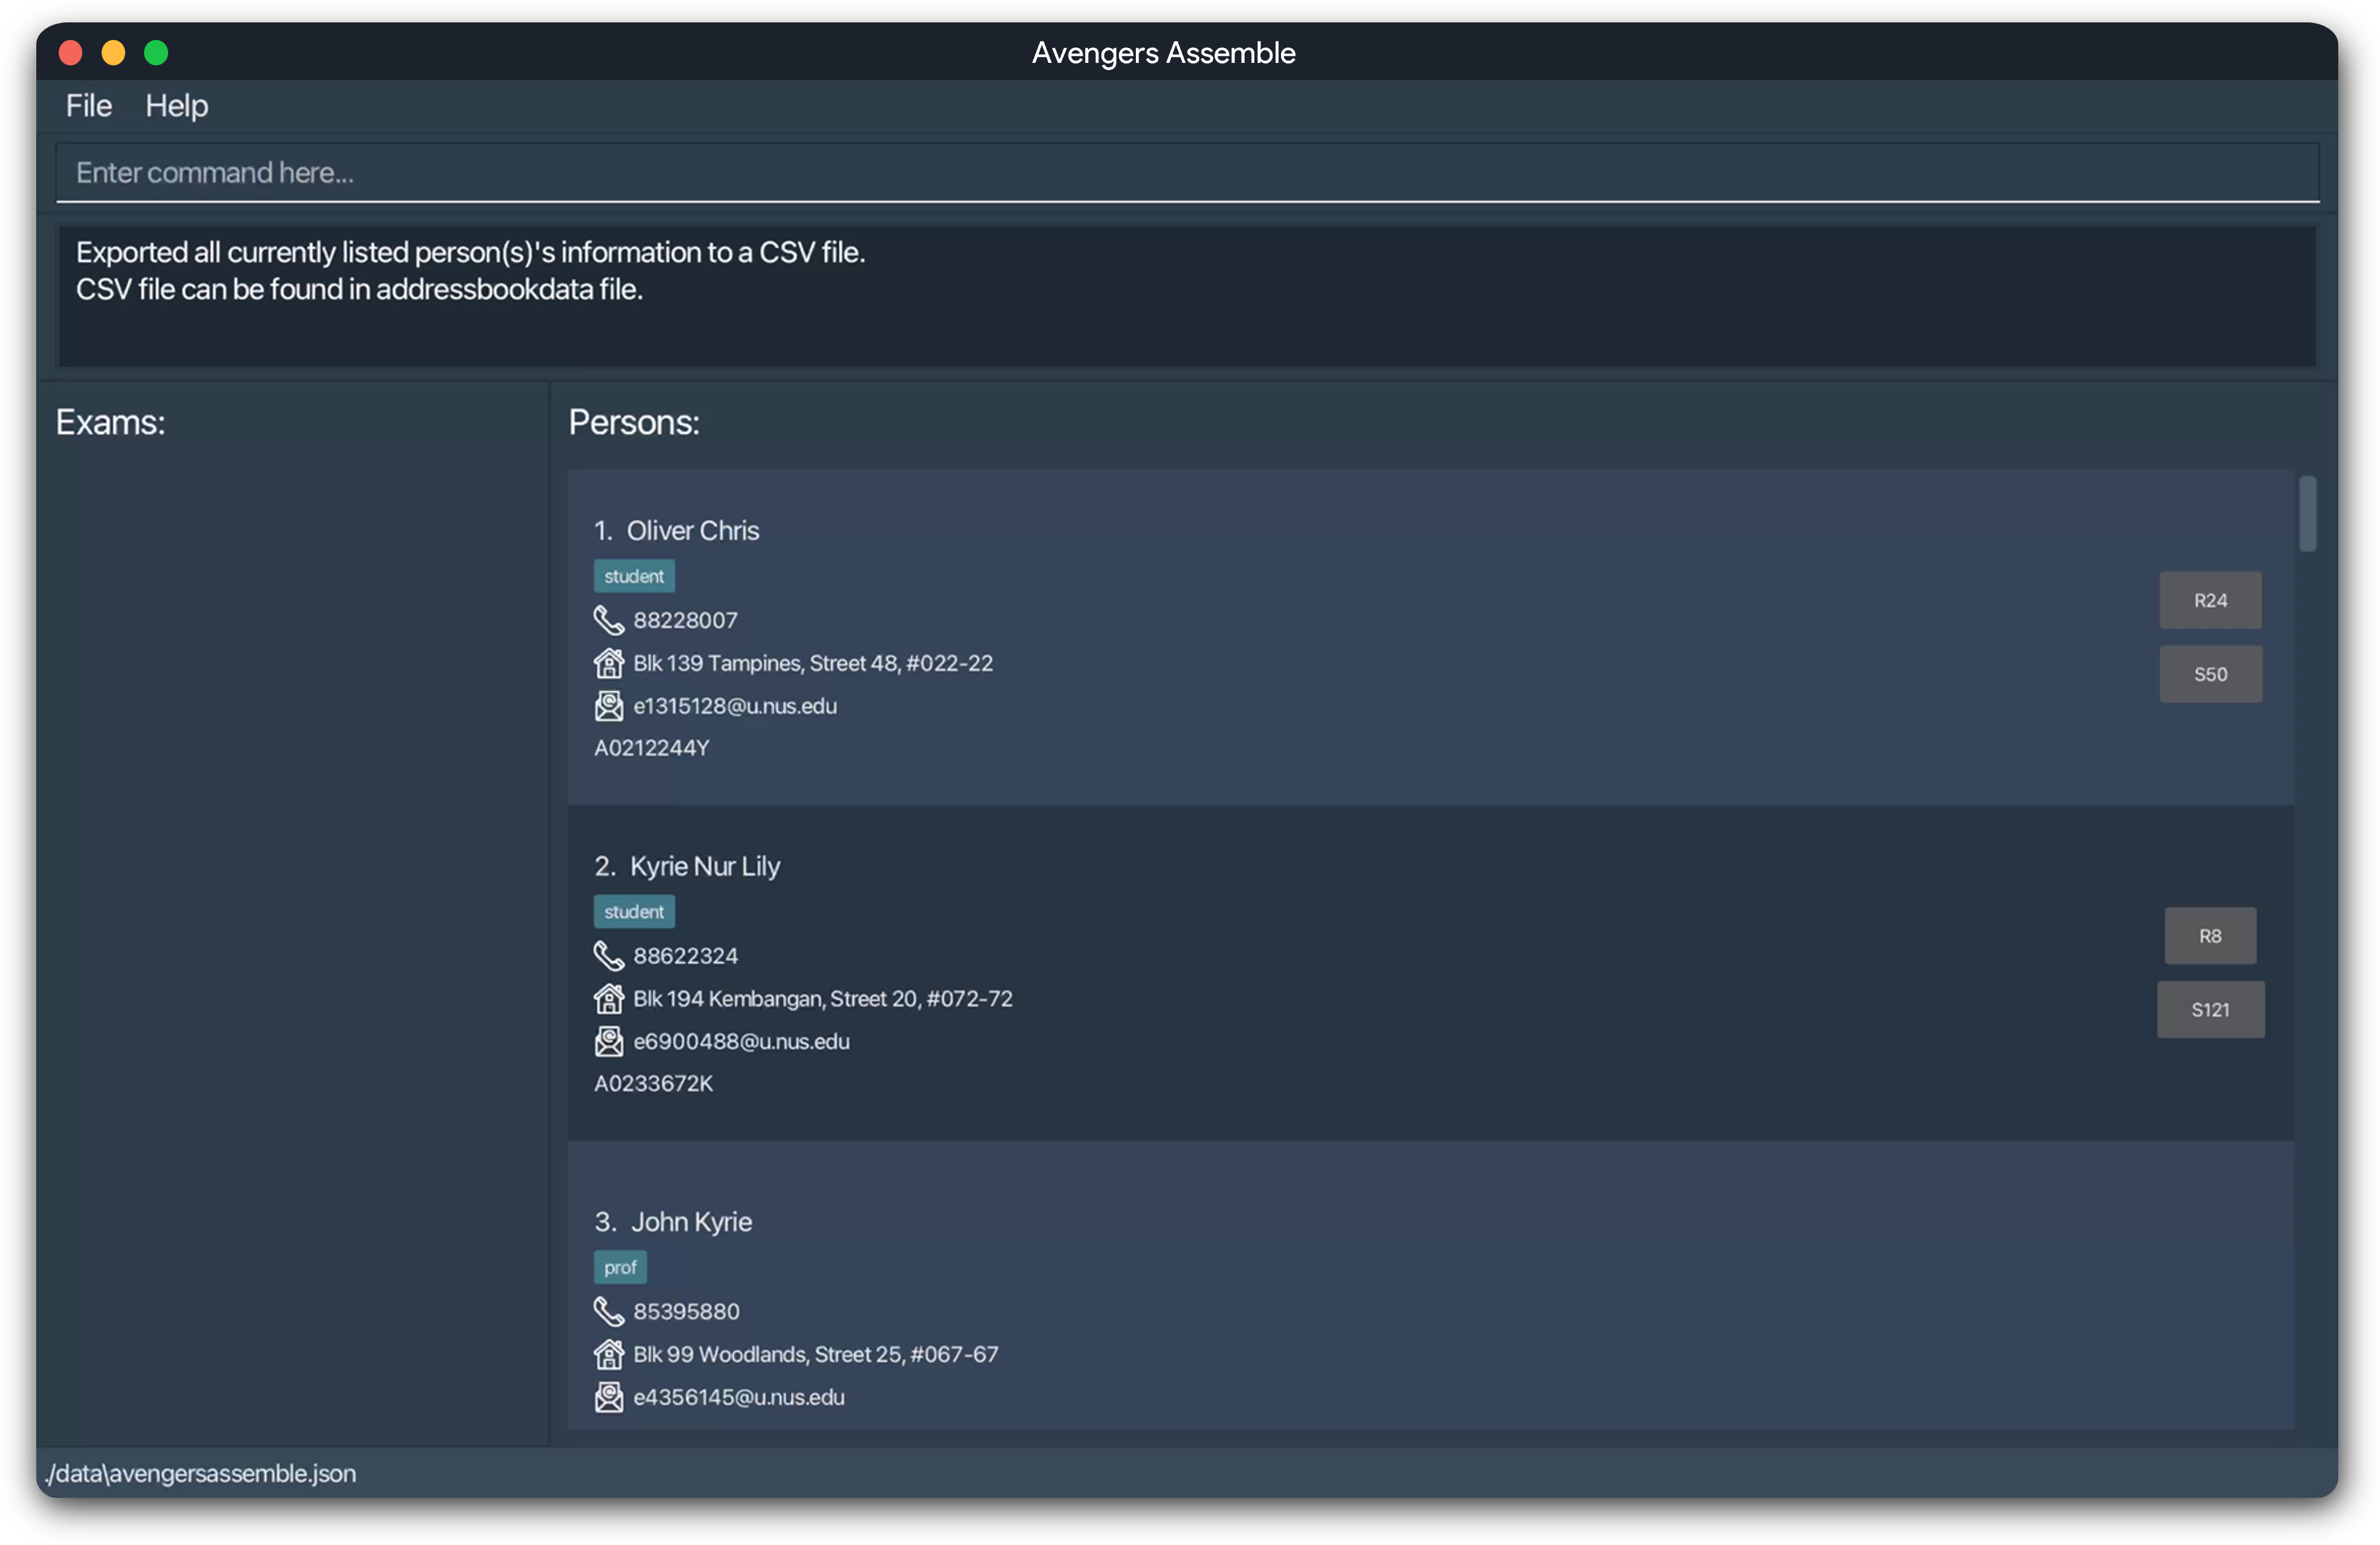
You will see this message once you have successfully exported the data:
Exiting the Program : exit
Exits the program. The app will close automatically.
Format: exit
Note: The application ignores any extraneous parameters as we assume they are typos.
Exam Management Features
These features are designed to help you manage exam scores for the persons in your contact list and consolidate all assessment data from canvas, edurec, and source academy. You can import exam scores from CSV files generated by these platforms, manage the exam scores of each person in your contact list, and gather statistics on student performance.
Importing Exam Scores from a CSV File : importExamScores
Imports all exam results from a CSV file.
Format: importExamScores i|FILEPATH
Information:
- The file path should be absolute.
- The
emailheader must be the first column header. - Exam names starting with
Exam:e.g. if your exam is namedMidterms, the column heading containing the scores forMidtermsshould be namedExam:Midterms. - This command will only import scores if both the person and exam exists currently in Avengers Assemble. Use
addandaddExamto add persons and exams respectively. - Duplicate exam headers in the CSV file will be ignored, with only the first occurrence being used.
- Each row following the header row corresponds to an individual's exam scores, with the first column containing the person's email address and the subsequent columns containing the scores for the exams as specified by the headers.
- Exam score values should be entered as decimal numbers within the valid score range (0 - maximum score), rounded to a maximum of 2 decimal places.
Caution:
- Erroneous entries will be ignored, and the application will continue to import the rest of the data.
- This command will only import persons' exam scores. To import persons' particulars, take a look at
import
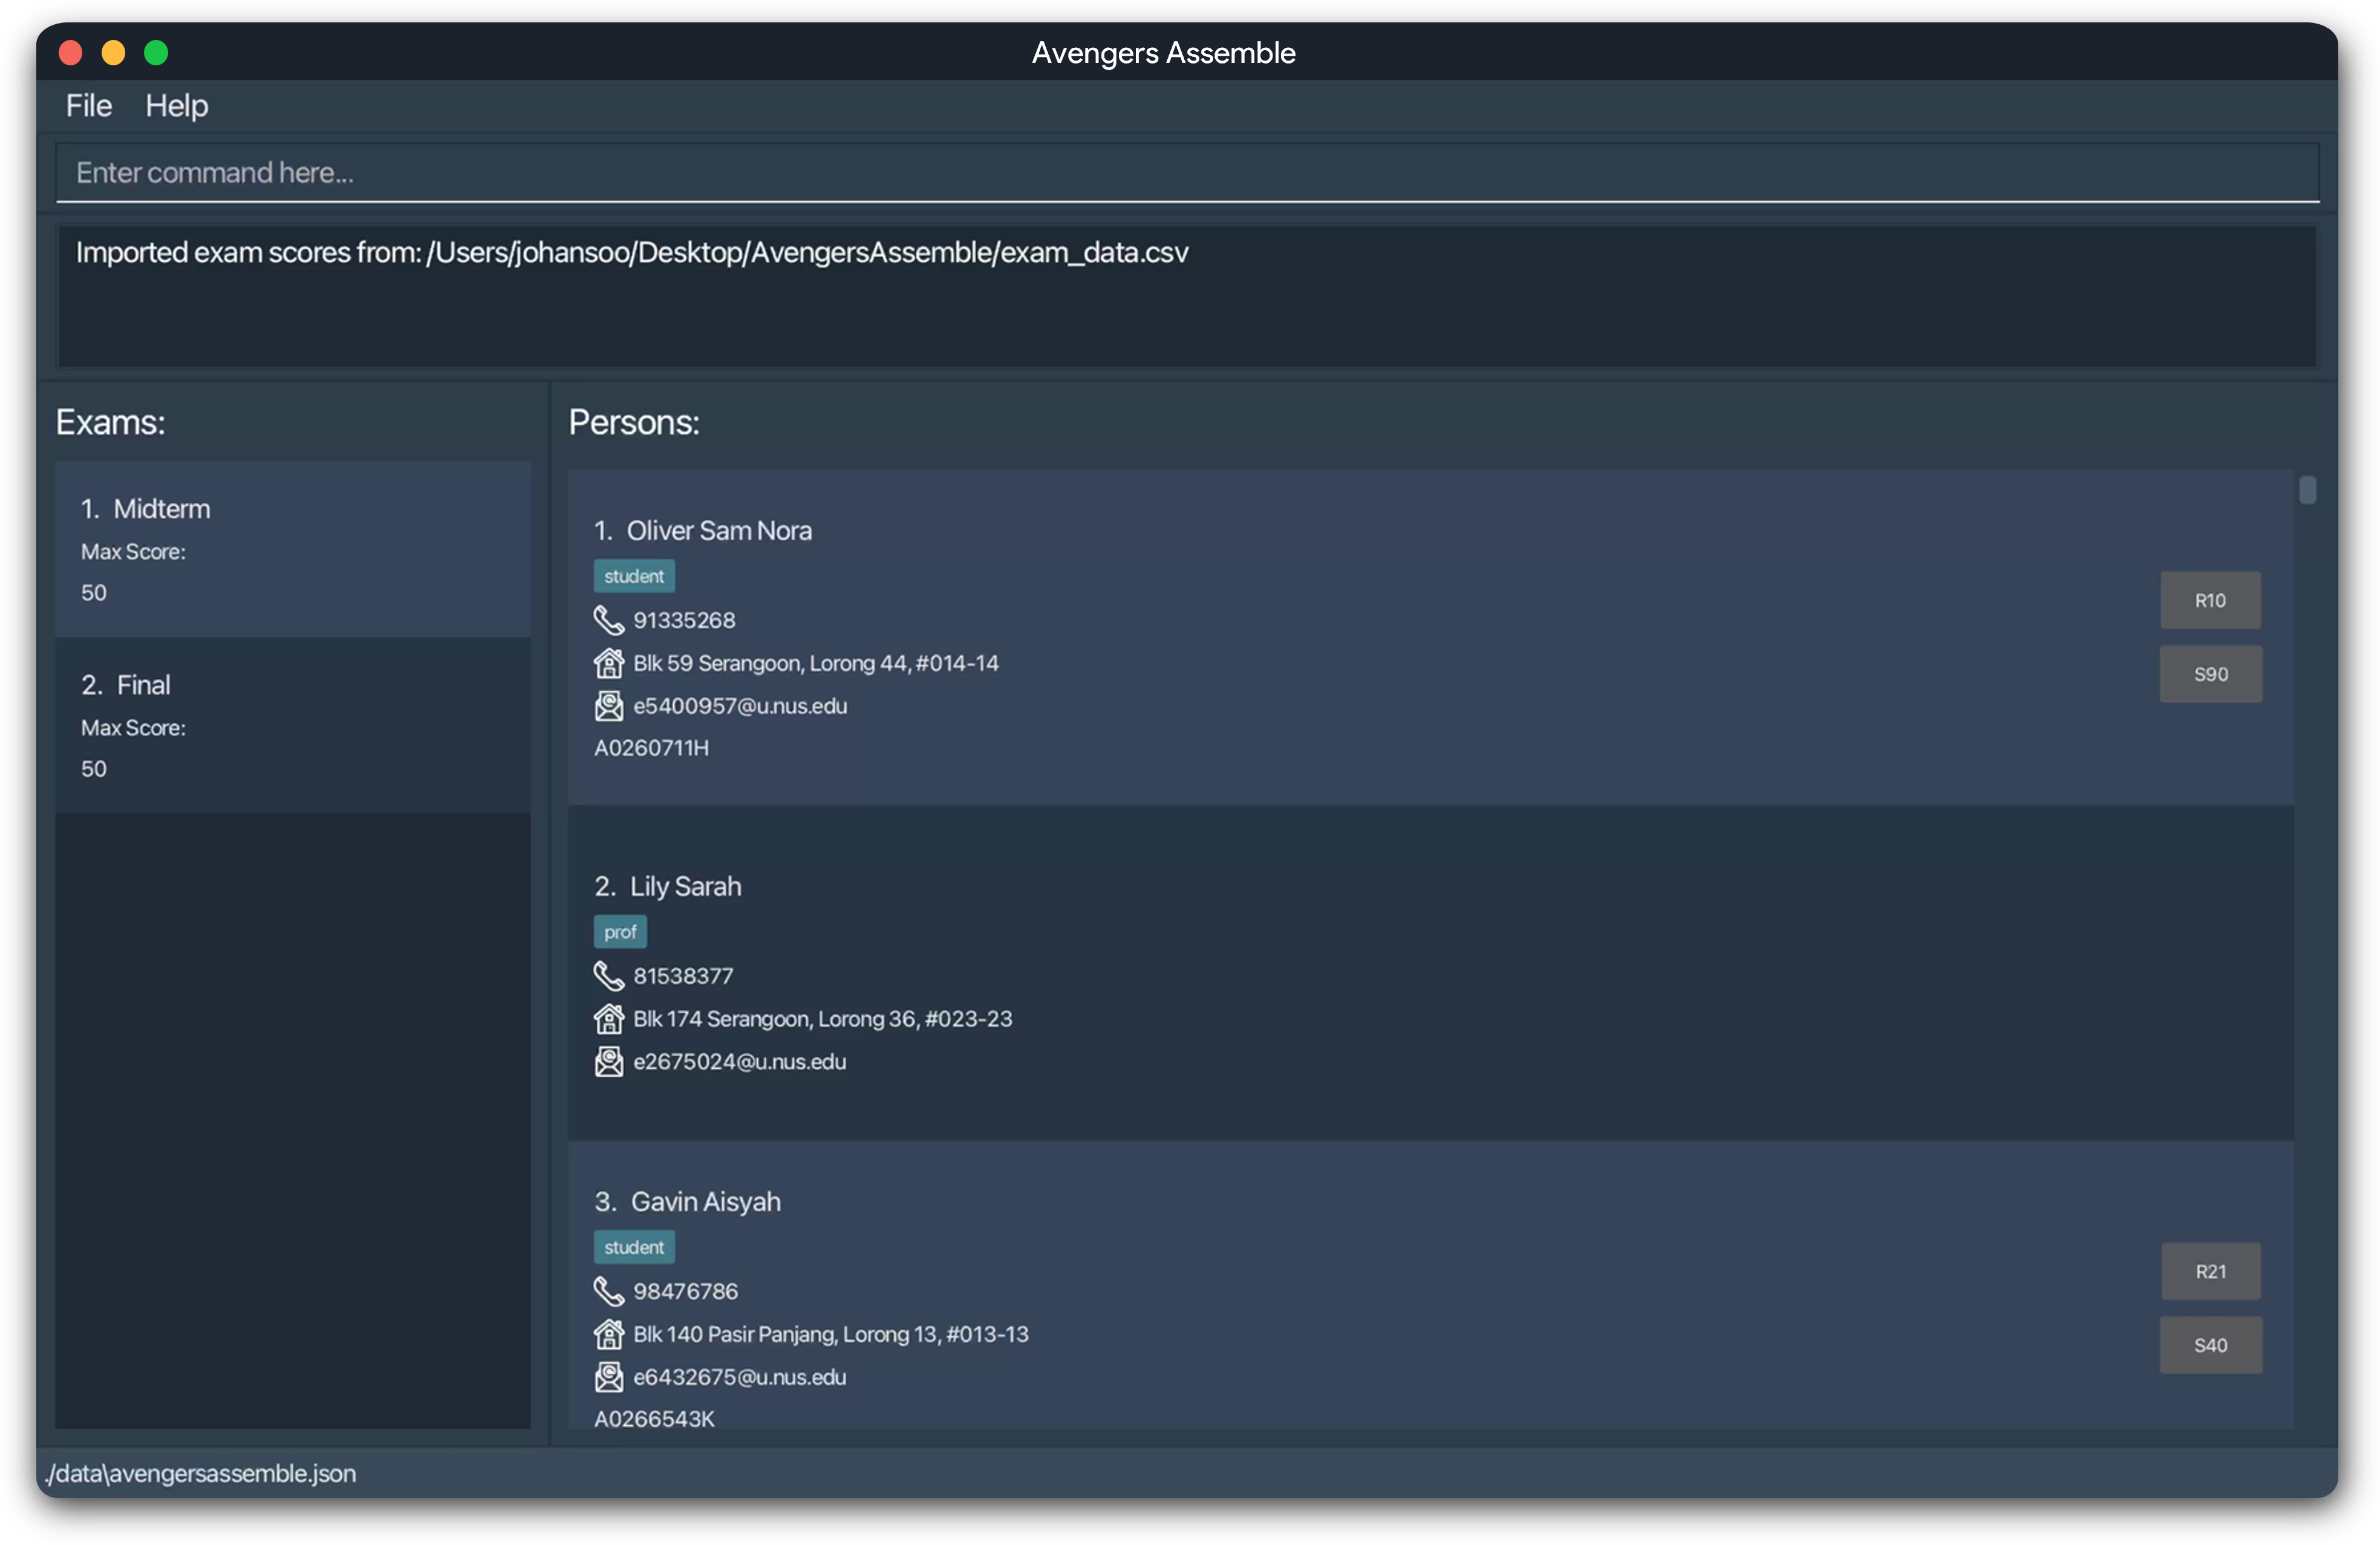
Example: importExamScores i|/Users/johansoo/Desktop/AvengersAssemble/exam_data.csv
imports exam results from the CSV file located at /Users/johansoo/Desktop/AvengersAssemble/exam_data.csv.
You will see this message once you have successfully imported the exam results:
For more details on the parameter, click here.
Adding an Exam : addExam
Adds an exam into your exam list.
Format: addExam n|NAME s|MAX_SCORE
Important:
Each exam should have a unique name. Avengers Assemble does not allow for exams with duplicate names to be added.
Example: addExam n|Midterm s|100
Adds an exam with the name "Midterm" and a max score of "100" into your exam list.
You will see this message once you successfully add an exam, including the details of the exam:
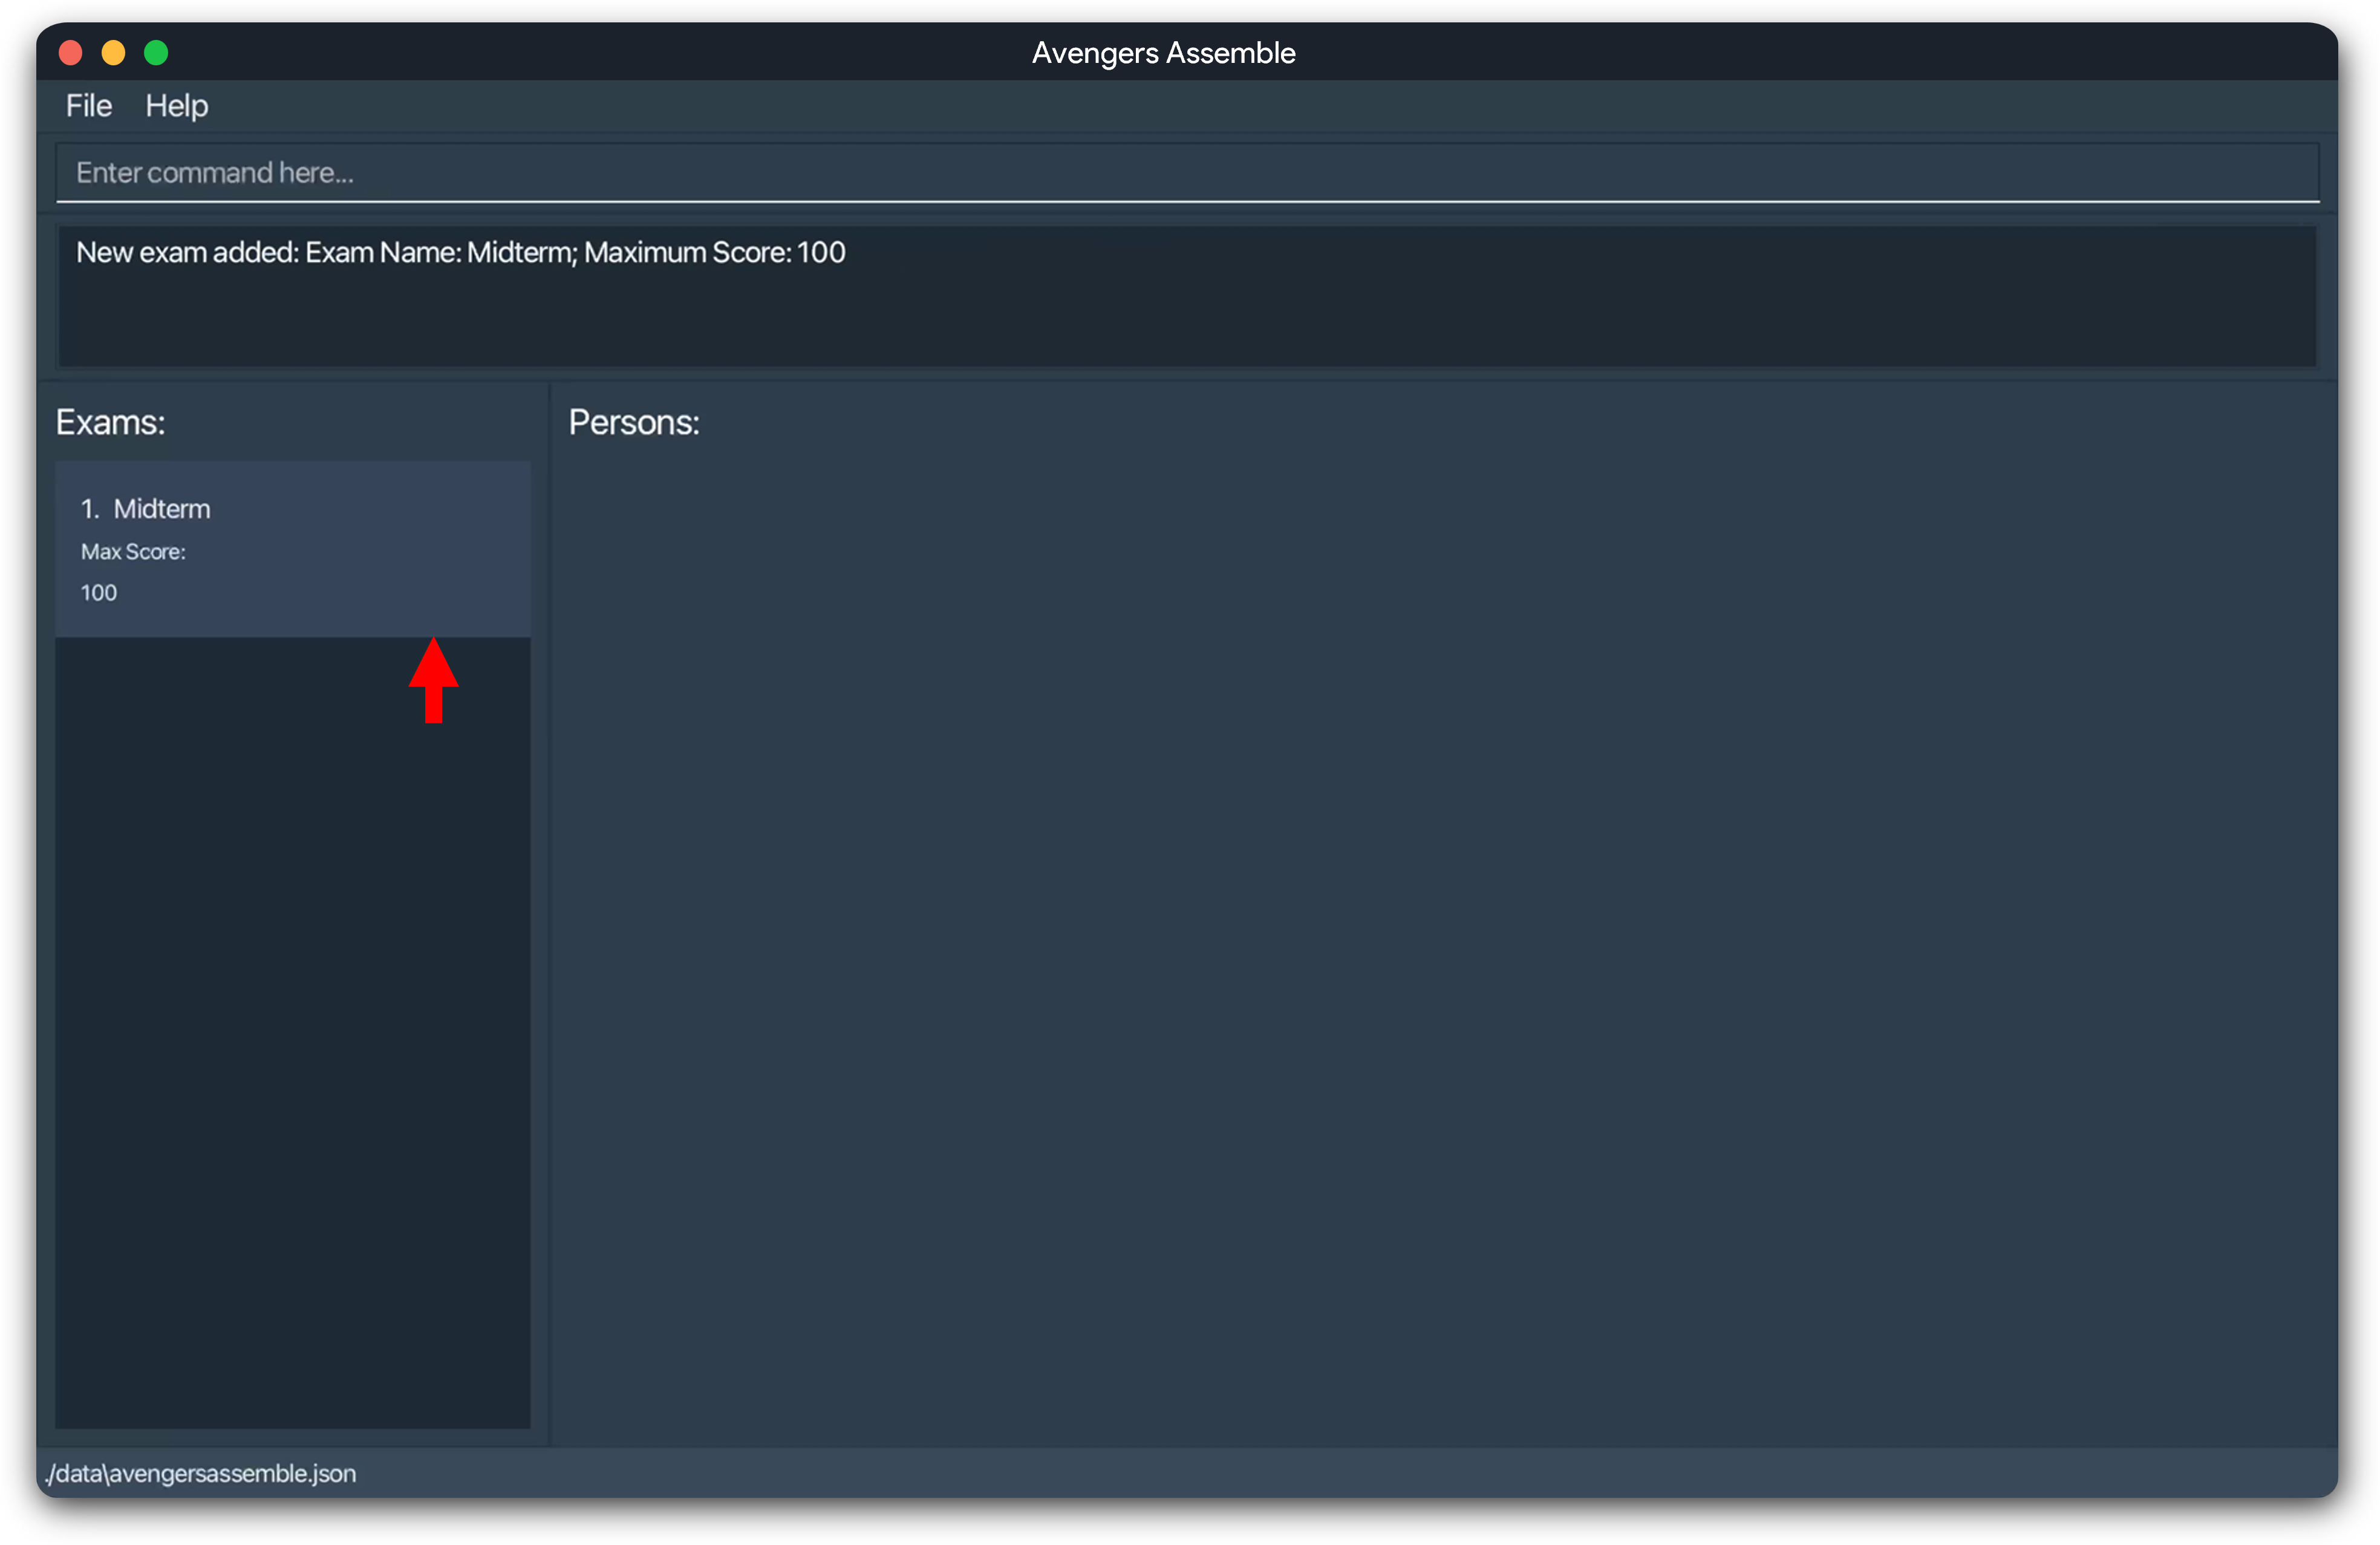
For more details on each parameter, click here.
Deleting an Exam : deleteExam
Removes an exam from your exam list.
Format: deleteExam INDEX
Information:
- Deletes the exam at the specified
INDEX. - When an exam is deleted, all corresponding records of scores associated with that exam will also be deleted.
- If the currently selected exam is deleted, it will be deselected.
Example: deleteExam 3
Removes the third exam displayed in Avengers Assemble.
You will see this message once you have successfully deleted an exam, including the details of the exam you are deleting:
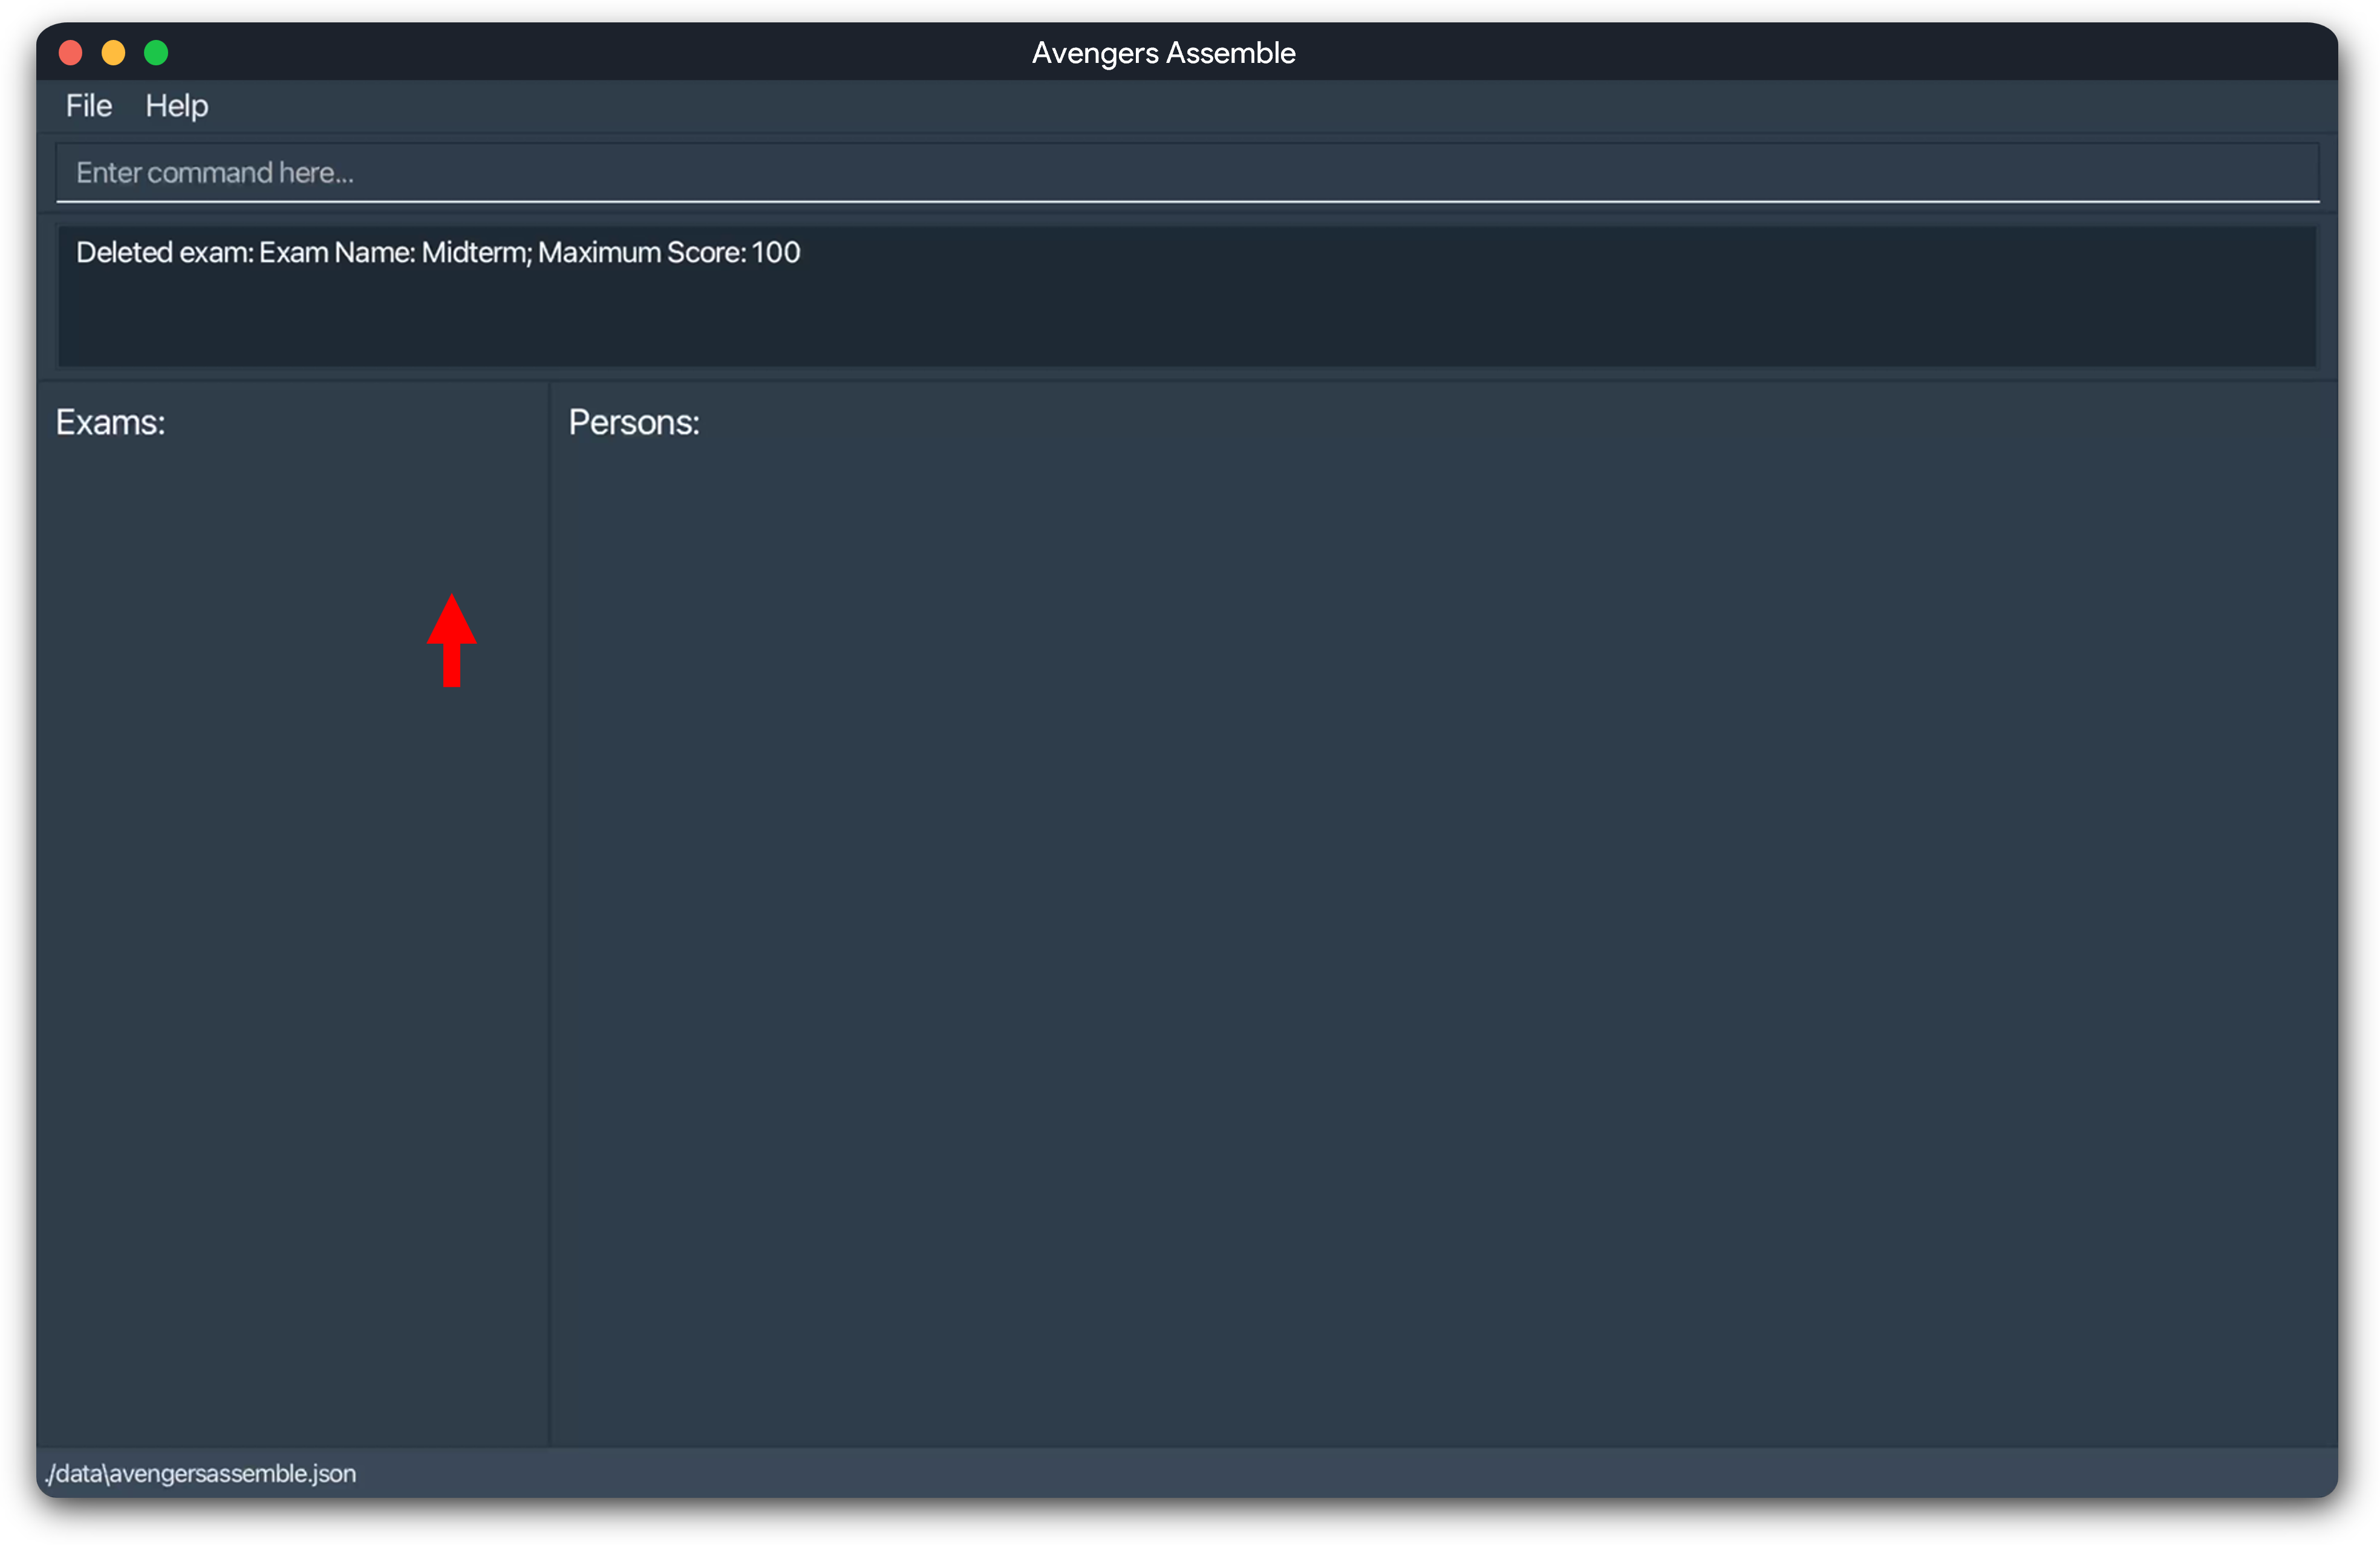
Selecting an Exam : selectExam
Selects an exam in your exam list.
Format: selectExam INDEX
Information:
- Selects the exam at the specified
INDEX. - On selection, the exam will become highlighted on the user interface.
- Selecting an exam will display all scores of persons associated with that exam.
Example: selectExam 1
Selects the first exam displayed on the exam list.
You will see this message once you have successfully selected an exam, including the details of the exam:
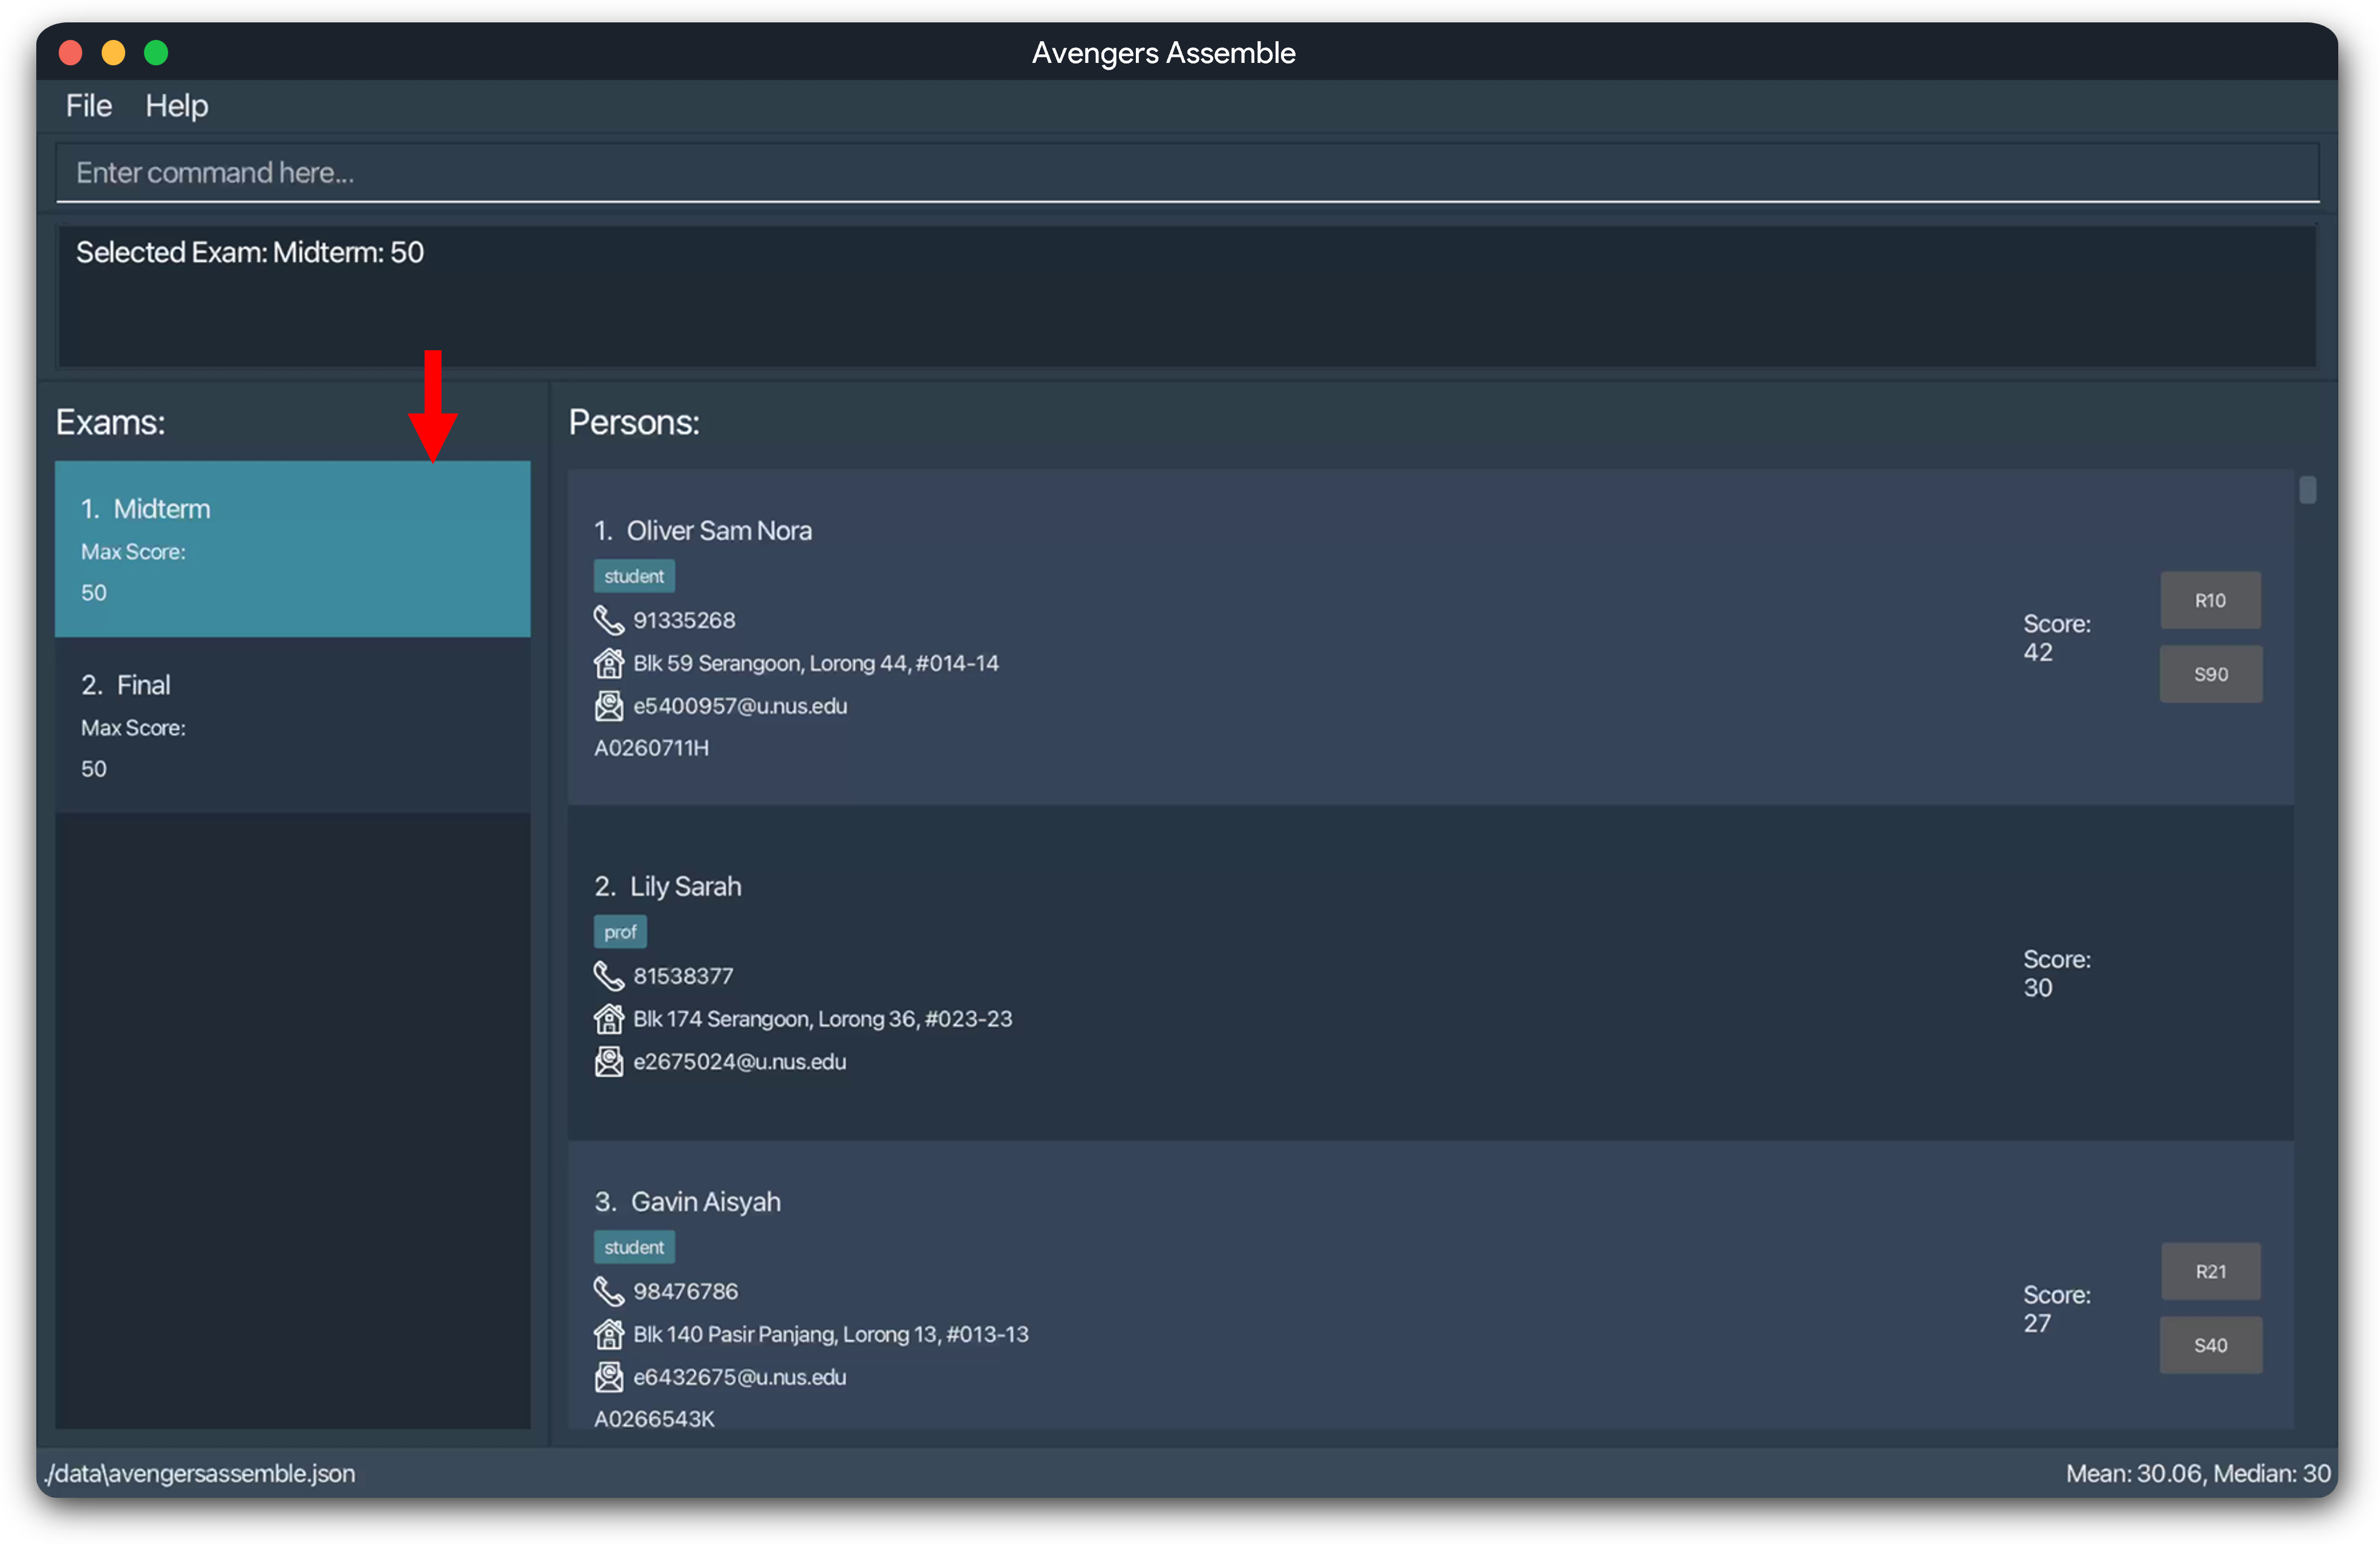
Deselecting an Exam : deselectExam
Deselects your currently selected exam.
Format: deselectExam
You will see this message once you have successfully deselected an exam:
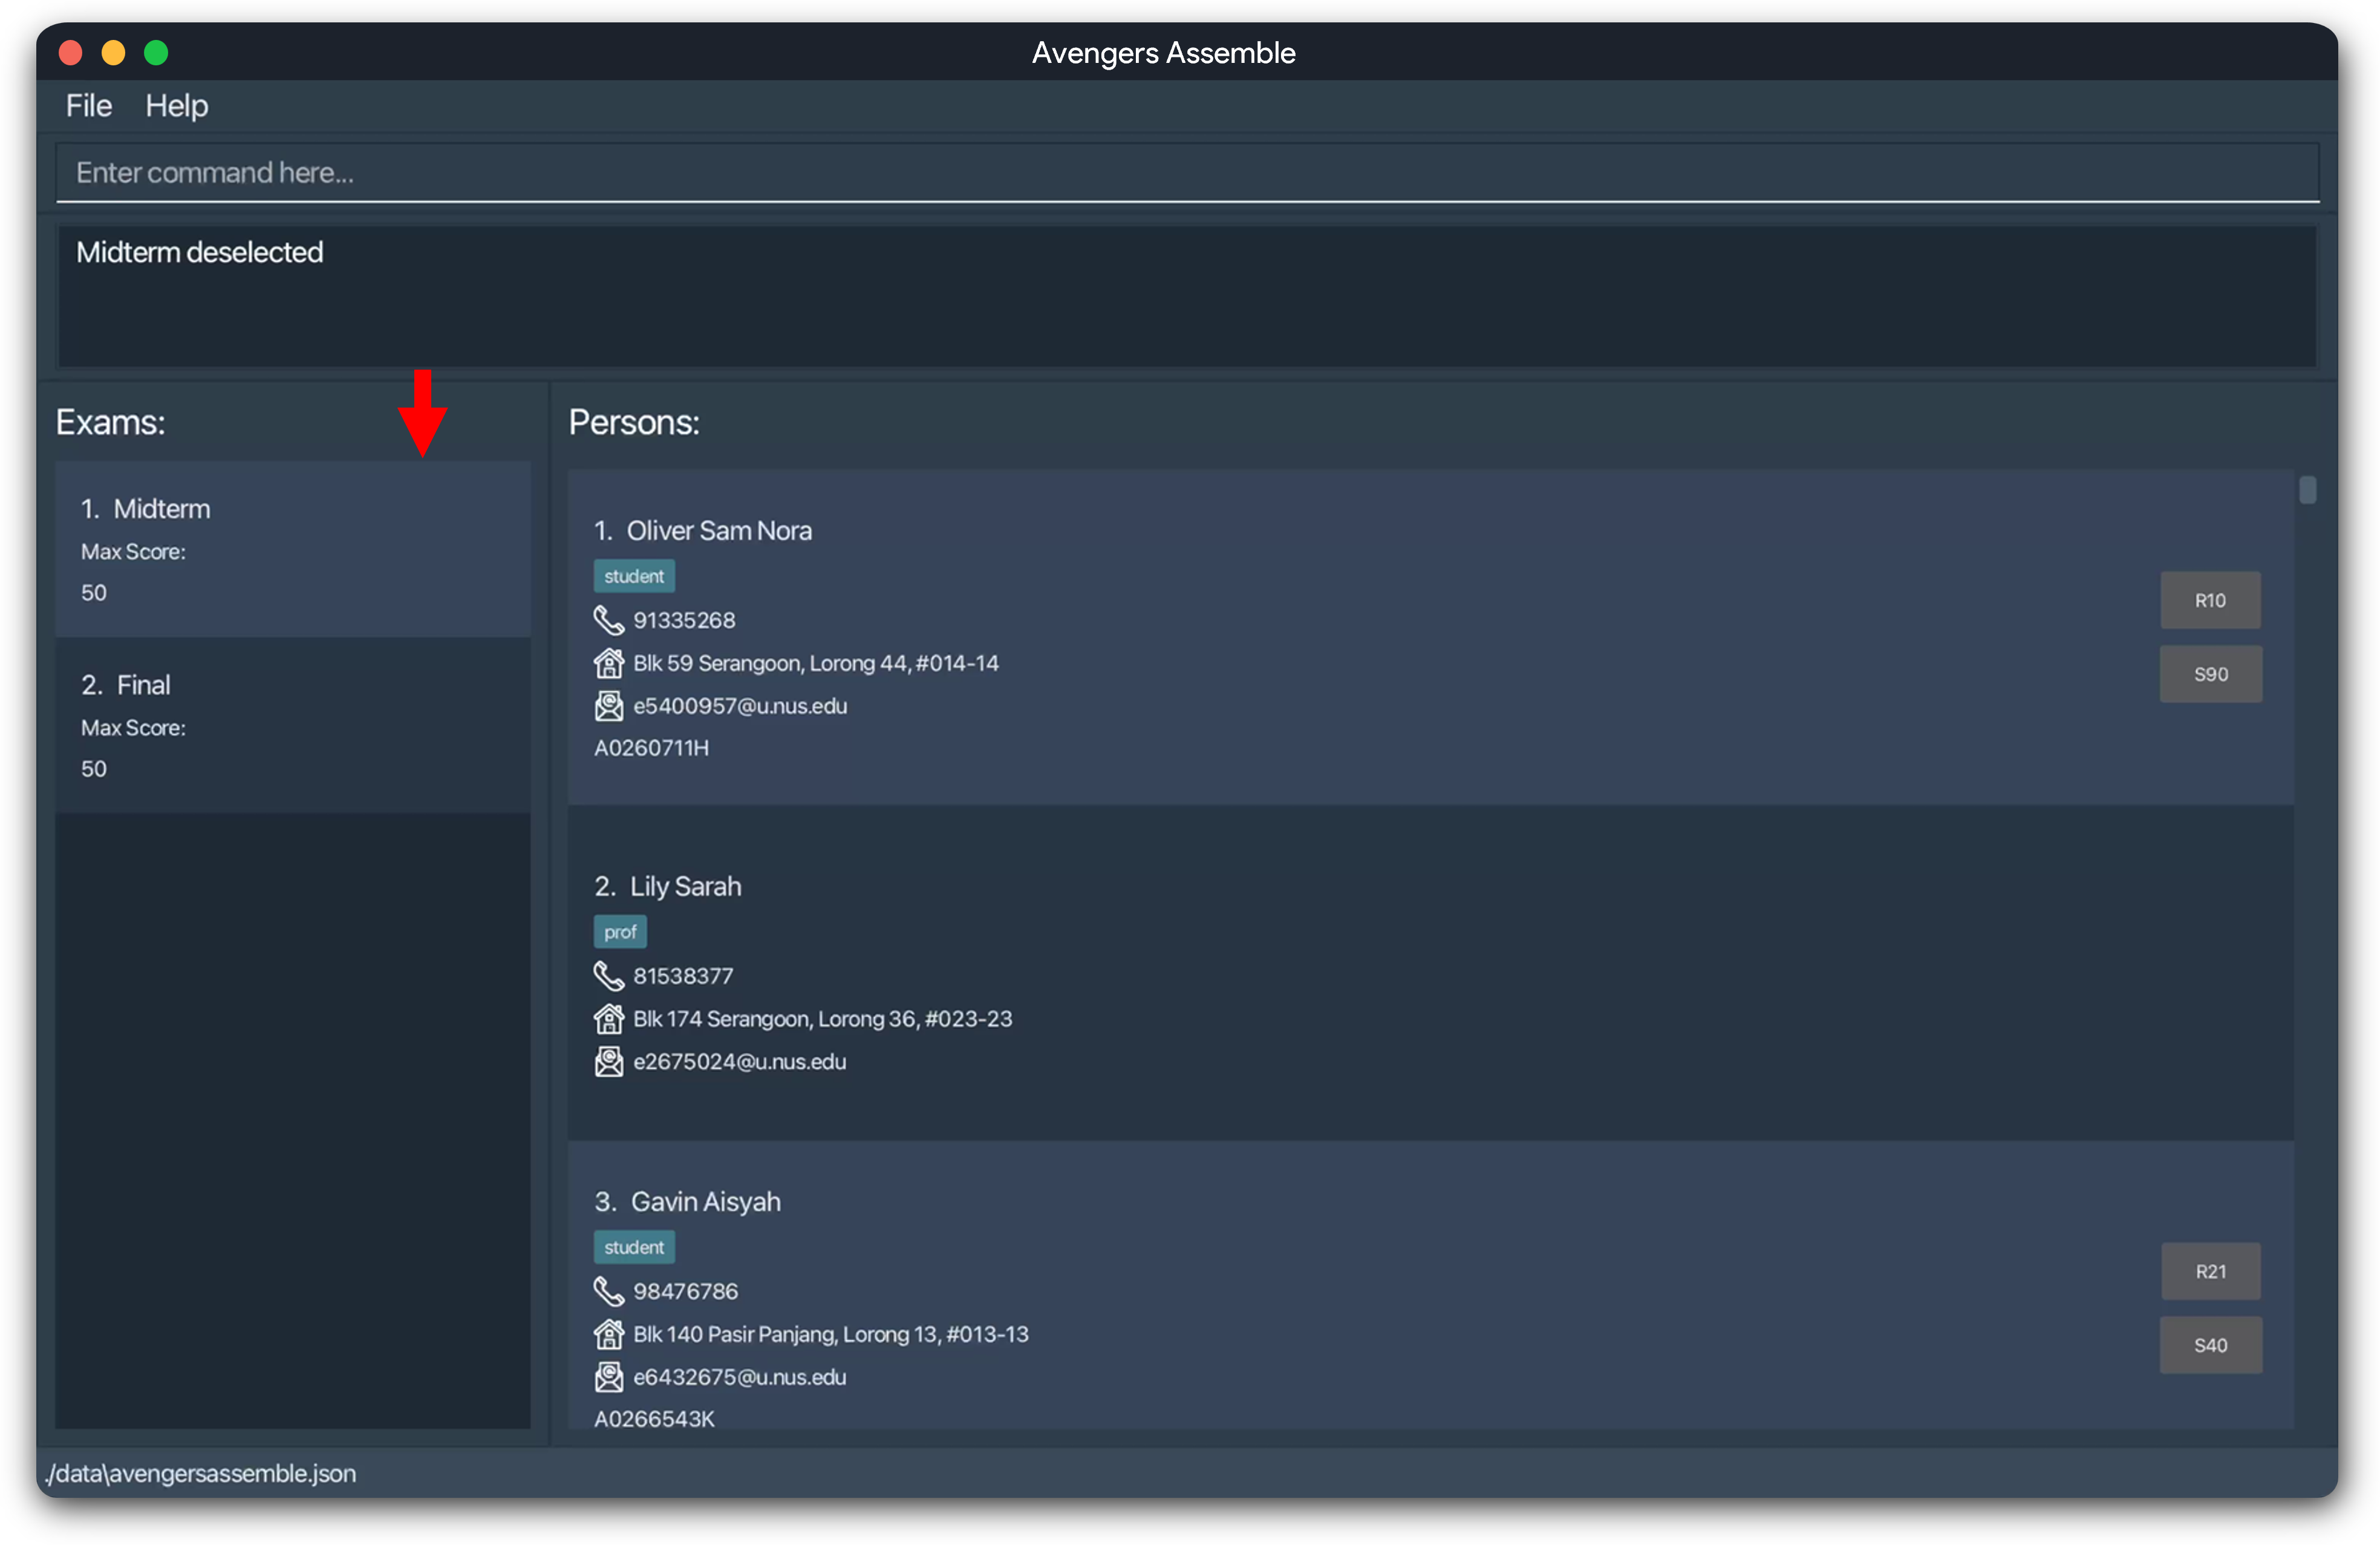
Adding an Exam Score : addScore
Adds an exam score to a person at the specified index.
Format: addScore INDEX s|SCORE
Important: An exam must be selected for this command to work! You can use the selectExam command to do so.
Information:
- Adds an exam score to the person at the specific
INDEX. - The exam score added will correspond to the currently selected exam.
- The exam score added cannot be greater than the max score of the currently selected exam.
- The exam score will be displayed on the user interface only when the corresponding exam is selected.
Example: addScore 1 s|42
Adds a score of 42 to the person currently displayed at index 1.
You will see this message once you successfully add a score, including the name of the person you added the score for:
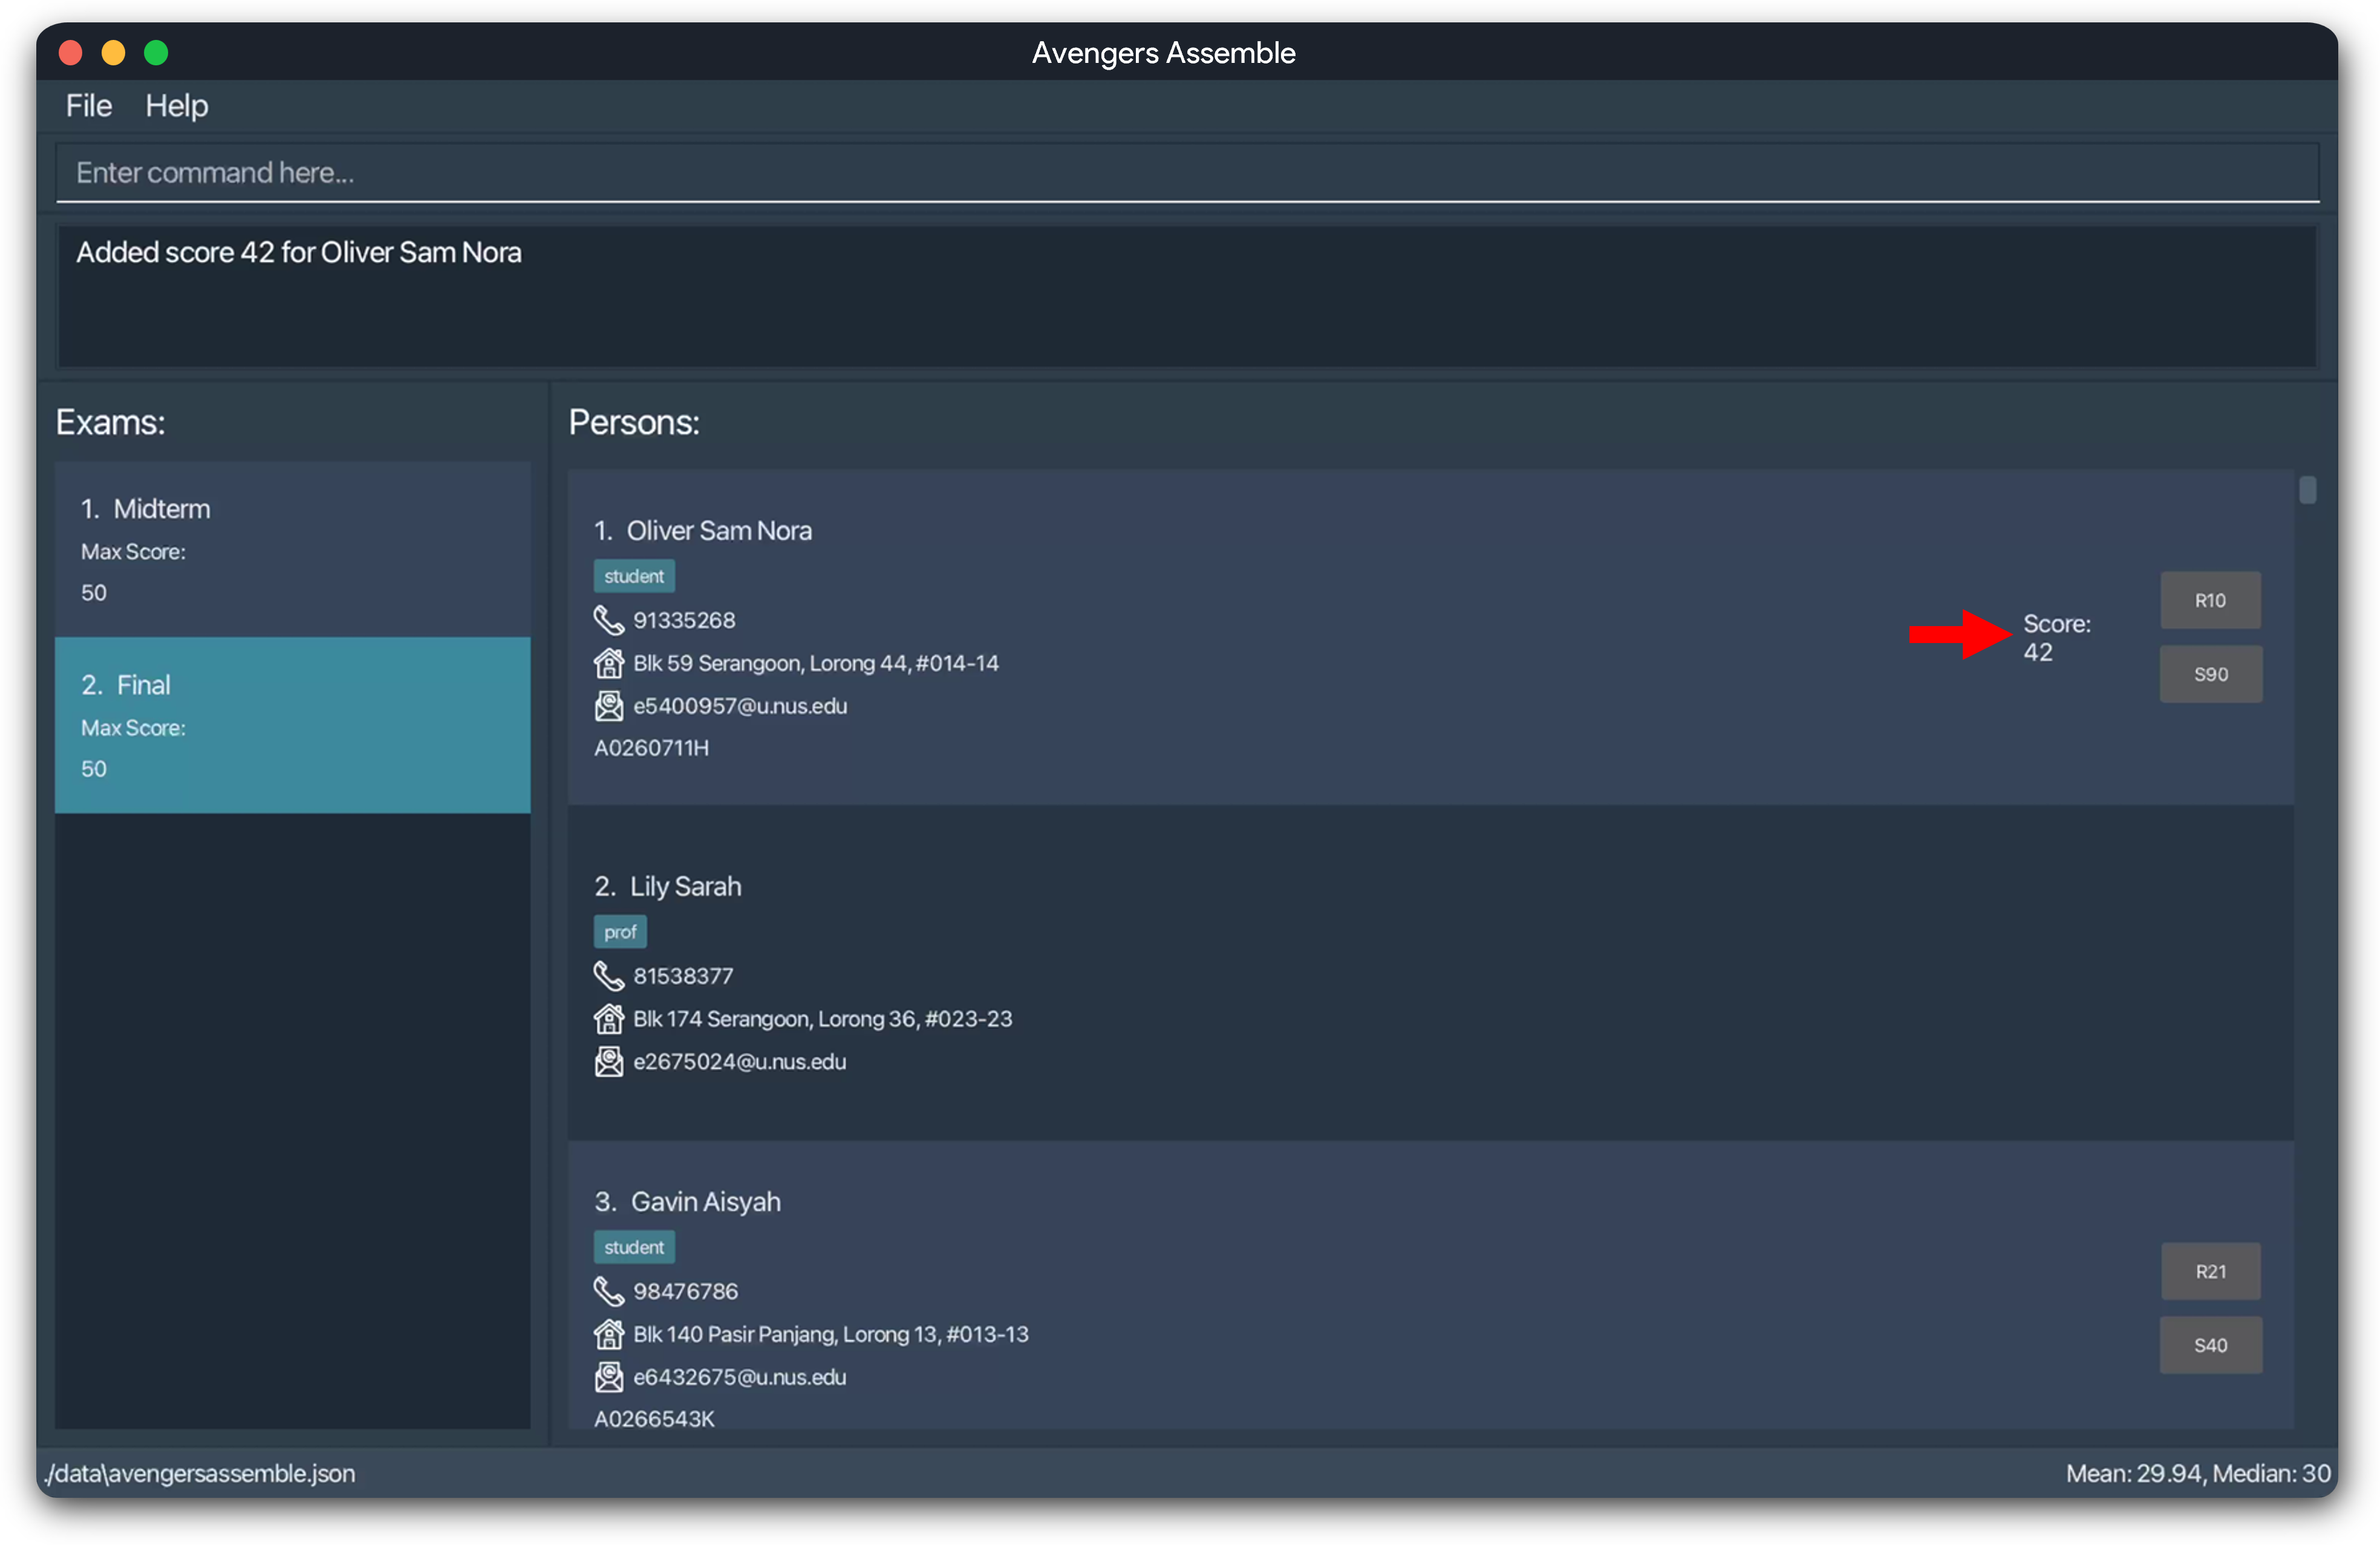
For more details on the parameter, click here.
Editing an Exam Score : editScore
Edits a specified person's exam score.
Format: editScore INDEX s|SCORE
Information:
- Edits the exam score of the person at the specific
INDEX. - A person must have an exam score for the currently selected exam for this command to work.
- The exam score edited corresponds to the currently selected exam.
- The exam score cannot be edited to be greater than the max score of the currently selected exam.
Important:
An exam must be selected for this command to work! You can use the selectExam command to do so.
Example: editScore 1 s|25
Edits the score of the person currently displayed at index 1 to 25.
You will see this message once you successfully edit a score, including some details of the person you added the score for:
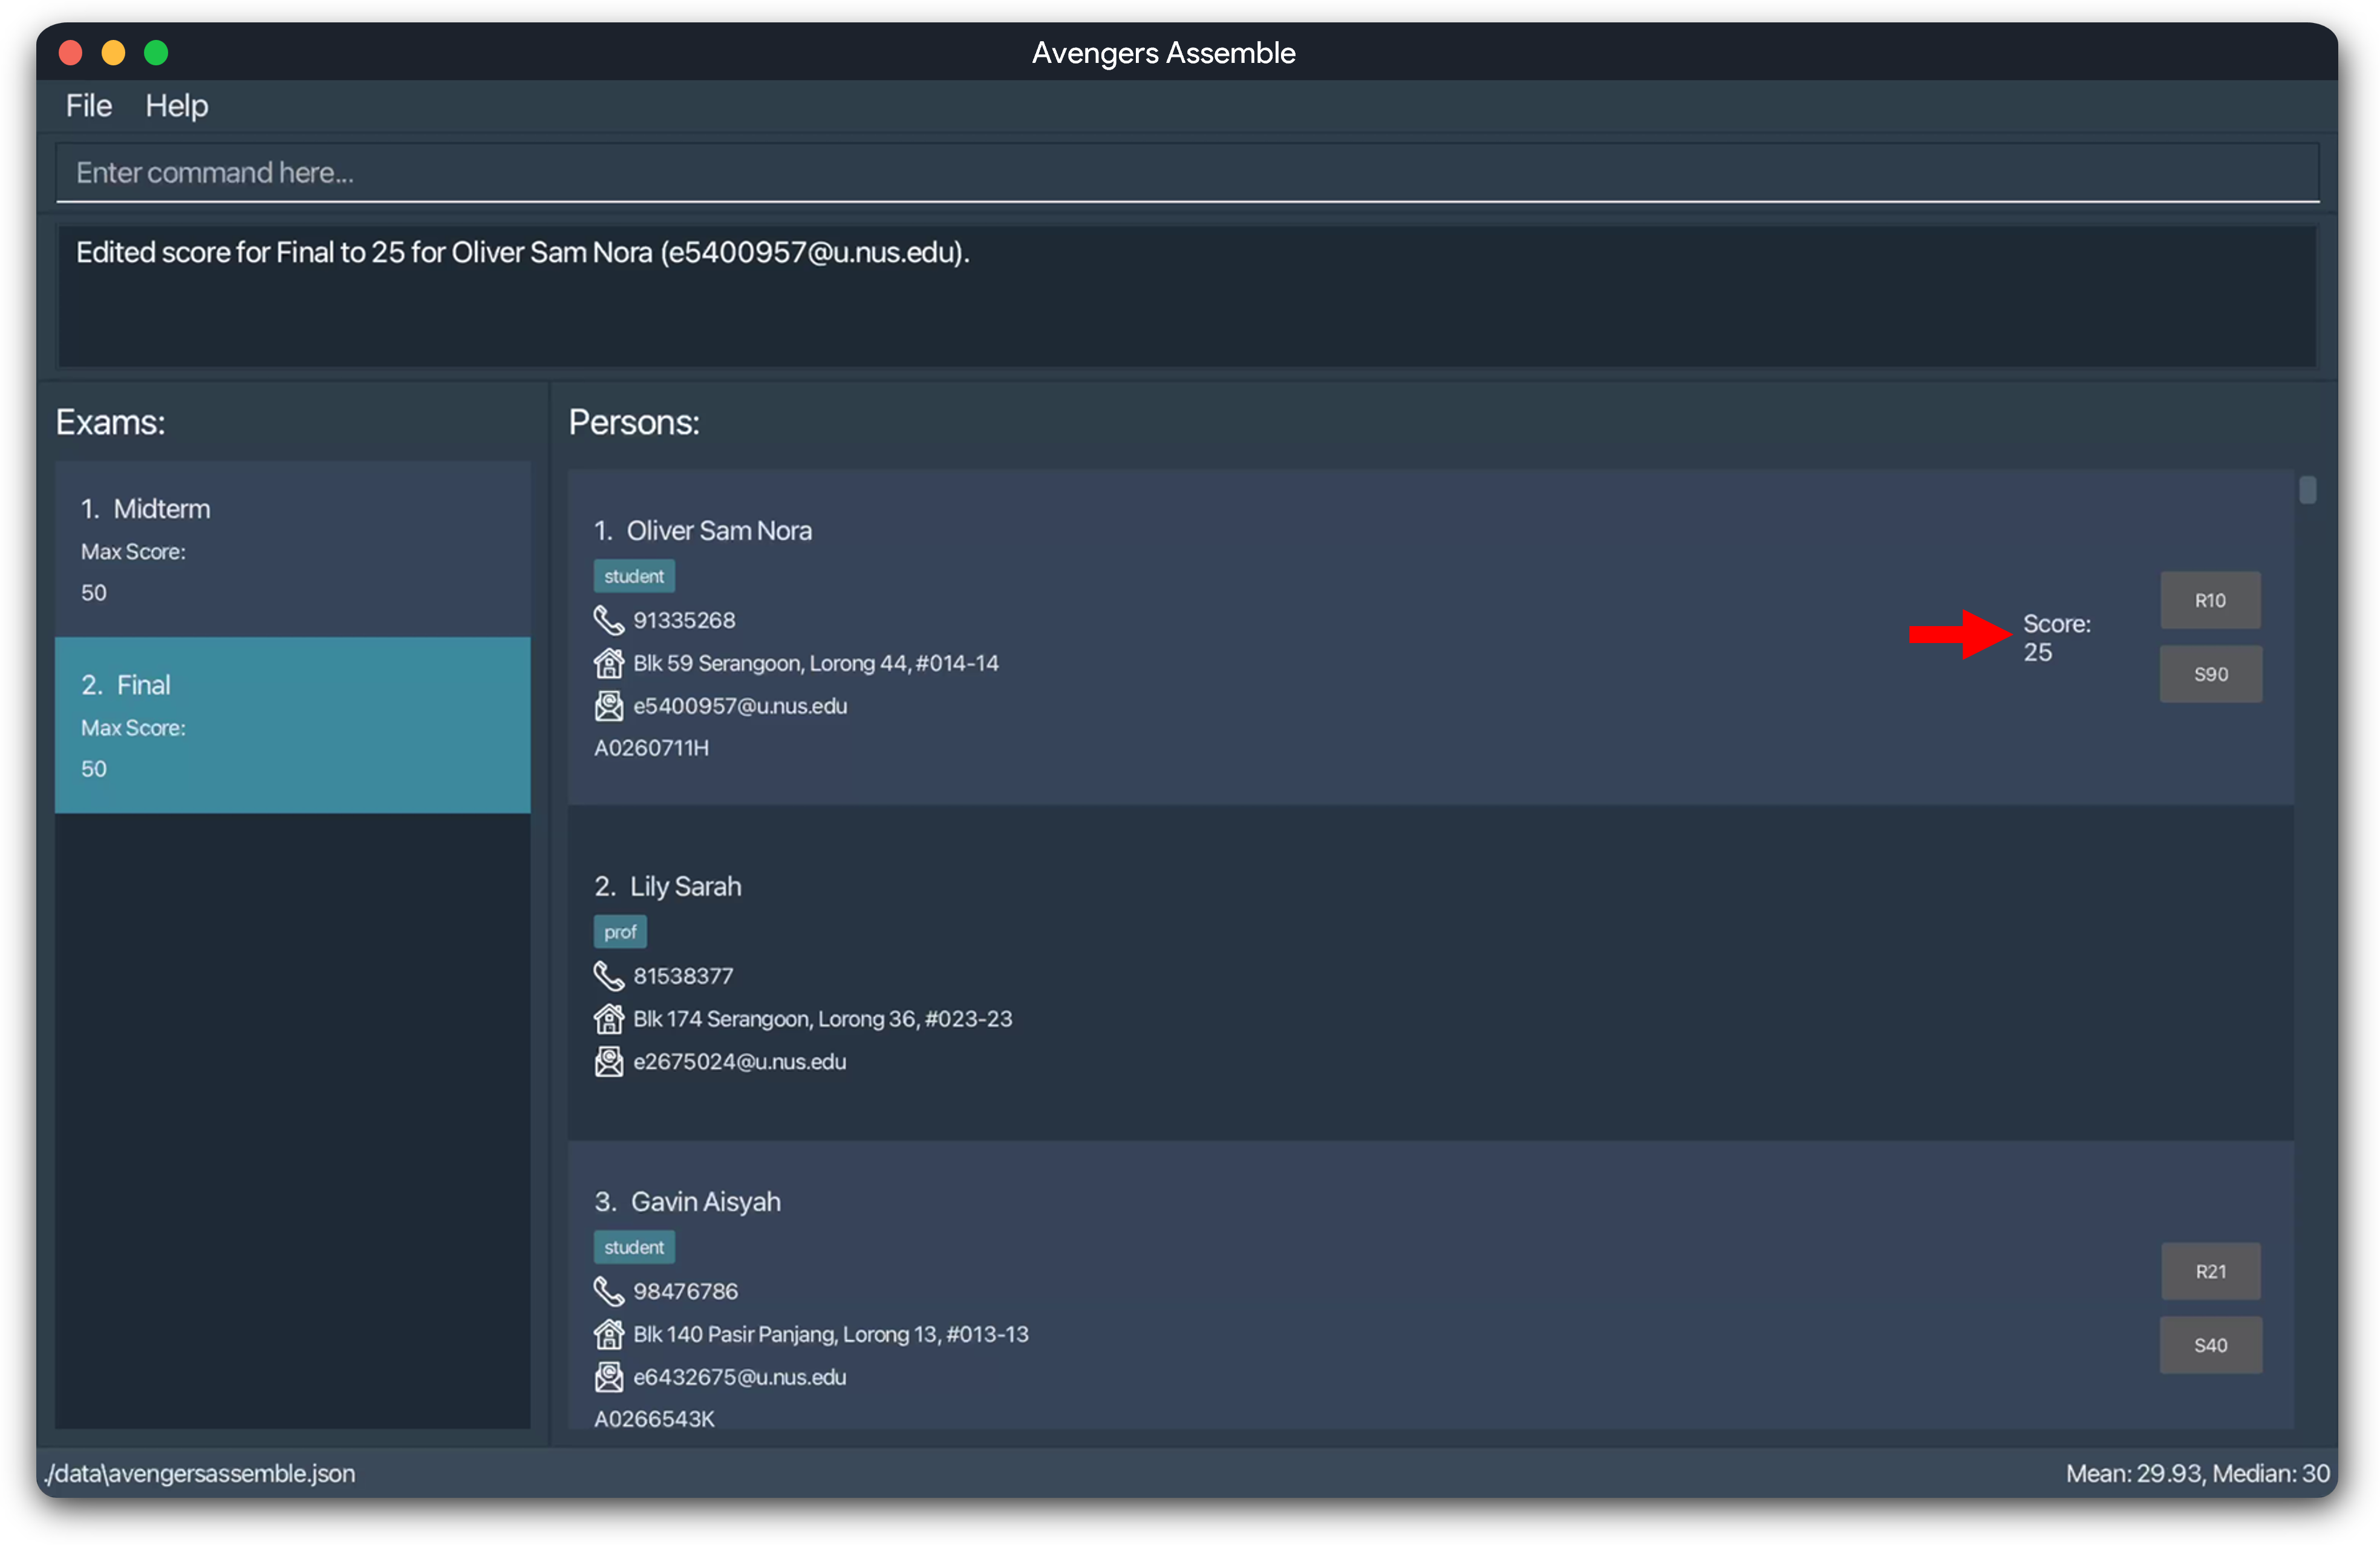
For more details on the parameter, click here.
Deleting an Exam Score : deleteScore
Deletes a specified person's exam score.
Format: deleteScore INDEX
Information:
- Deletes the exam score of the person at the specific
INDEX. - A person must have an exam score for the currently selected exam for this command to work.
- The exam score deleted corresponds to the currently selected exam.
Important:
An exam must be selected for this command to work! You can use the selectExam command to do so.
Example: deleteScore 1
deletes the score of the person currently displayed at index 1.
You will see this message once you have successfully deleted a score, including some details of the person you added the score for:
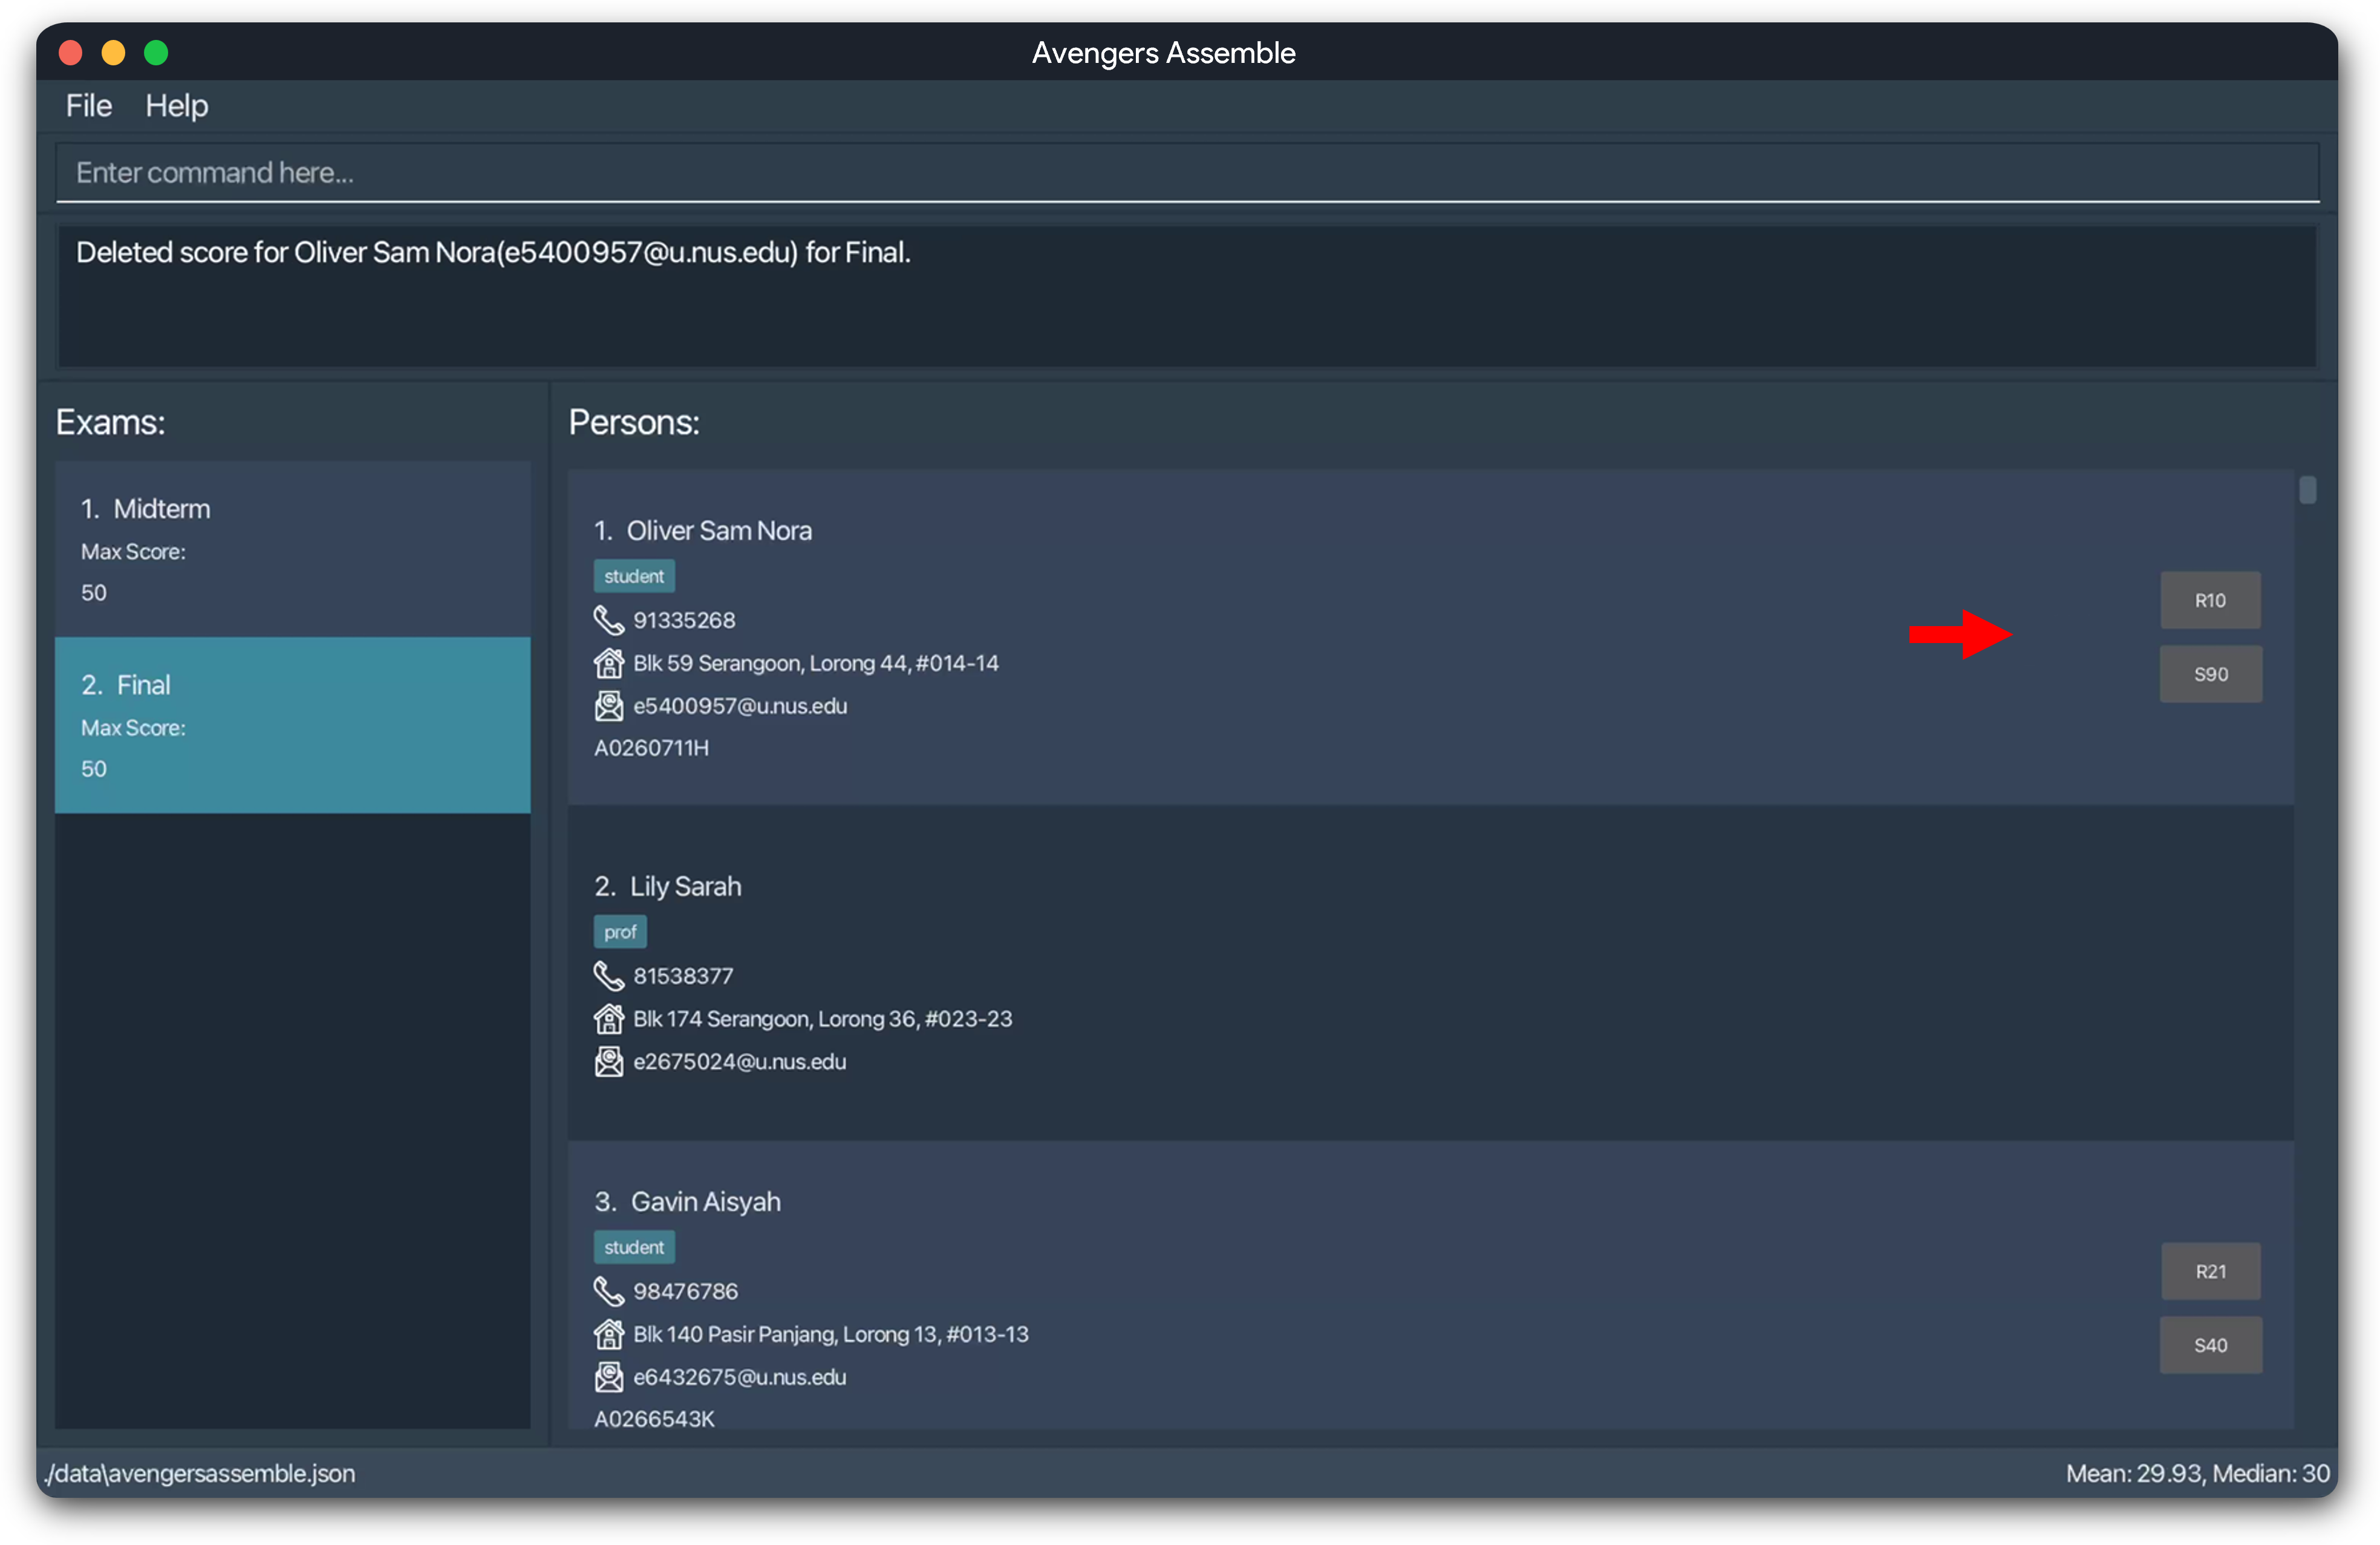
Mean and Median of Exam Scores
You can view the mean and median of the scores of the exam currently selected at the bottom right of the application window.
Information:
- When an exam is selected, the mean and median will automatically show up on the right of the footer of the application.
- The mean and median is calculated based on the currently filtered list of persons.
- If a person has no score for the selected exam, he is completely excluded from the calculation of mean and median.
When an exam is selected, the statistics will show on the bottom right of the application:
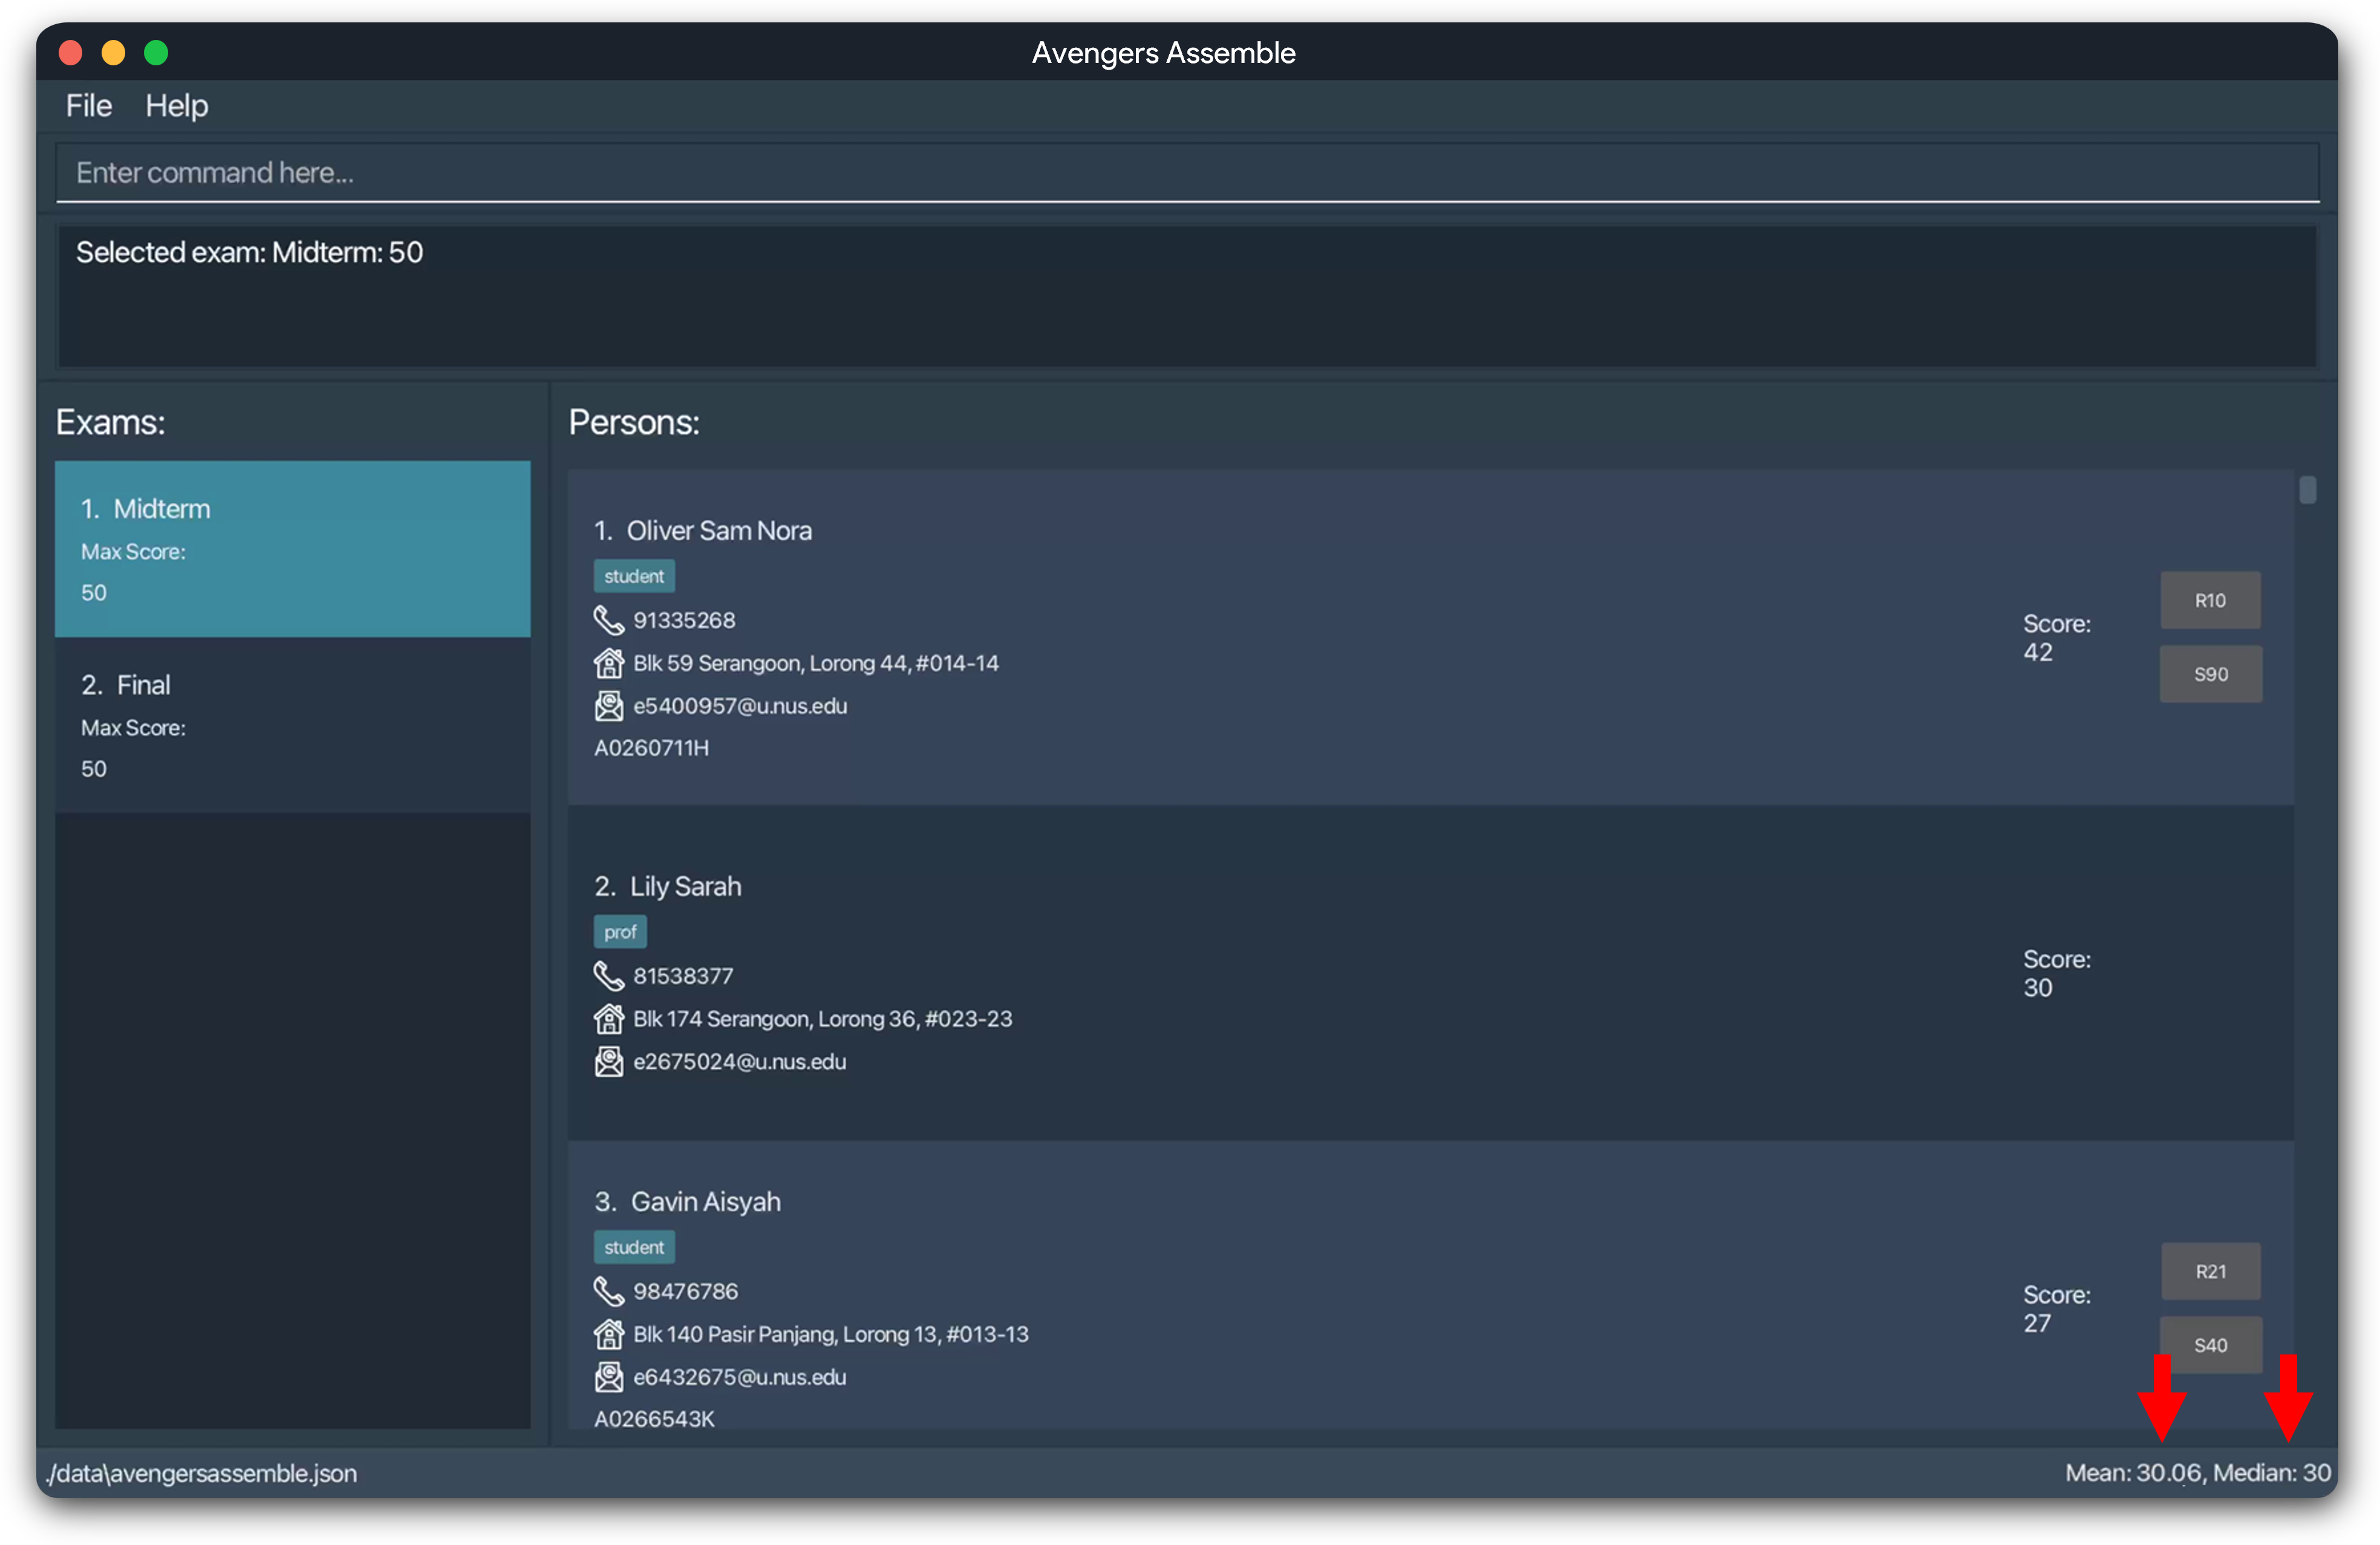
Additional Information
Saving the Data
All data are saved in the hard disk automatically after any command that changes the data. There is no need to save manually.
Editing the Data File
All data are saved automatically as a JSON file located at [JAR file location]/data/avengersassemble.json by default. You can update data directly by editing that data file if you are an advanced user.
Caution:
If your changes to the data file makes its format invalid, Avengers Assemble will discard all data and start with an empty data file at the next run. Hence, it is recommended to take a backup of the file before editing it.
Furthermore, certain edits can cause the Avengers Assemble application to behave in unexpected ways (e.g., if a value entered is outside the acceptable range). Therefore, edit the data file only if you are confident that you can update it correctly.
FAQ
Q: How do I transfer my data to another computer?
A: Install the app in the other computer and overwrite the empty data file it creates with the file that contains the data of your previous AA home folder.
Known Issues
Using Multiple Screens
If you move the application to a secondary screen, and later switch to using only the primary screen, the GUI will open off-screen. The remedy is to delete the preferences.json file created by the application before running the application again.
Importing on MacOS
On MacOS computers, due to privacy settings, the application may encounter difficulties accessing and importing CSV files from various locations. If this issue occurs, transfer the CSV file you want to import to the same folder where the application's JAR file is located, then try again.
Exporting Data on Initial Launch
Since the export function relies on data stored in your computer's hard disk, there might be some issues exporting it during the first launch of the application.
If you encounter this problem, you can resolve it by executing any other command (such as list) and then attempting the export again.
Command Summary
Below is a summary of the commands available in Avengers Assemble. Some examples are included for your convenience.
| Action | Format, Examples |
|---|---|
| Help | help |
| Clear | clear |
| Import | import i|FILEPATH
|
| Add | add n|NAME p|PHONE_NUMBER e|EMAIL a|ADDRESS [t|TAG]… [m|MATRICULATION_NUMBER] [s|STUDIO] [r|REFLECTION]
|
| Edit | edit INDEX [n|NAME] [p|PHONE_NUMBER] [e|EMAIL] [a|ADDRESS] [t|TAG]… [m|MATRICULATION_NUMBER] [s|STUDIO] [r|REFLECTION]
|
| Delete | delete INDEX
|
| Delete Shown Persons | deleteShown |
| List | list |
| Find | find PREFIX|KEYWORD
|
| Copy | copy |
| Export to CSV | export |
| Exit | exit |
| Import Exam Scores | importExamScores i|FILEPATH
|
| Add Exam | addExam n|NAME s|MAX_SCORE
|
| Delete Exam | deleteExam INDEX
|
| Select Exam | selectExam INDEX
|
| Deselect Exam | deselectExam |
| Add Exam Score | addScore INDEX s|SCORE
|
| Edit Exam Score | editScore INDEX s|SCORE
|
| Delete Exam Score | deleteScore INDEX
|
Command Parameter Summary
Some commands require you to include parameters. These parameters are identified by prefixes. Here are a list of valid prefixes and what they each refer to.
Important:
Words in
UPPER_CASEare the parameters to be supplied by you.e.g. in
add n|NAME,NAMEis a parameter which can be used asadd n|John Doe.Prefixes encased with '[ ]' are optional.
e.g.
n|NAME [t|TAG]can be used asn|John Doe t|friendor asn|John Doe.Prefixes with '…' after them can be used multiple times.
e.g.
[t|TAG]…can be used as(i.e. 0 times),t|friend(i.e 1 time),t|friend t|familyetc.Parameters can be in any order.
e.g. if the command specifies
n|NAME p|PHONE_NUMBER,p|PHONE_NUMBER n|NAMEis also acceptable.Extraneous parameters for commands that do not take in parameters (such as
help,list,exit,copy,exportandclear) will be ignored.e.g. if the command specifies
help 123, it will be interpreted ashelp.
Caution:
- If you are using a PDF version of this document, be careful when copying and pasting commands that span multiple lines as space characters surrounding line-breaks may be omitted when copied over to the application.
- Note the same prefix may be used for different purposes such as in the case of
s|for studios and for scores. In these cases, we ensure no command would have to use the same prefix for multiple purposes.
| Prefix | What it Refers to | Max. Length | Constraints |
|---|---|---|---|
n| | Name | 80 | Should only contain alphanumeric characters, spaces, and the characters ,, -, ., /, ( and ). |
n| | Exam Name | 30 | Should only contain alphanumeric characters and spaces. |
p| | Phone Number | 30 | It can start with an optional + to indicate the country code, with the rest only containing numbers. It should be at least 3 digits long. |
e| | 100 | Format: local-part@domain Constraints for local part: • Should only contain alphanumeric characters, and the characters +, _, . and -.• Should not start or end with special characters. • Should not have two consecutive special characters. Constraints for domain: • Made up of domain labels separated by periods. • Must end with a domain label of at least 2 characters long. • Domain label should consist of alphanumeric characters separated only by singular hyphens, if any. | |
a| | Address | 100 | Can take any values. |
i| | Path of CSV File to Import | - | Should be the absolute file path of the CSV file without any inverted commas. |
[m| ] | Matriculation ID | Fixed at 9 | The first letter must be an uppercase 'A', followed by 7 numbers, and end with an uppercase letter. |
[r| ] | Reflection Group | 4 | The first letter must be an uppercase 'R', followed by any number. |
[s| ] | Studio Group | 4 | The first letter must be an uppercase 'S', followed by any number. |
[s| ] | Score | 7 + 2 decimals | For exam max scores: the input must be a positive integer. For persons' exam scores: the input must be an integer greater than or equal to zero. |
[t| ]… | Tags | 100 | Should be alphanumeric, and should not contain spaces. |
[lt|] | Less Than | 7 + 2 decimals | Should be a positive numerical value smaller than the currently selected exam's max score. |
[mt| ] | More Than | 7 + 2 decimals | Should be a positive numerical value smaller than the currently selected exam's max score. |